
How to Create an IRCC Account: 2026 Guide
| Updated in August 2026. The screens shown in the screenshots of this tutorial are from the 2024 version and the interface has changed. The logical step-by-step remains the same (create credential, link to your dossier, send documents), but read the warning below before following the prints to the letter. |
Before you start: which account do you need to create?
This is the point that most confuses those just starting out, because IRCC operates more than one platform at the same time:
- IRCC secure account*, the historic platform, accessed by GCKey or by Sign-In Partner (your Canadian bank credentials if you already have an account here). This is what students need to use for a study permit.
- IRCC Portal (IRCC Portal), latest, used for permanent residence and other flows.
- New version of the IRCC Portal, in gradual implementation. Today it is valid for visitor visa and super visa, and only if you are 18 years old or over, have never applied before, are applying alone and without a representative.
The rule of thumb: don’t create an account until you know what order you’re going to place. Always start with the page for your type of application on the IRCC website and follow the link it indicates, it is the government itself that sends you to the right platform. Creating the wrong account is one of the most common causes of people getting stuck without being able to link the dossier.
Tip worth the entire post: keep the answers to your GCKey security questions in a safe place. Losing access to the GCKey in the middle of a process is a headache that takes weeks to resolve.
Five reasons to use an IRCC account
Creating an account in the IRCC (Immigration, Refugees and Citizenship Canada) online system is a fundamental step for anyone planning to visit, study, work or immigrate to Canada.
- Simplified Access to Immigration Services: Creating an account on the IRCC website allows you to access a wide range of immigration services in a centralized and efficient way. This includes applying for visas, study and work permits, and tracking the status of your applications.
- Digitized Application Process: With an IRCC account, you can fill out and submit forms online, saving time and avoiding the need to submit physical documents. Digitalizing the process makes application faster and less prone to errors.
- Real-time Updates and Notifications: When you have an account, you will receive real-time notifications and updates on the status of your requests. This ensures that you are always informed about any changes or necessary actions, making it easier to monitor the process.
- Security and Data Protection: The IRCC website uses advanced security measures to protect your personal and financial information. Creating an account ensures that your data is secure and accessible only to you and the appropriate authorities.
- Ease of Communication with IRCC: Having an account on the IRCC website facilitates direct communication with immigration authorities. You can send questions, receive answers and resolve any problems or concerns more efficiently, ensuring a smoother and more transparent immigration process.
How to create an account on the Canada immigration website in 2026
This process, although it may seem complex at first glance, is actually quite straightforward when you follow the correct steps.
In this detailed guide, we will break down each step necessary to establish your digital presence with the Canadian government. From choosing your account type to finalizing your immigration profile, you will find clear and precise instructions to navigate this important procedure.
By following these guidelines, you will be well prepared to begin your journey to Canada, whatever your goal. Let’s start building your digital bridge to the Great North! Here is a detailed step-by-step guide to creating a user account with IRCC (Immigration, Refugees and Citizenship Canada):
 Note important! Note important!The Canadian government may update immigration website links and interfaces without prior notice. We recommend that you verify that the screens you encounter match the descriptions provided in this guide. If you notice significant discrepancies, we suggest consulting directly with the official IRCC website for the most recent and accurate information. Our goal is to keep this guide as up-to-date as possible, but changes can occur quickly in the digital government environment. |
1. Visit the official website
Visit the official Government of Canada Immigration and Citizenship Services (IRCC) portal.
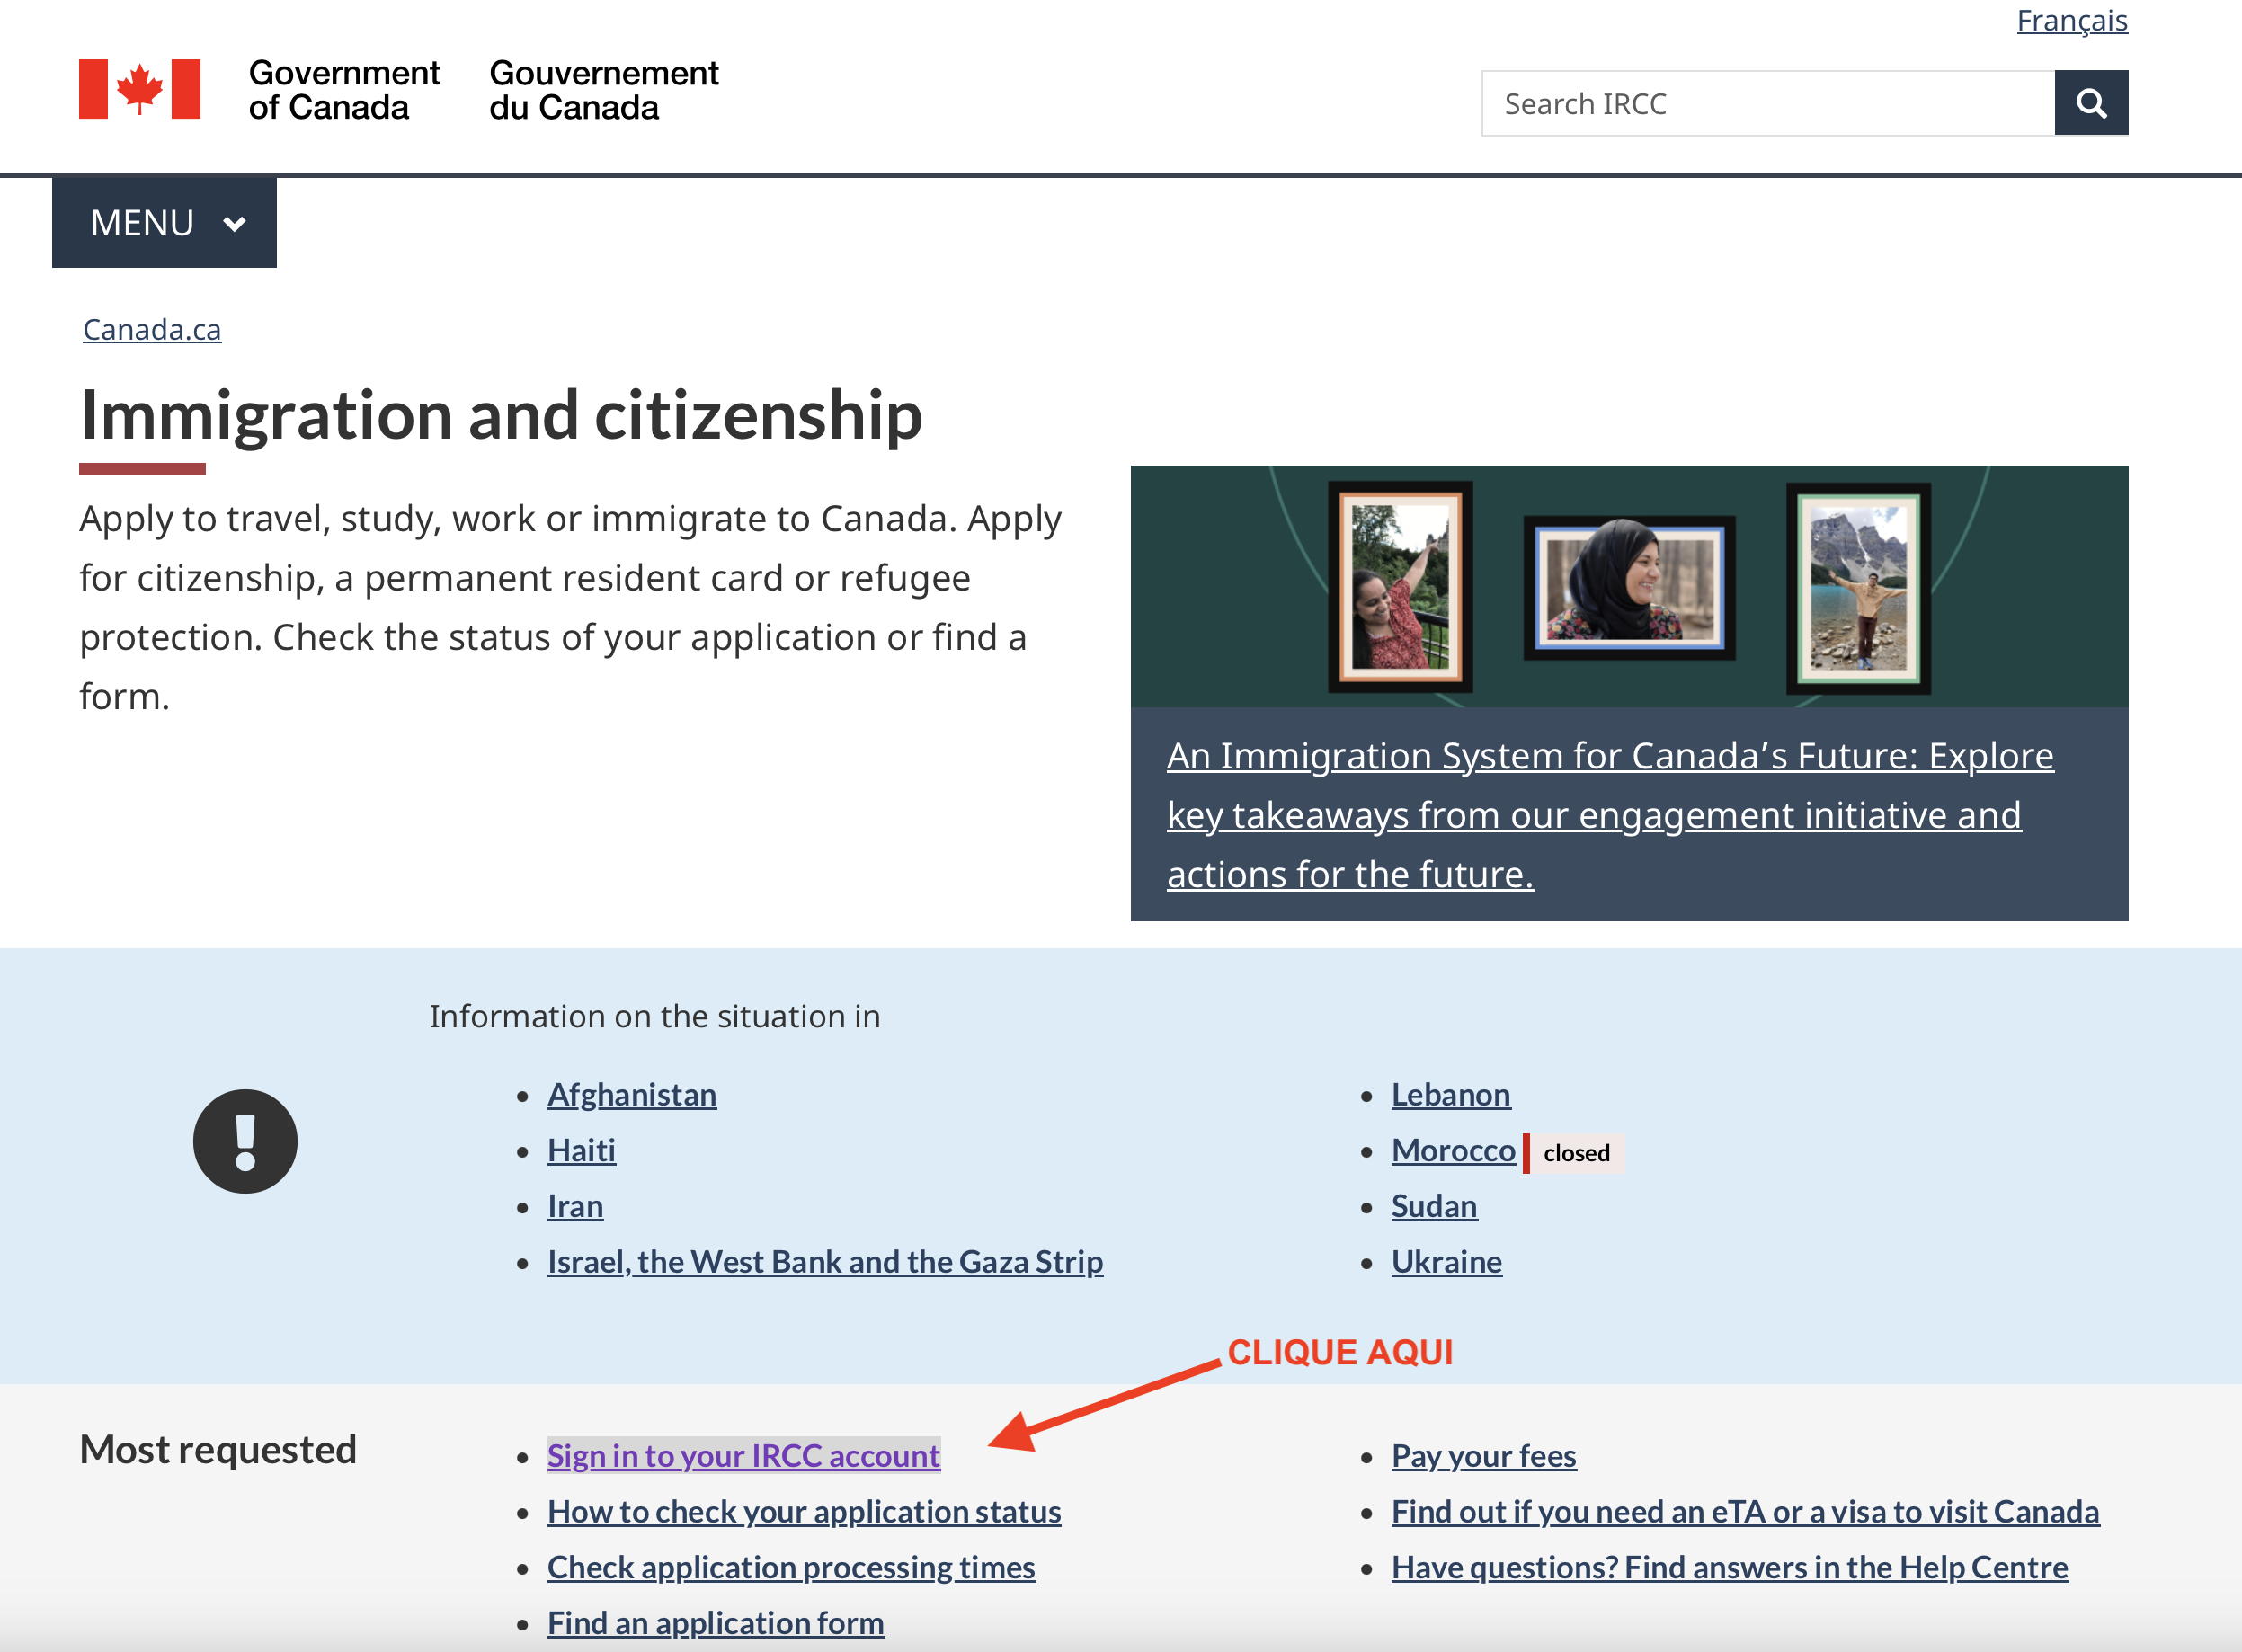
Screen 01 | Step-by-Step Guide: Create Account on Canada Immigration Website in 2024
Instruction screen 1: Select Sign in to your IRCC account.
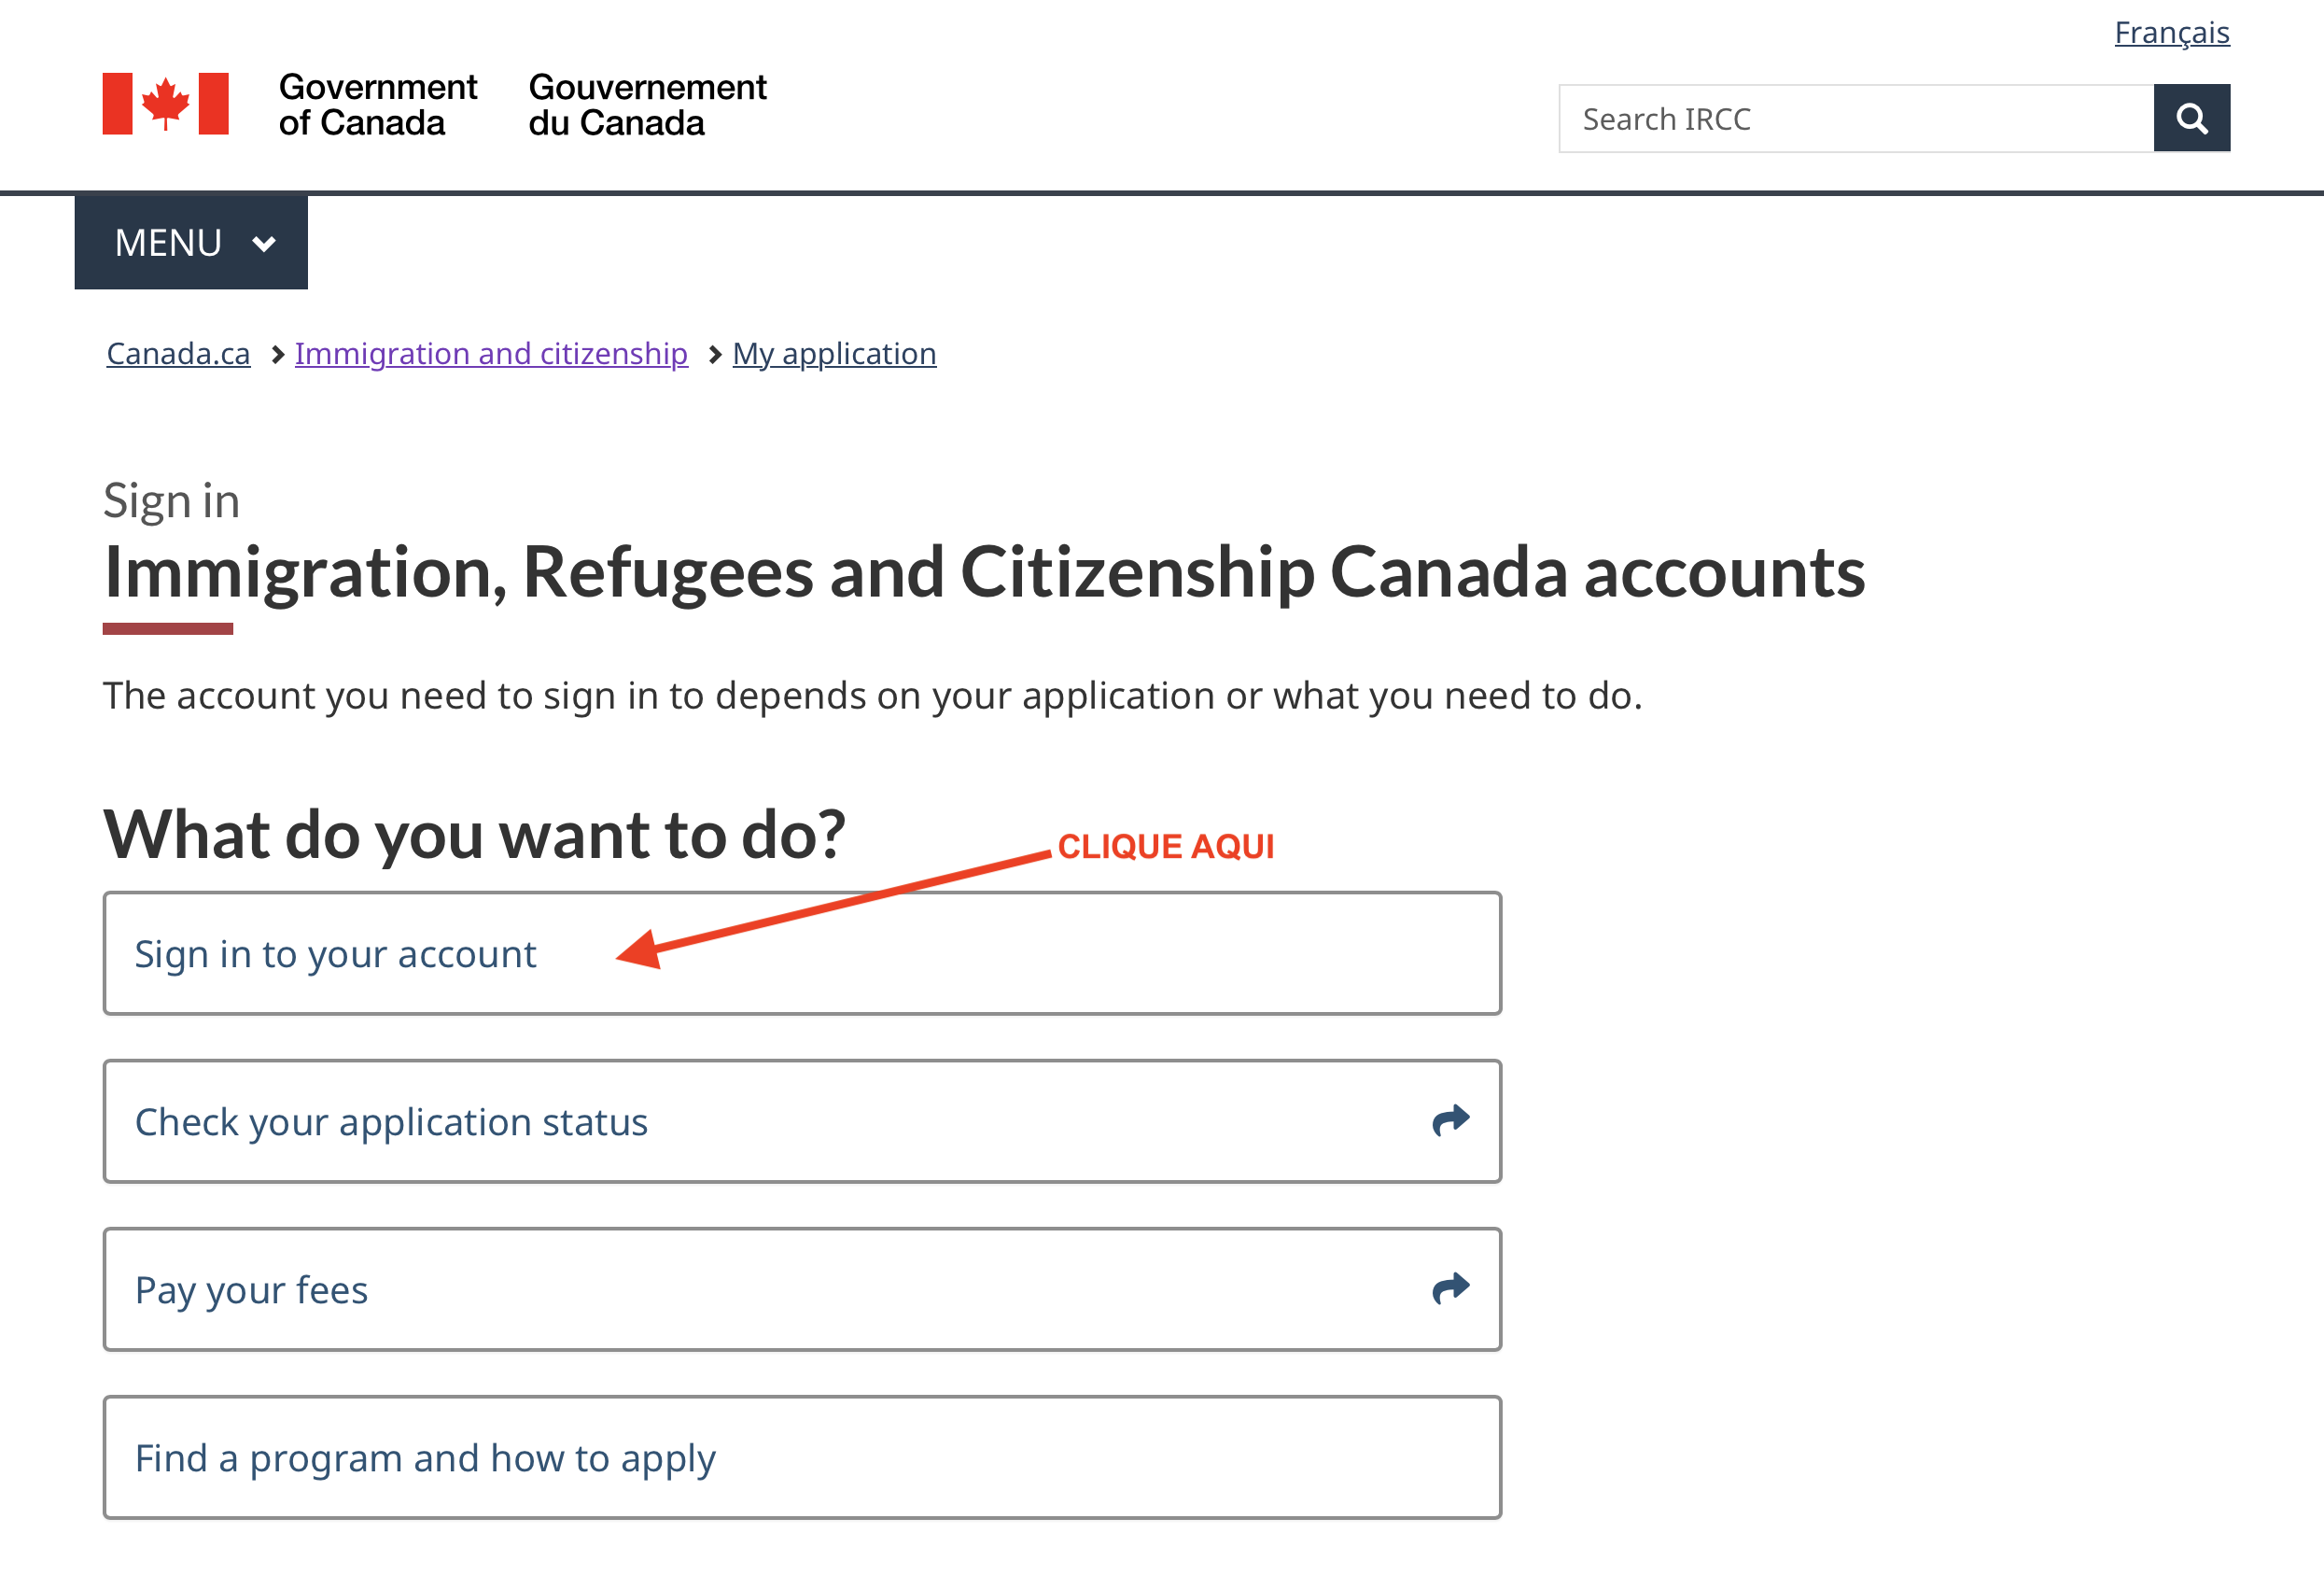
Screen 02 | Step-by-Step Guide: Create an Account on the Canadian Immigration Website
Instruction screen 2: Select Sign in to your IRCC account.
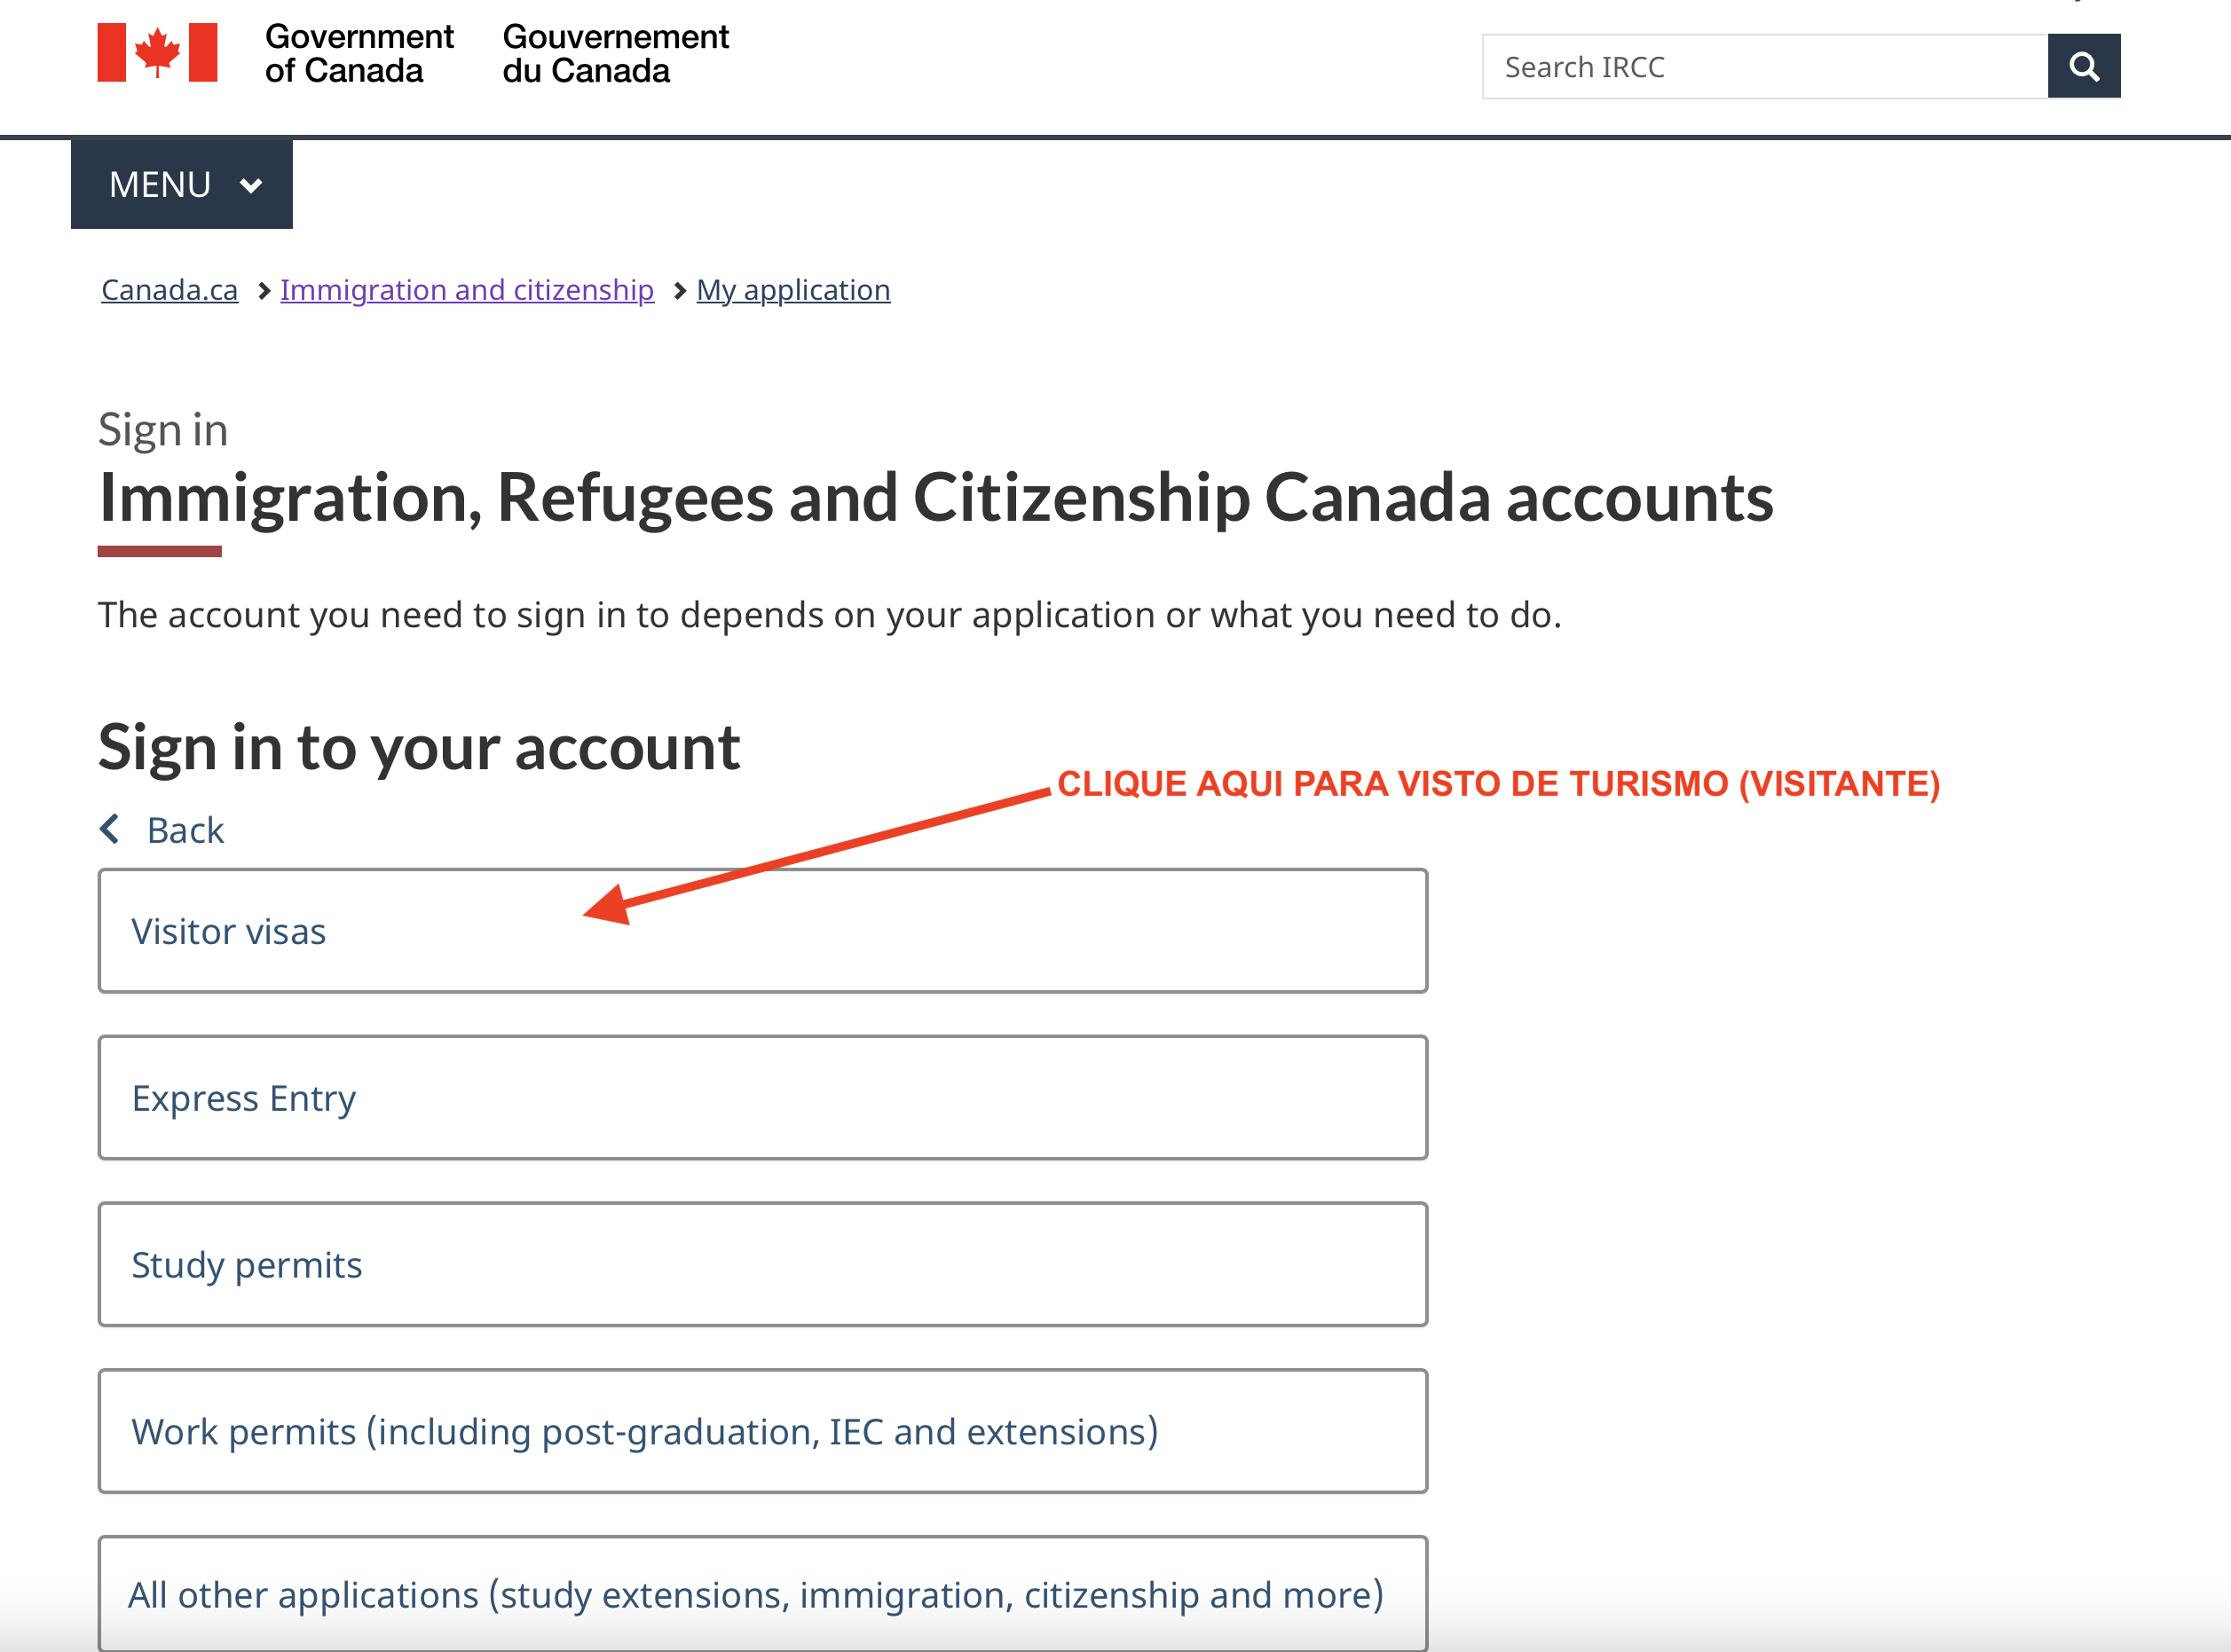
Screen 03 | Step-by-Step Guide: Create an Account on the Canadian Immigration Website
Instruction screen 3: Select Visitor visas.
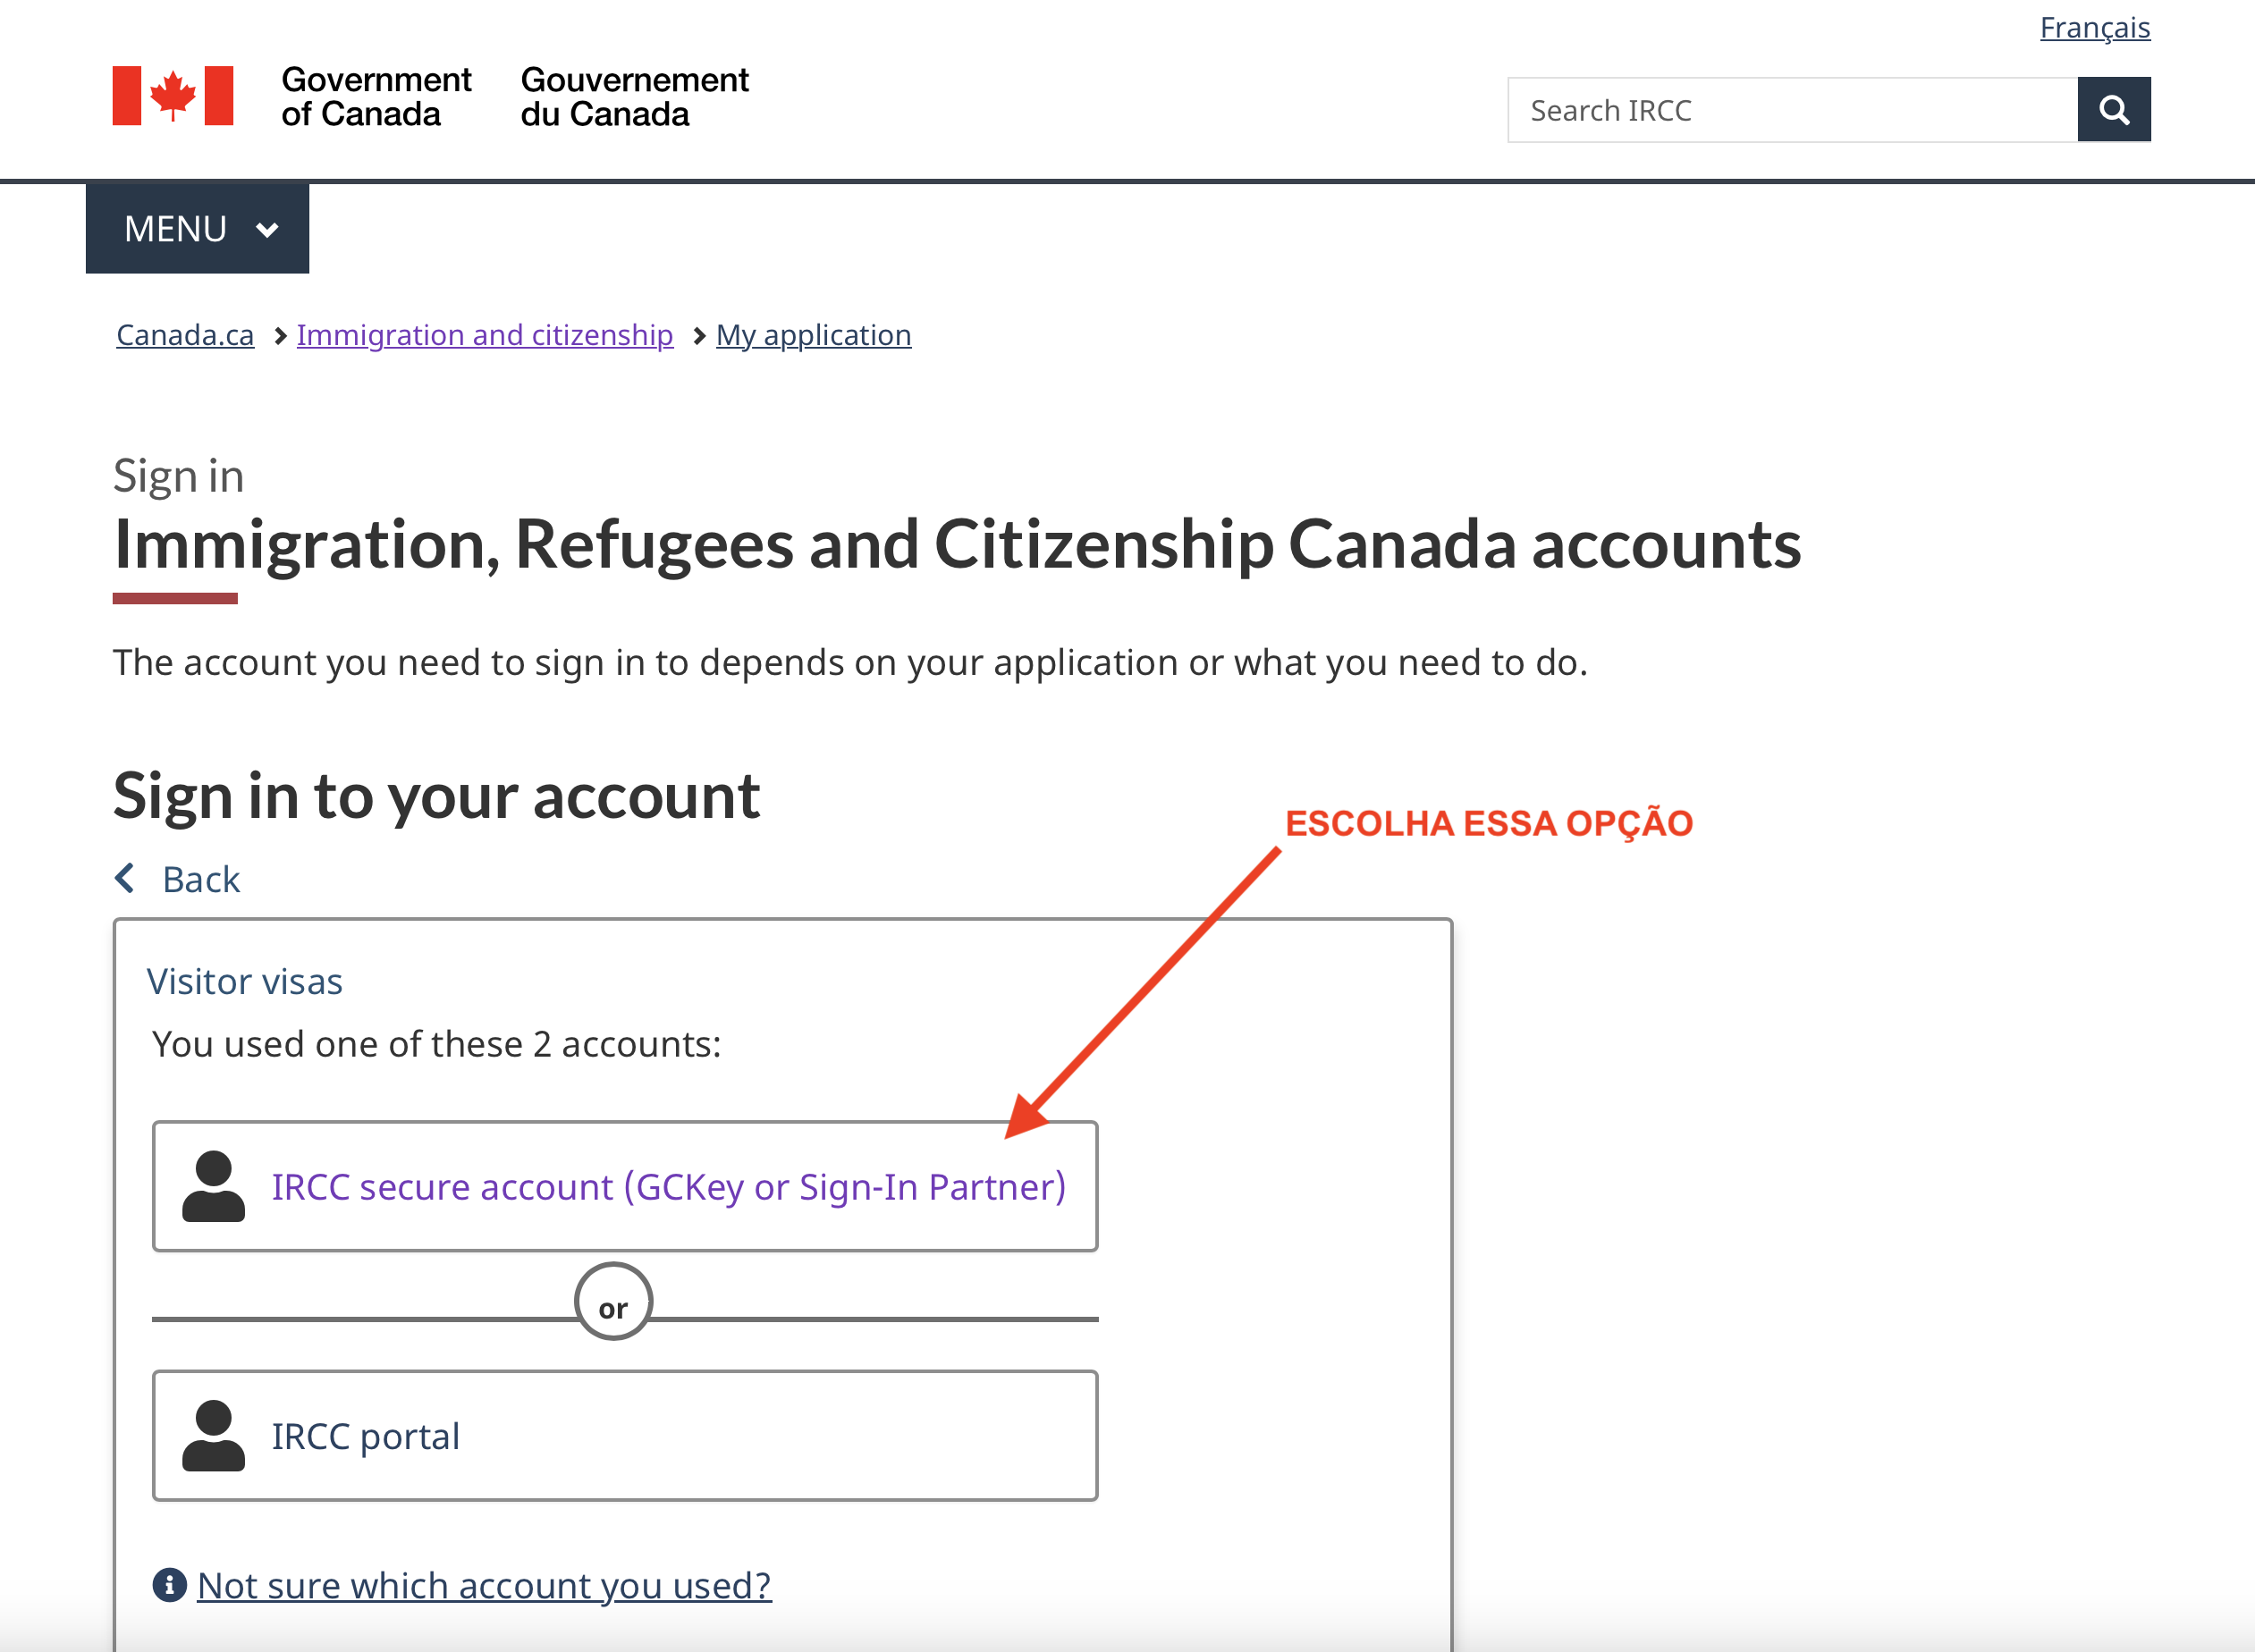
Screen 04 | Step-by-Step Guide: Create an Account on the Canadian Immigration Website
Instruction Screen 04: Click ->**
IRCC secure account (GCKey or Sign-In Partner)**
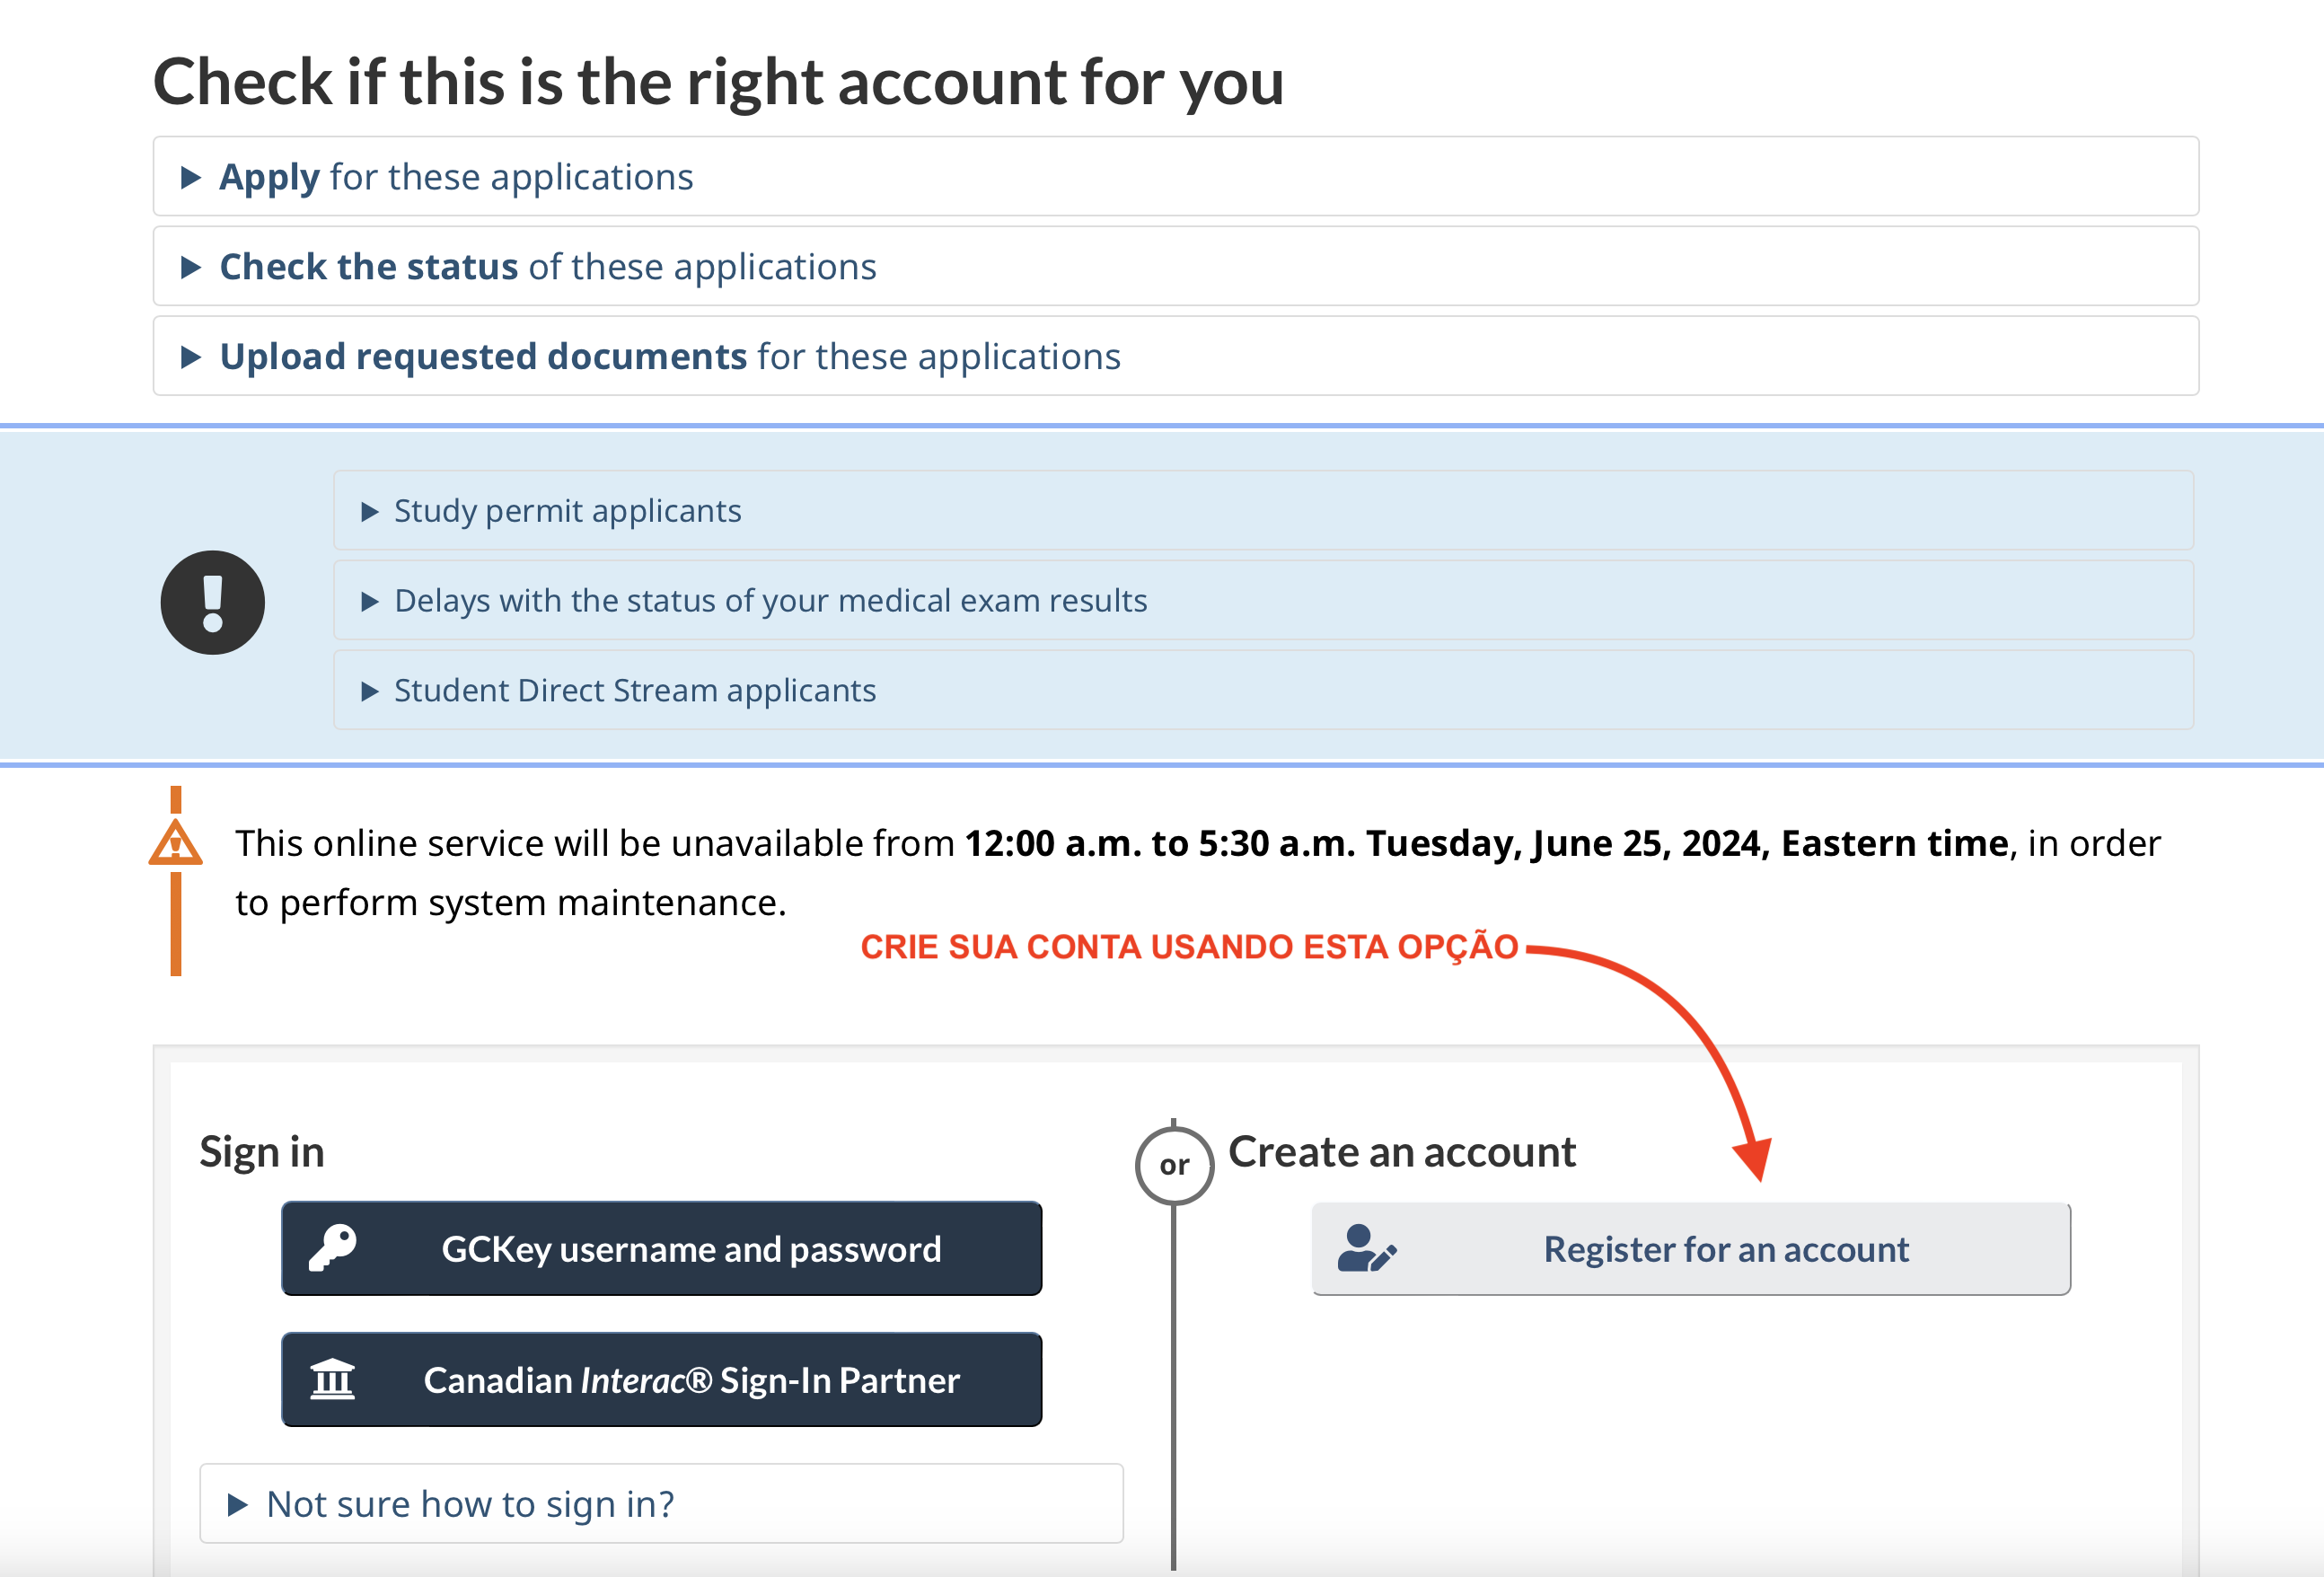
Screen 05 | Step-by-Step Guide: Create an Account on the Canadian Immigration Website
Instruction Screen 05: Click ->**
Register for an Account**
2. Choose the type of IRCC account
You will have two options:
- GCKey - Government of Canada Key (We will use this option)
- Sign-in Partner Login / Login Partner (This option is commonly chosen if you already have a bank account in Canada)
GCKey is the most common and recommended option for international users.
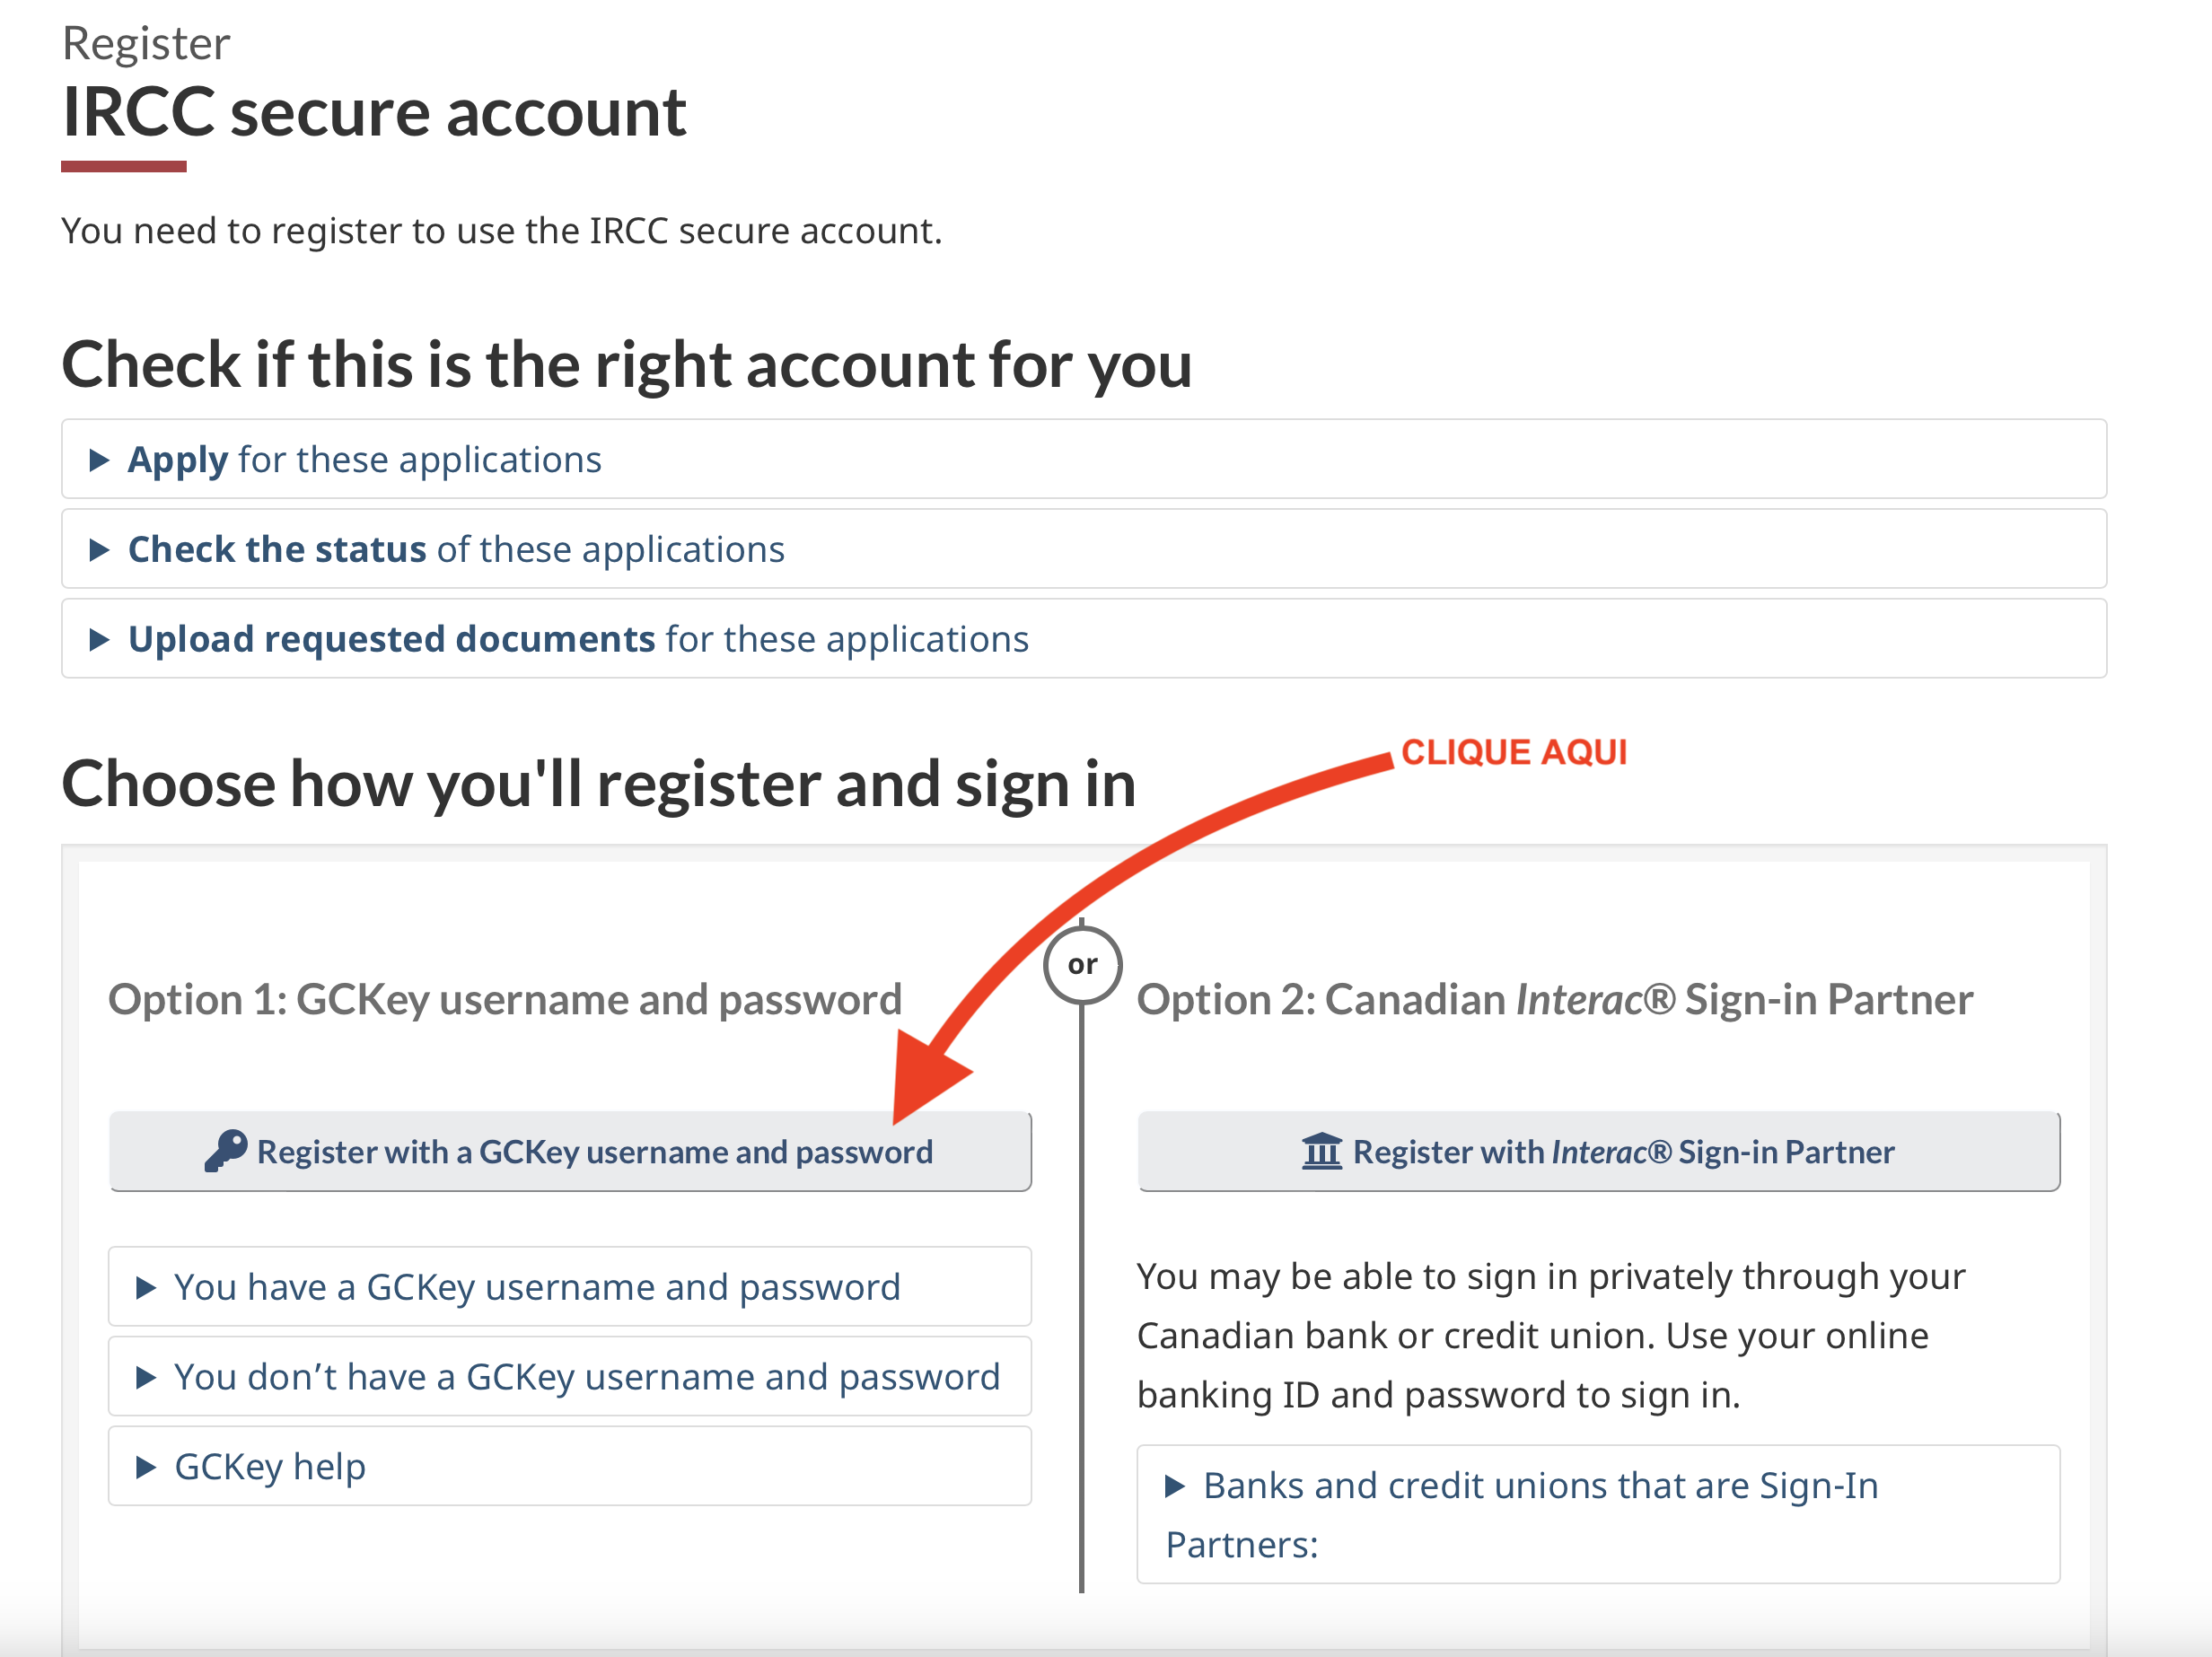
Screen 06 | Step-by-Step Guide: Create an Account on the Canadian Immigration Website
3. Create a GCKey on the IRCC website
- Click “Sign up” on the GCKey page
- Read and accept the terms and conditions
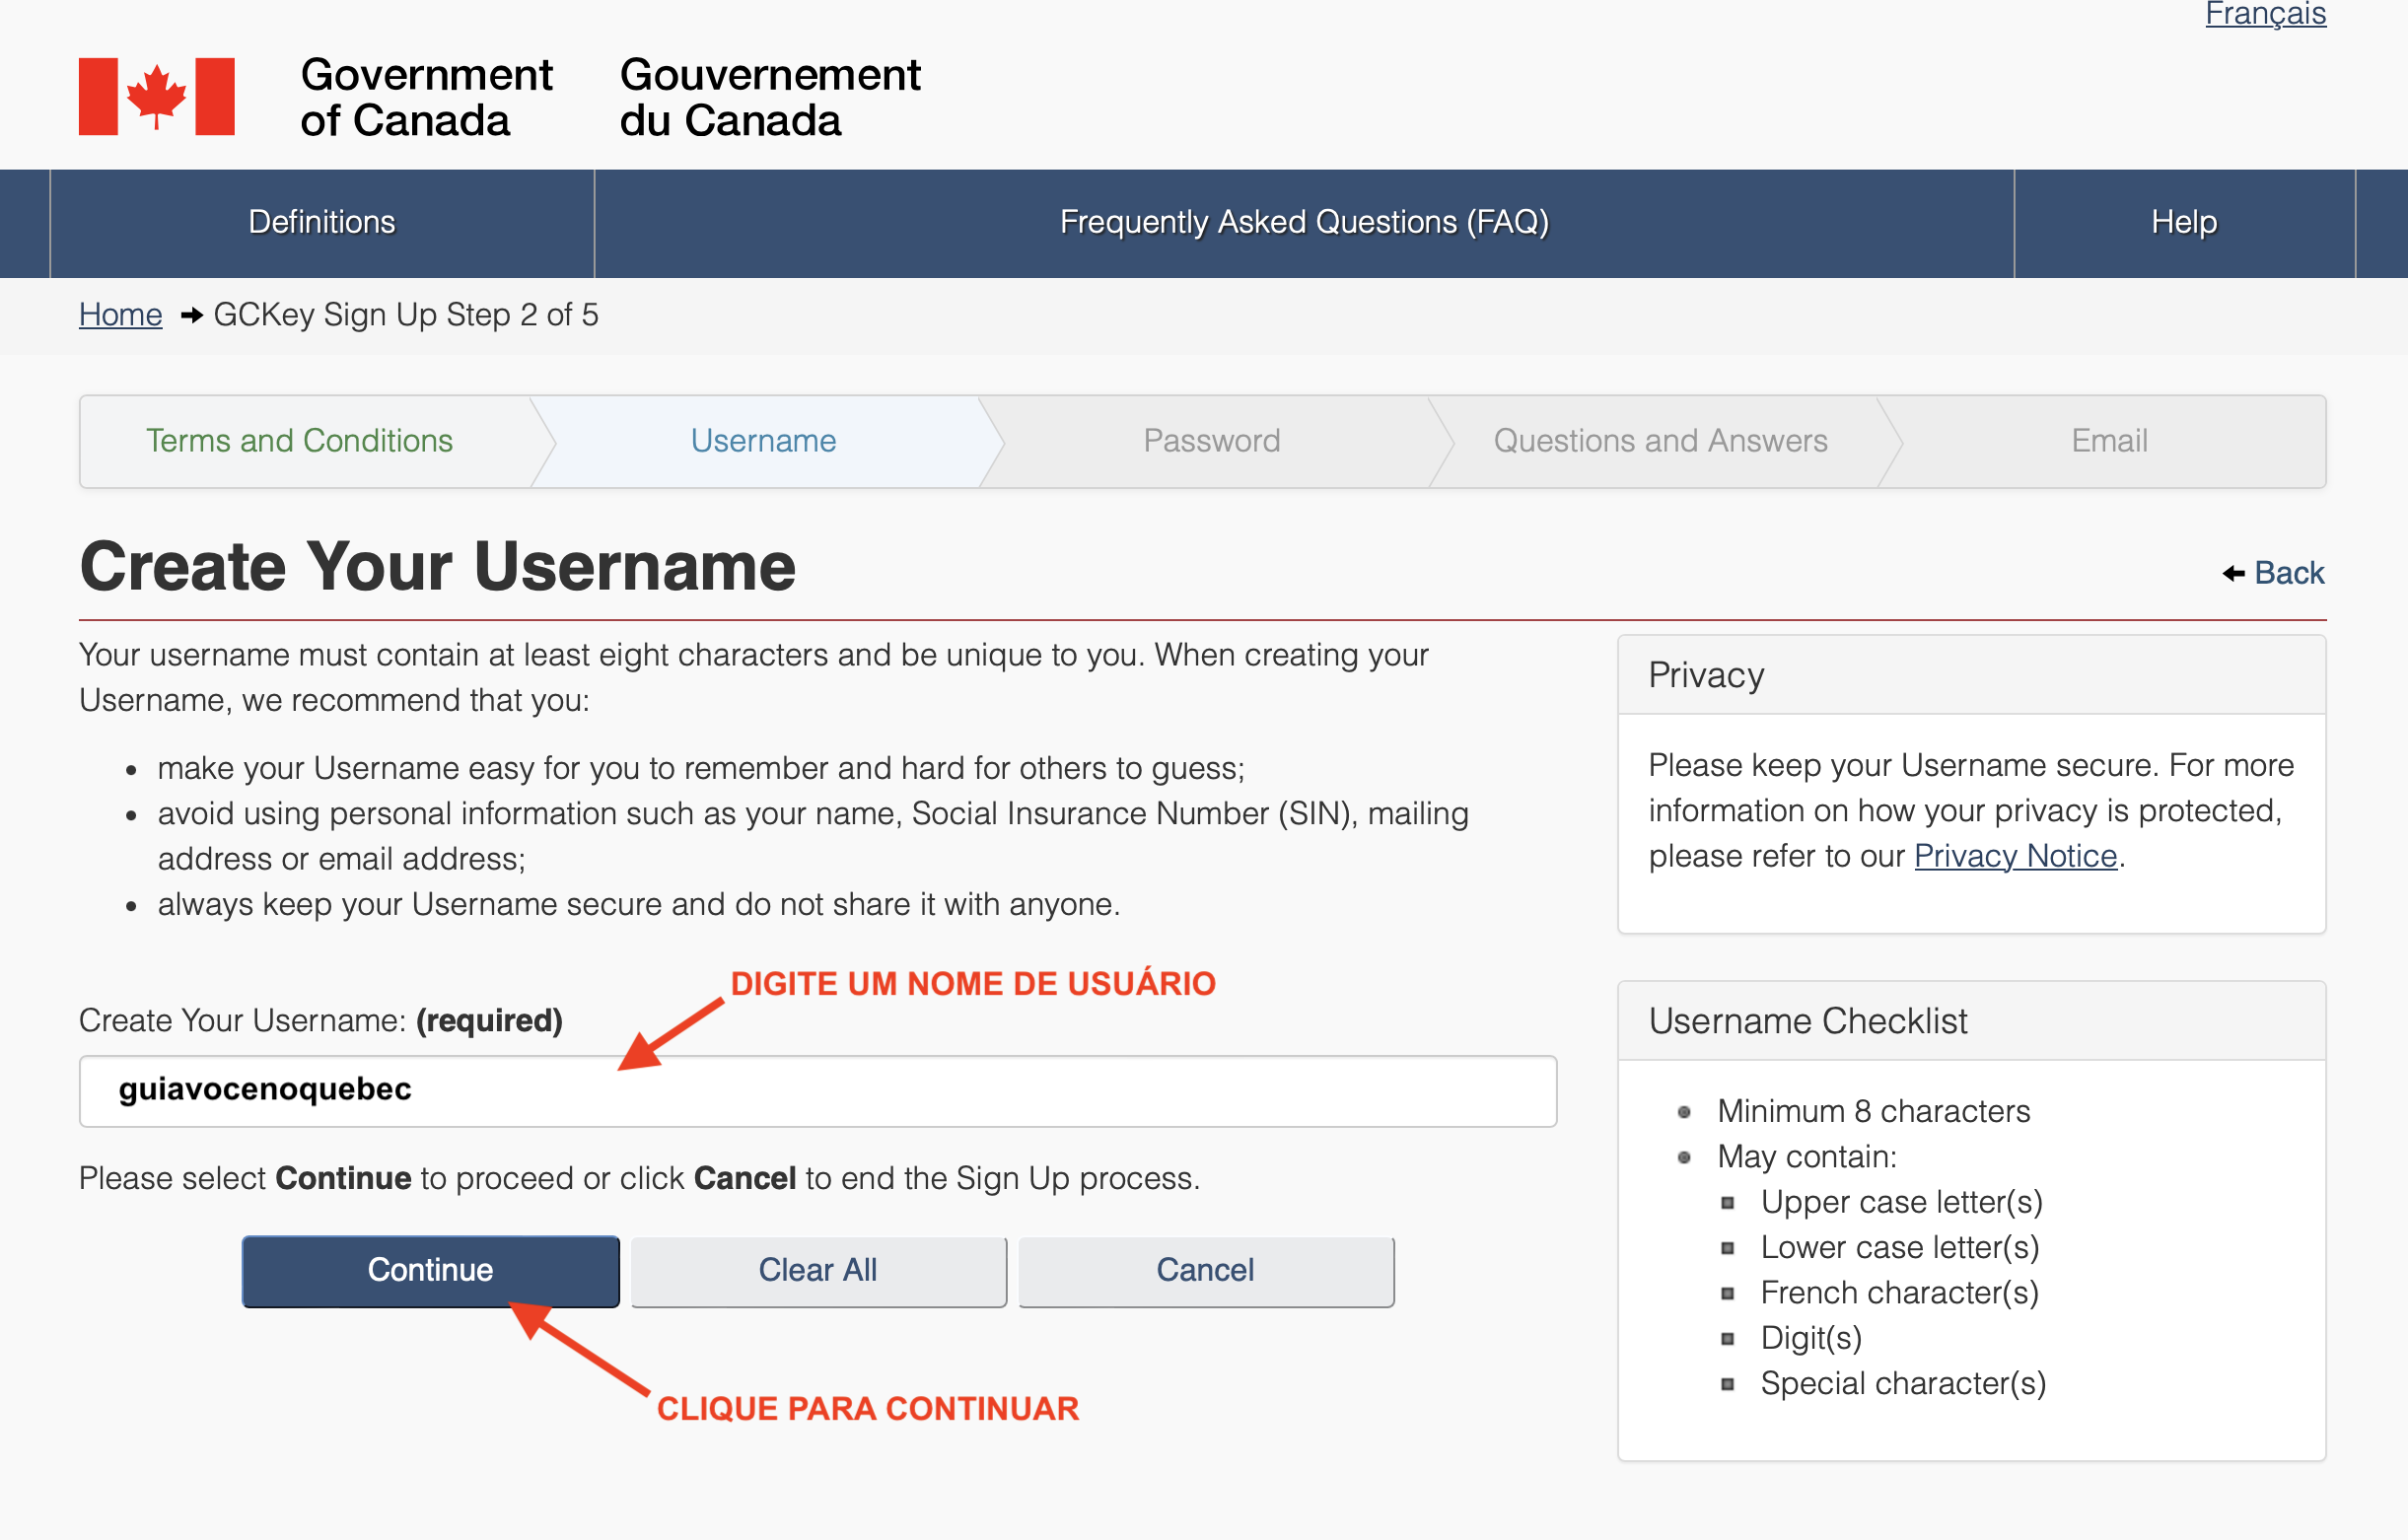
- Create a unique username (8-16 characters)
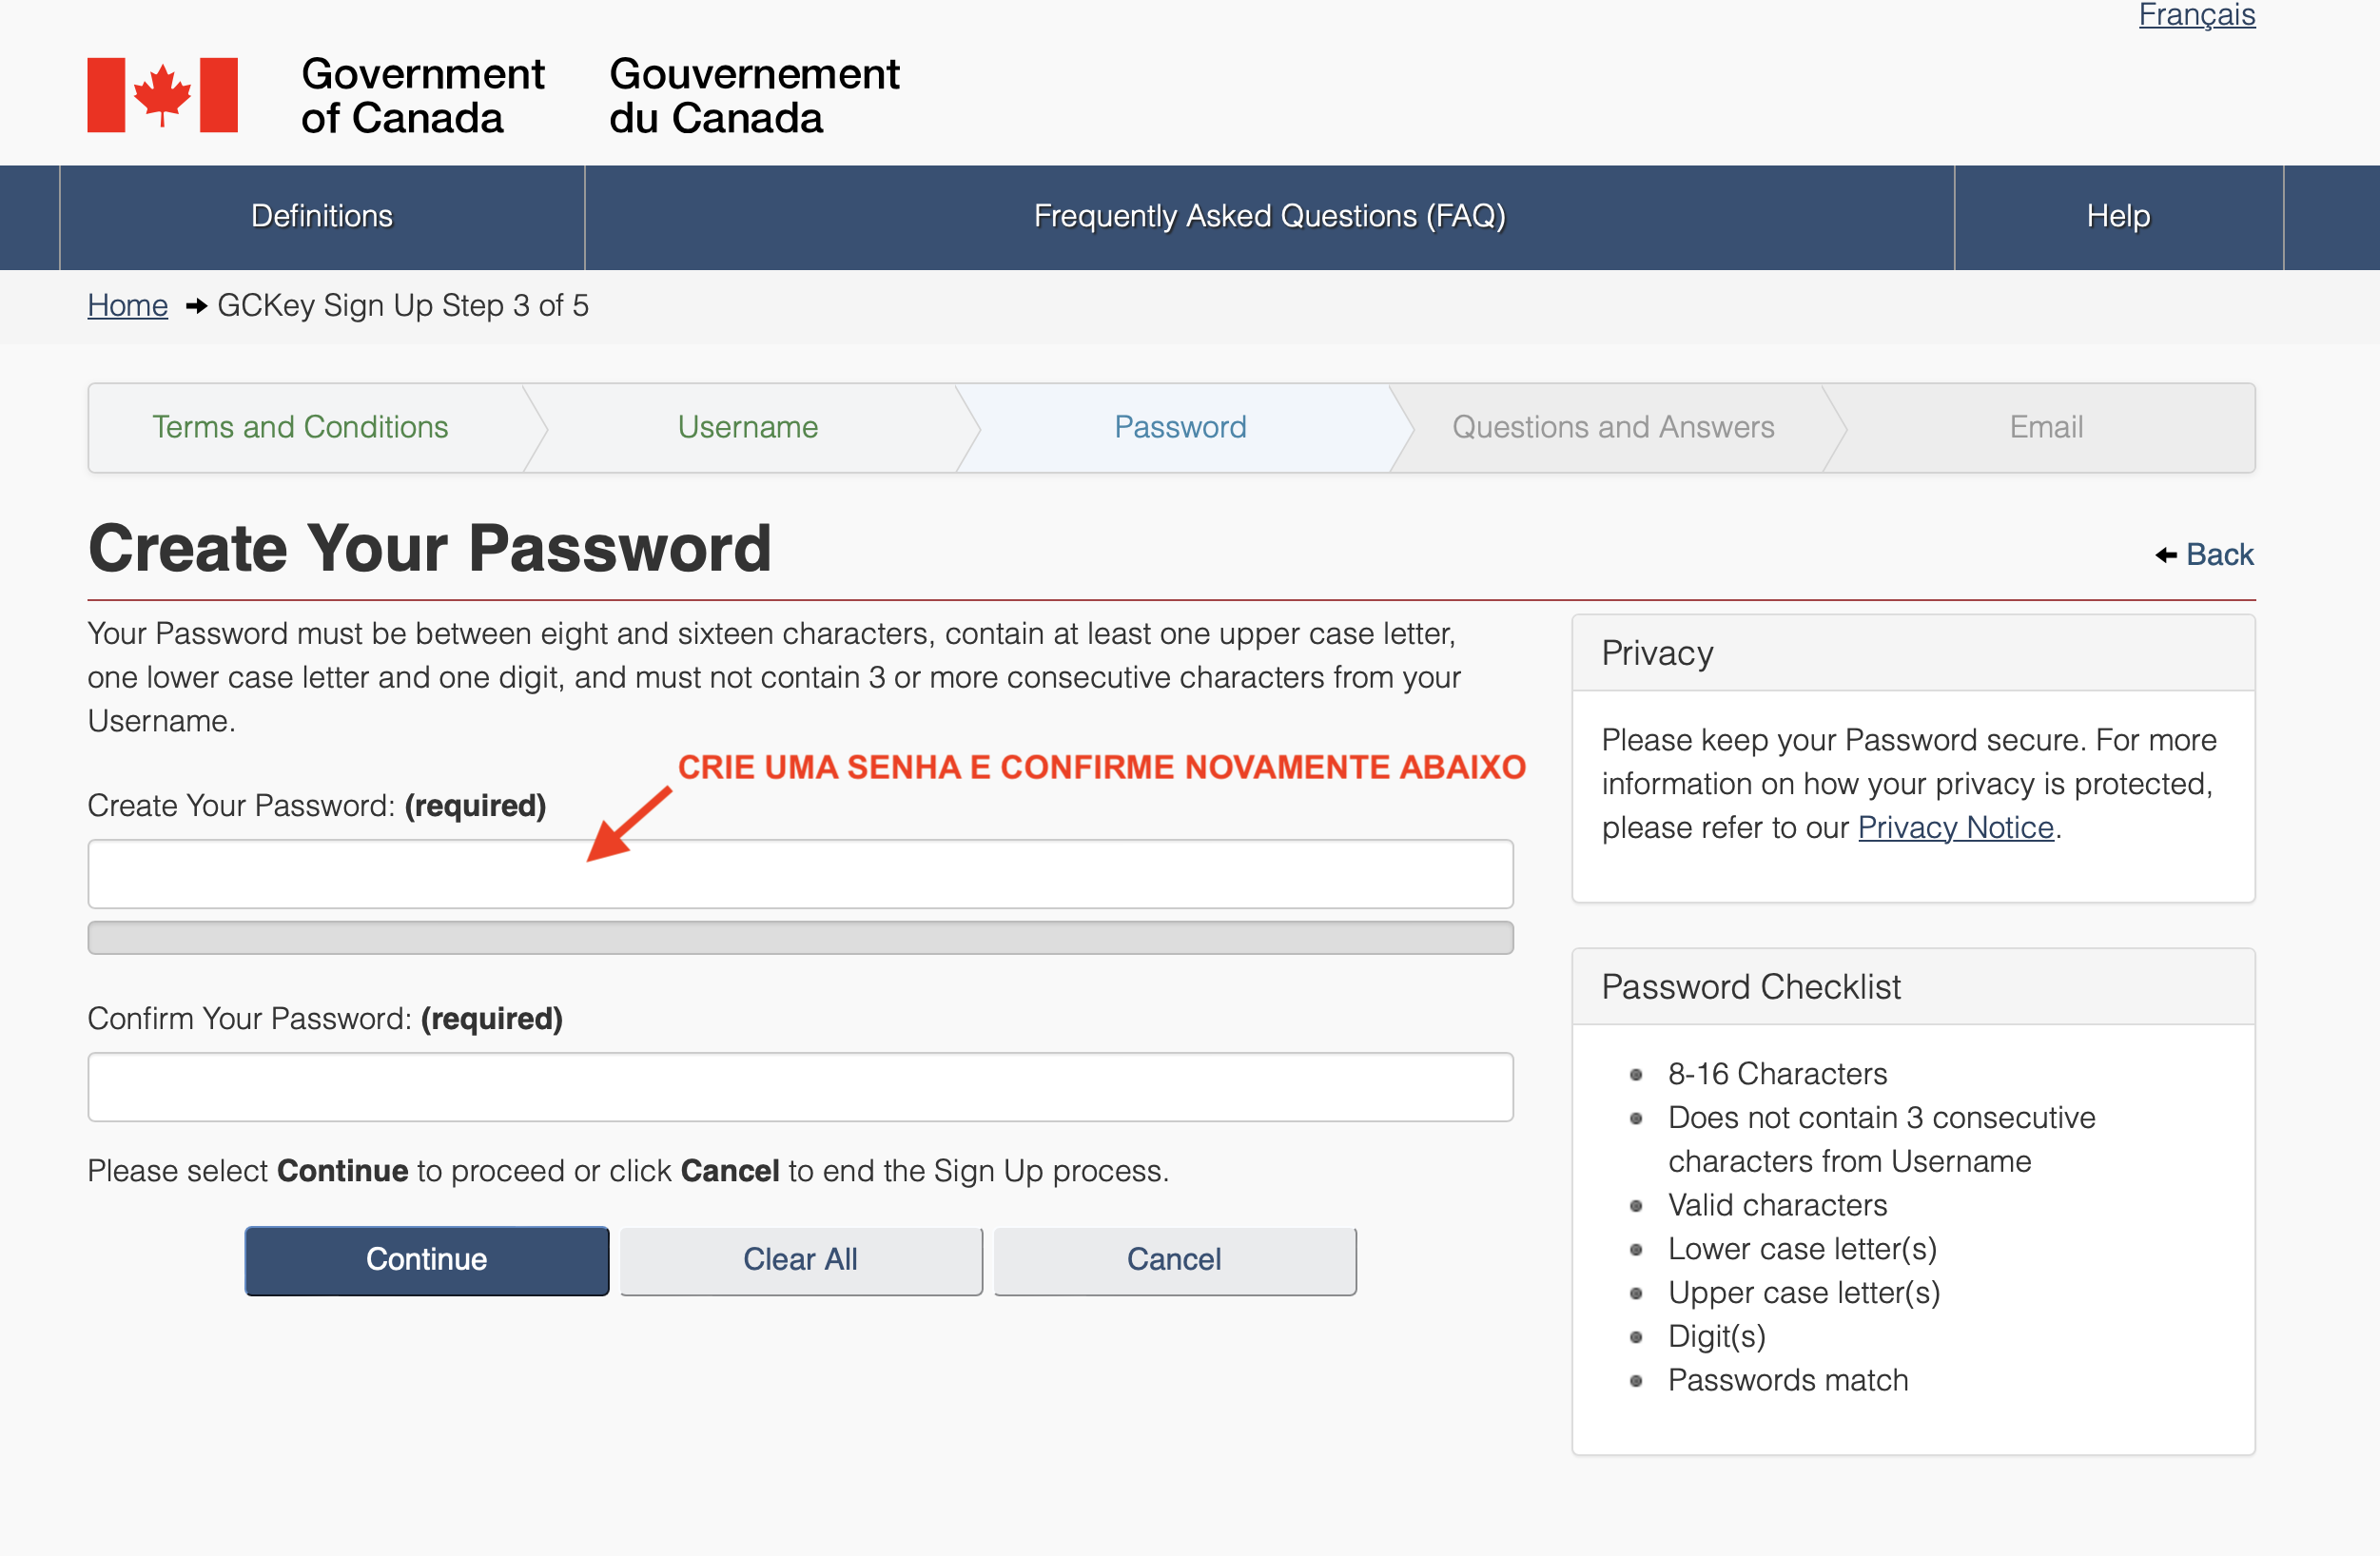
- Create a strong password (minimum 8 characters, including uppercase letters, lowercase letters and numbers)
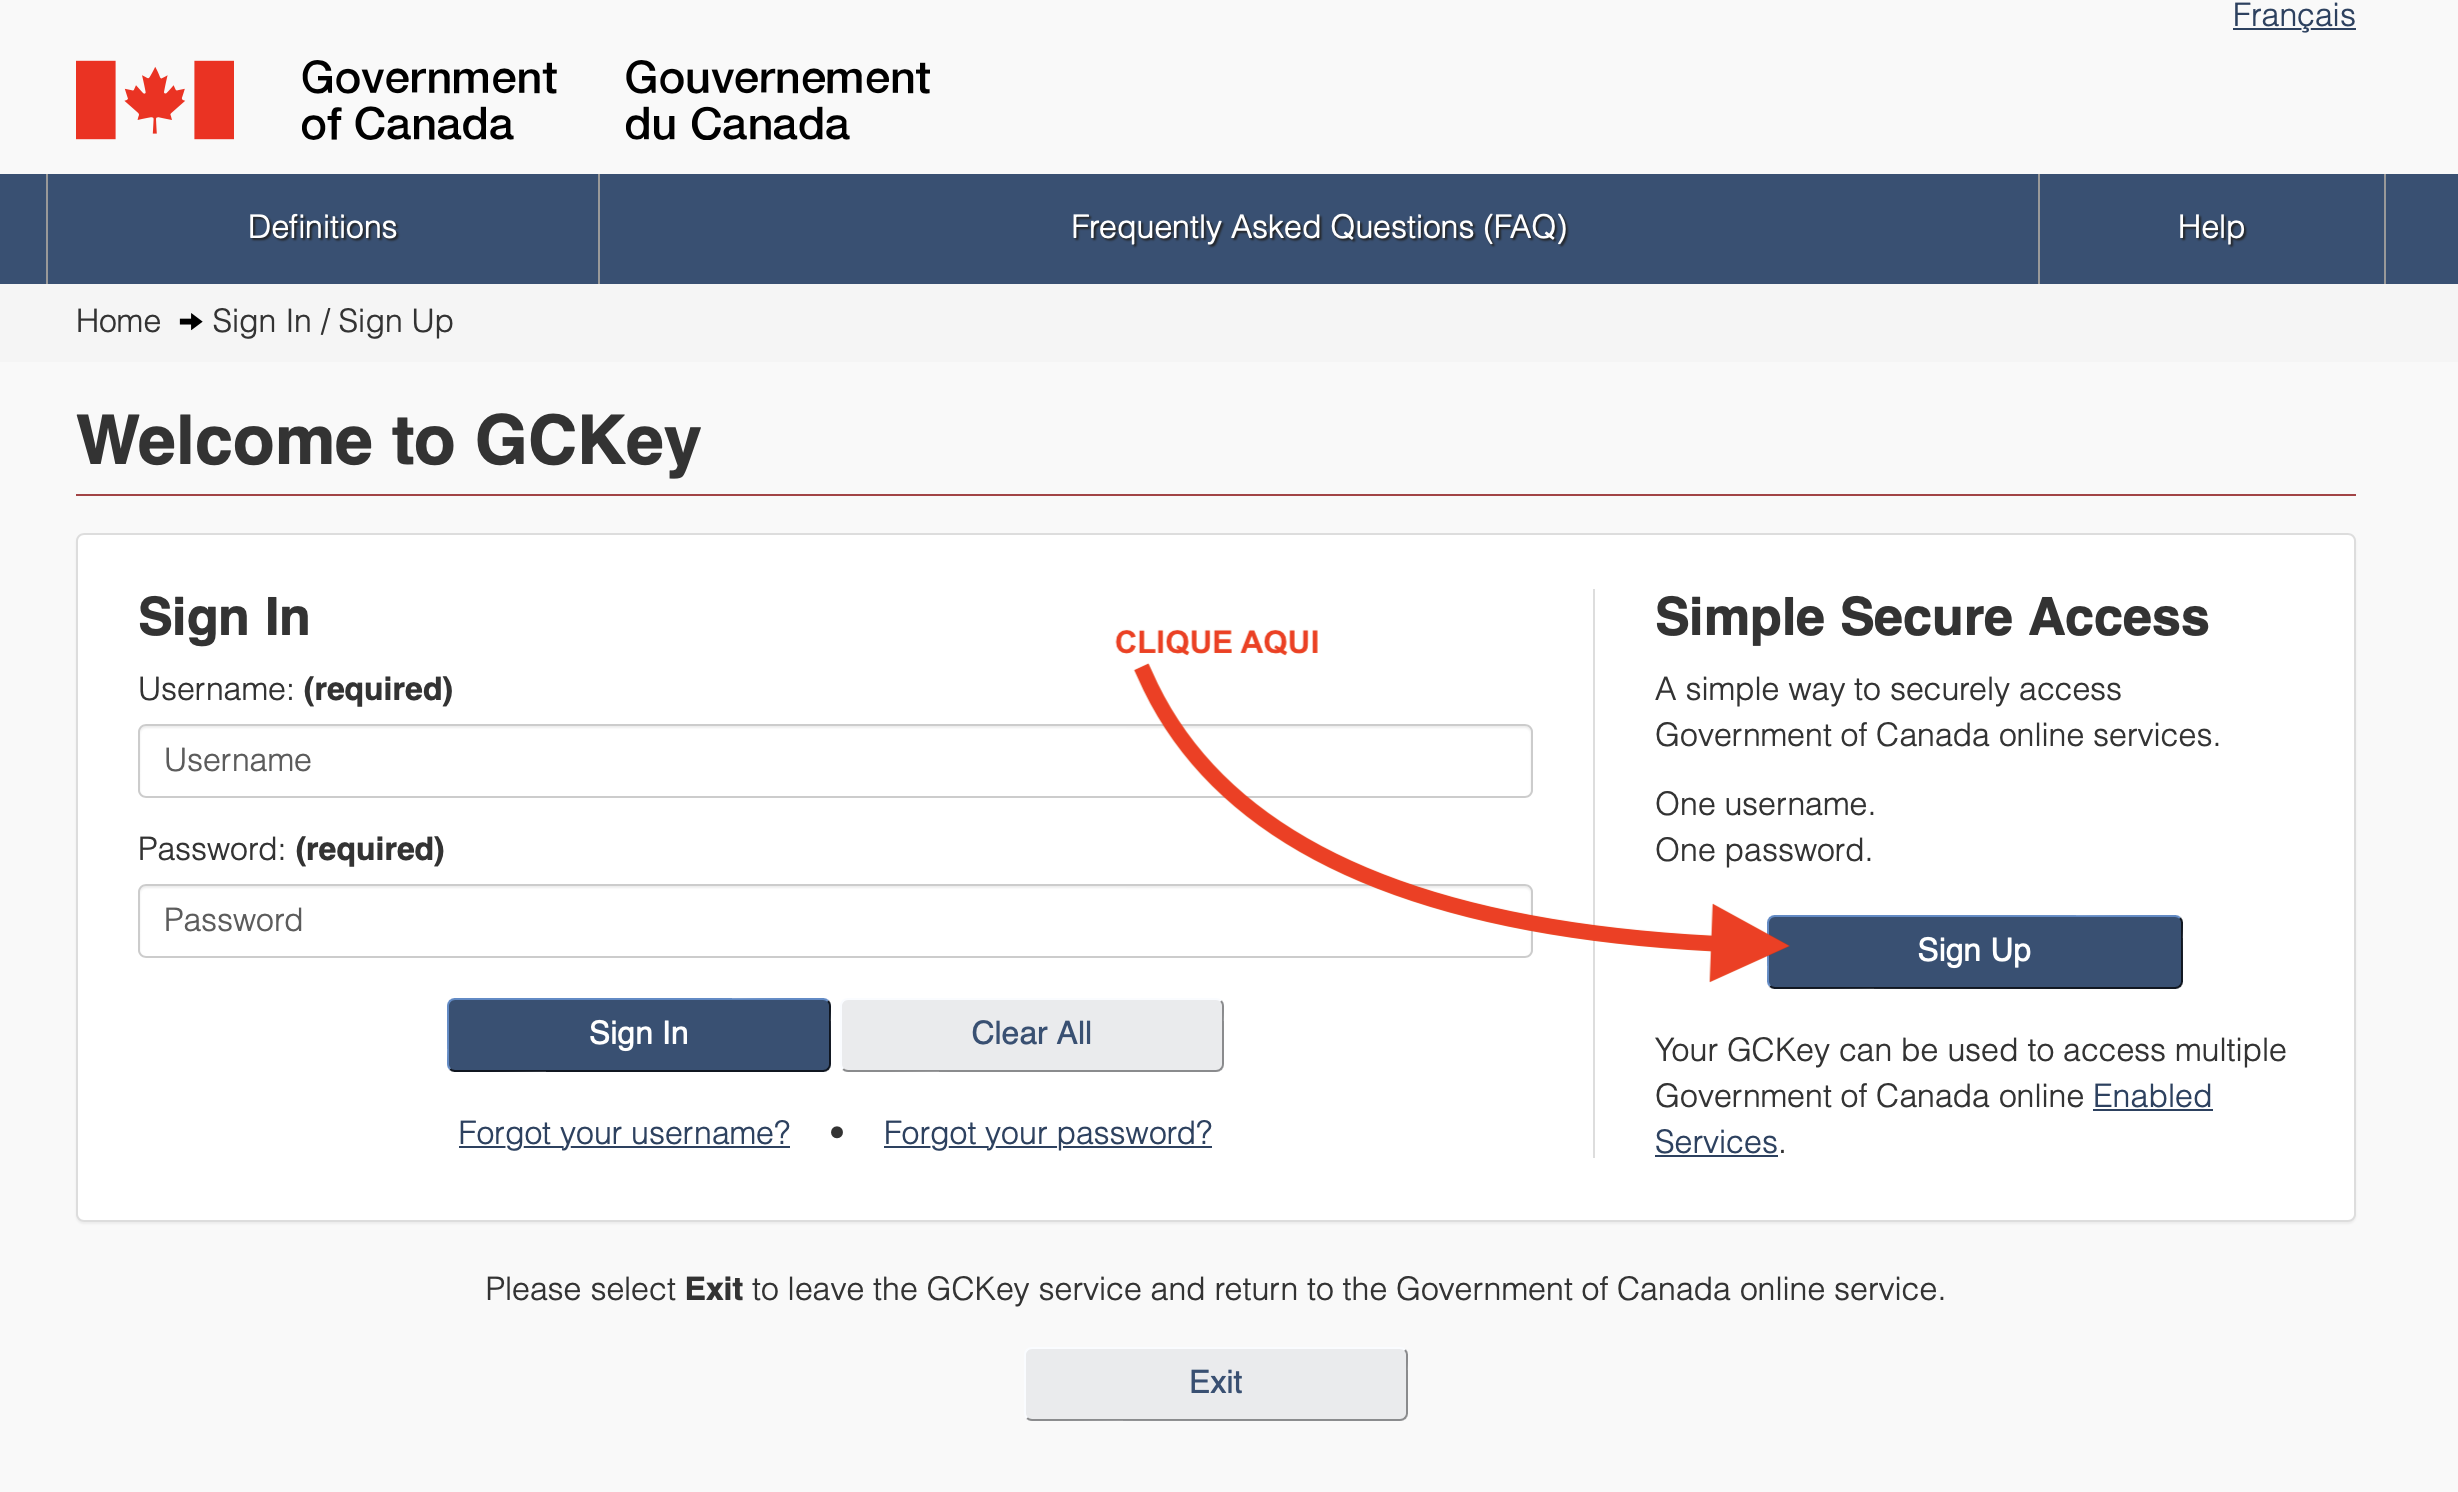
Screen 07 | Step-by-Step Guide: Create an Account on the Canadian Immigration Website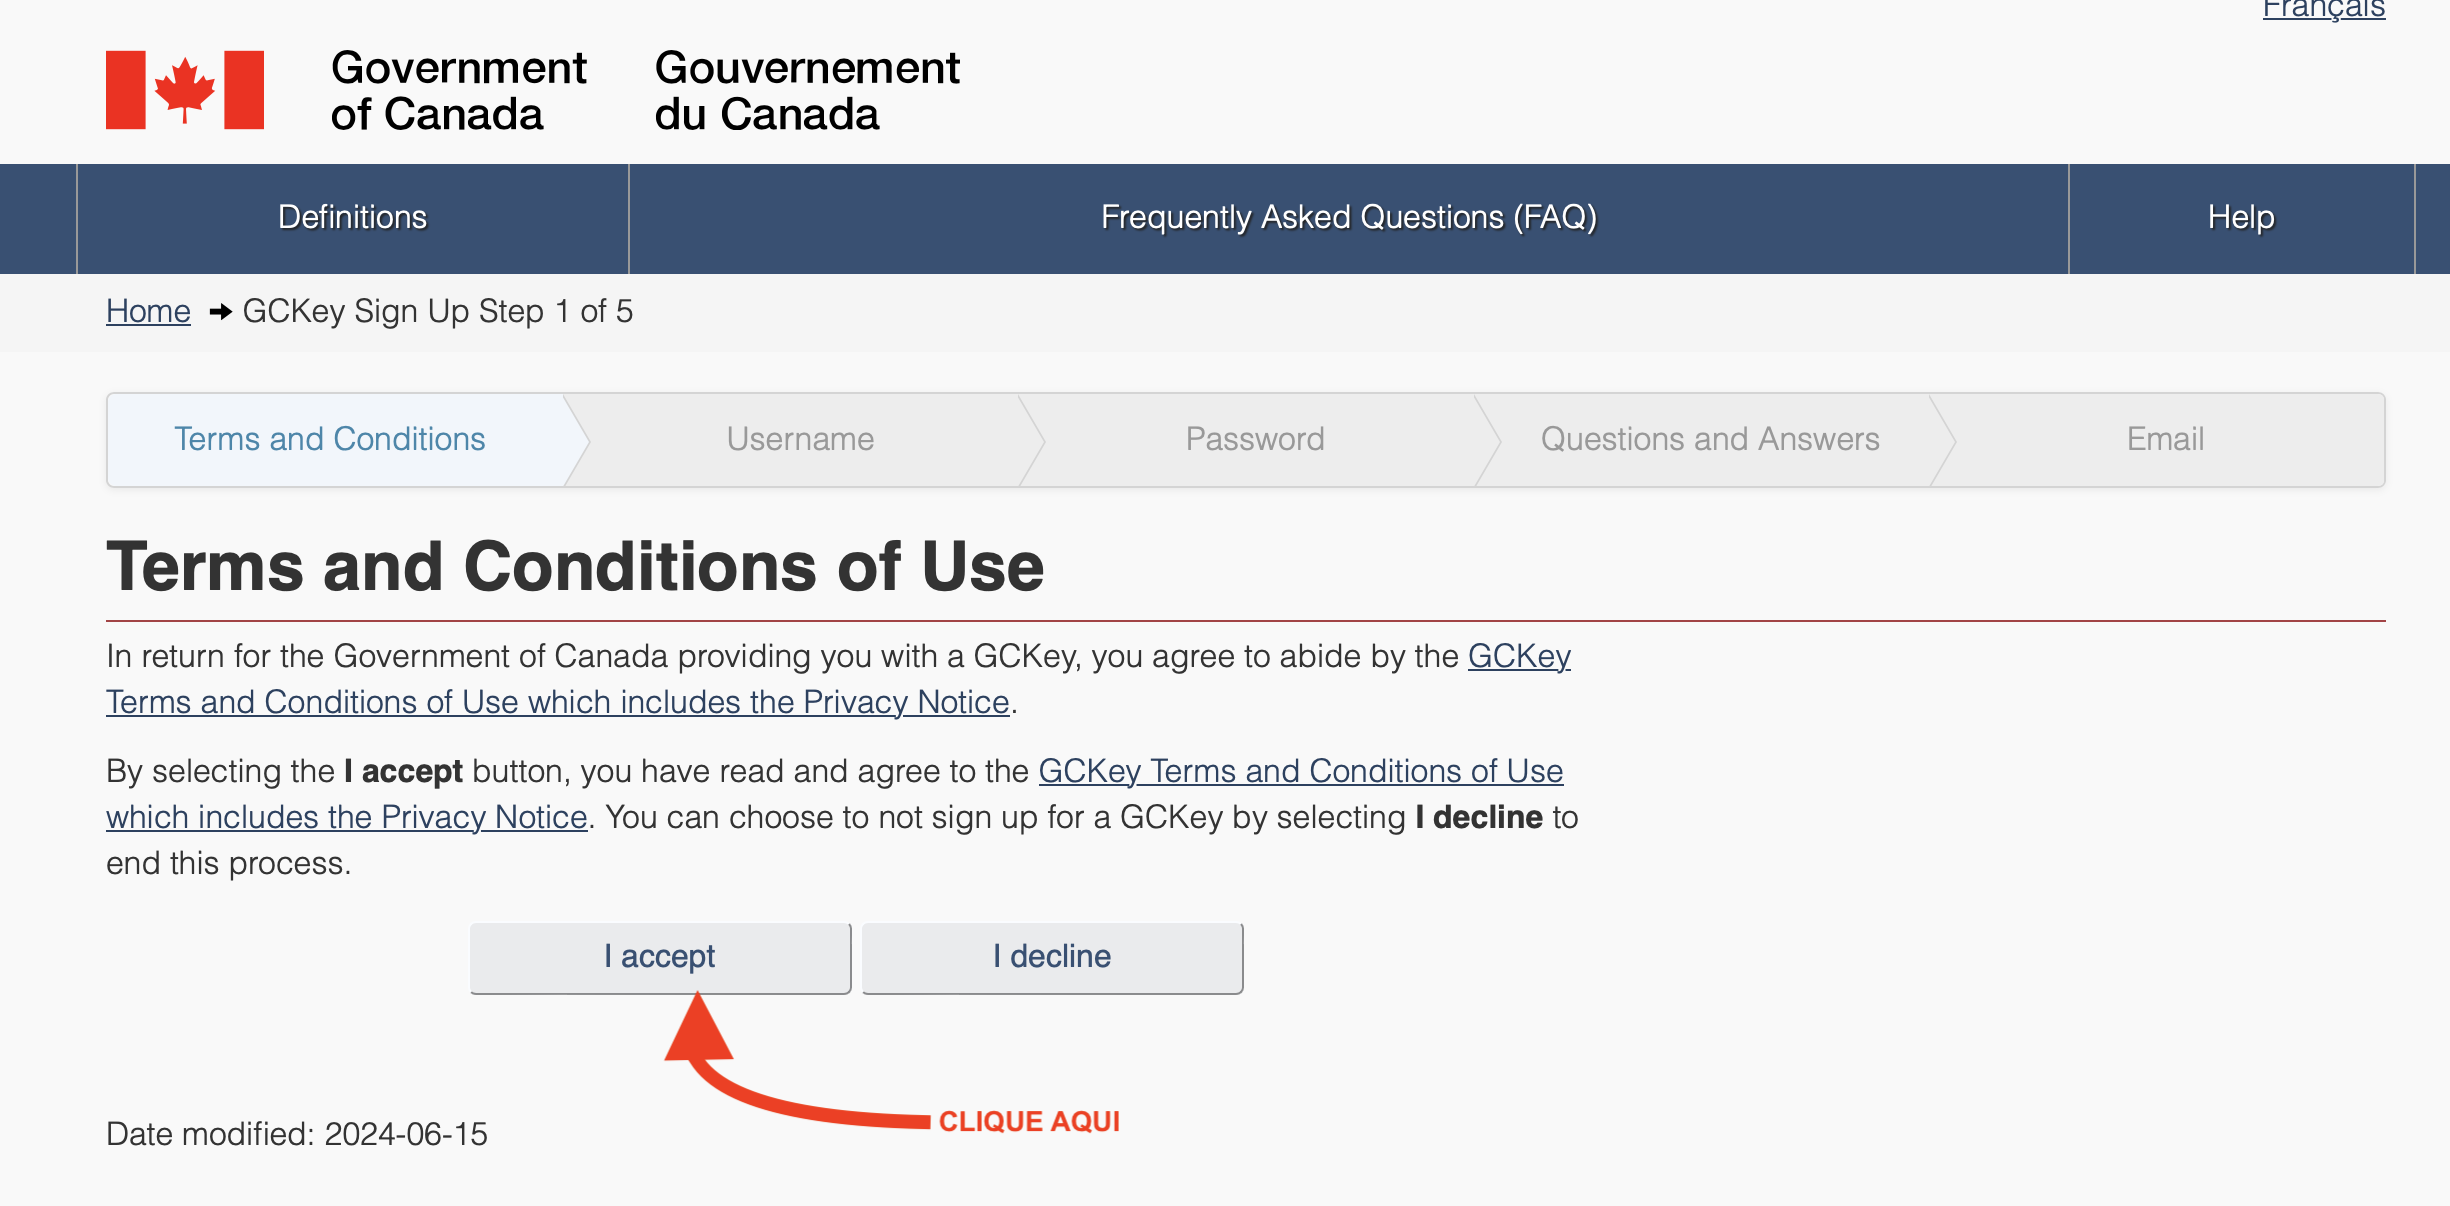
Screen 08 | Step-by-Step Guide: Create an Account on the Canadian Immigration Website
Screen 09 | Step-by-Step Guide: Create an Account on the Canadian Immigration Website
Screen 10 | Step-by-Step Guide: Create an Account on the Canadian Immigration Website
4. Configure recovery questions
- Choose and answer 3 security questions
- These questions will be used to recover your account if necessary
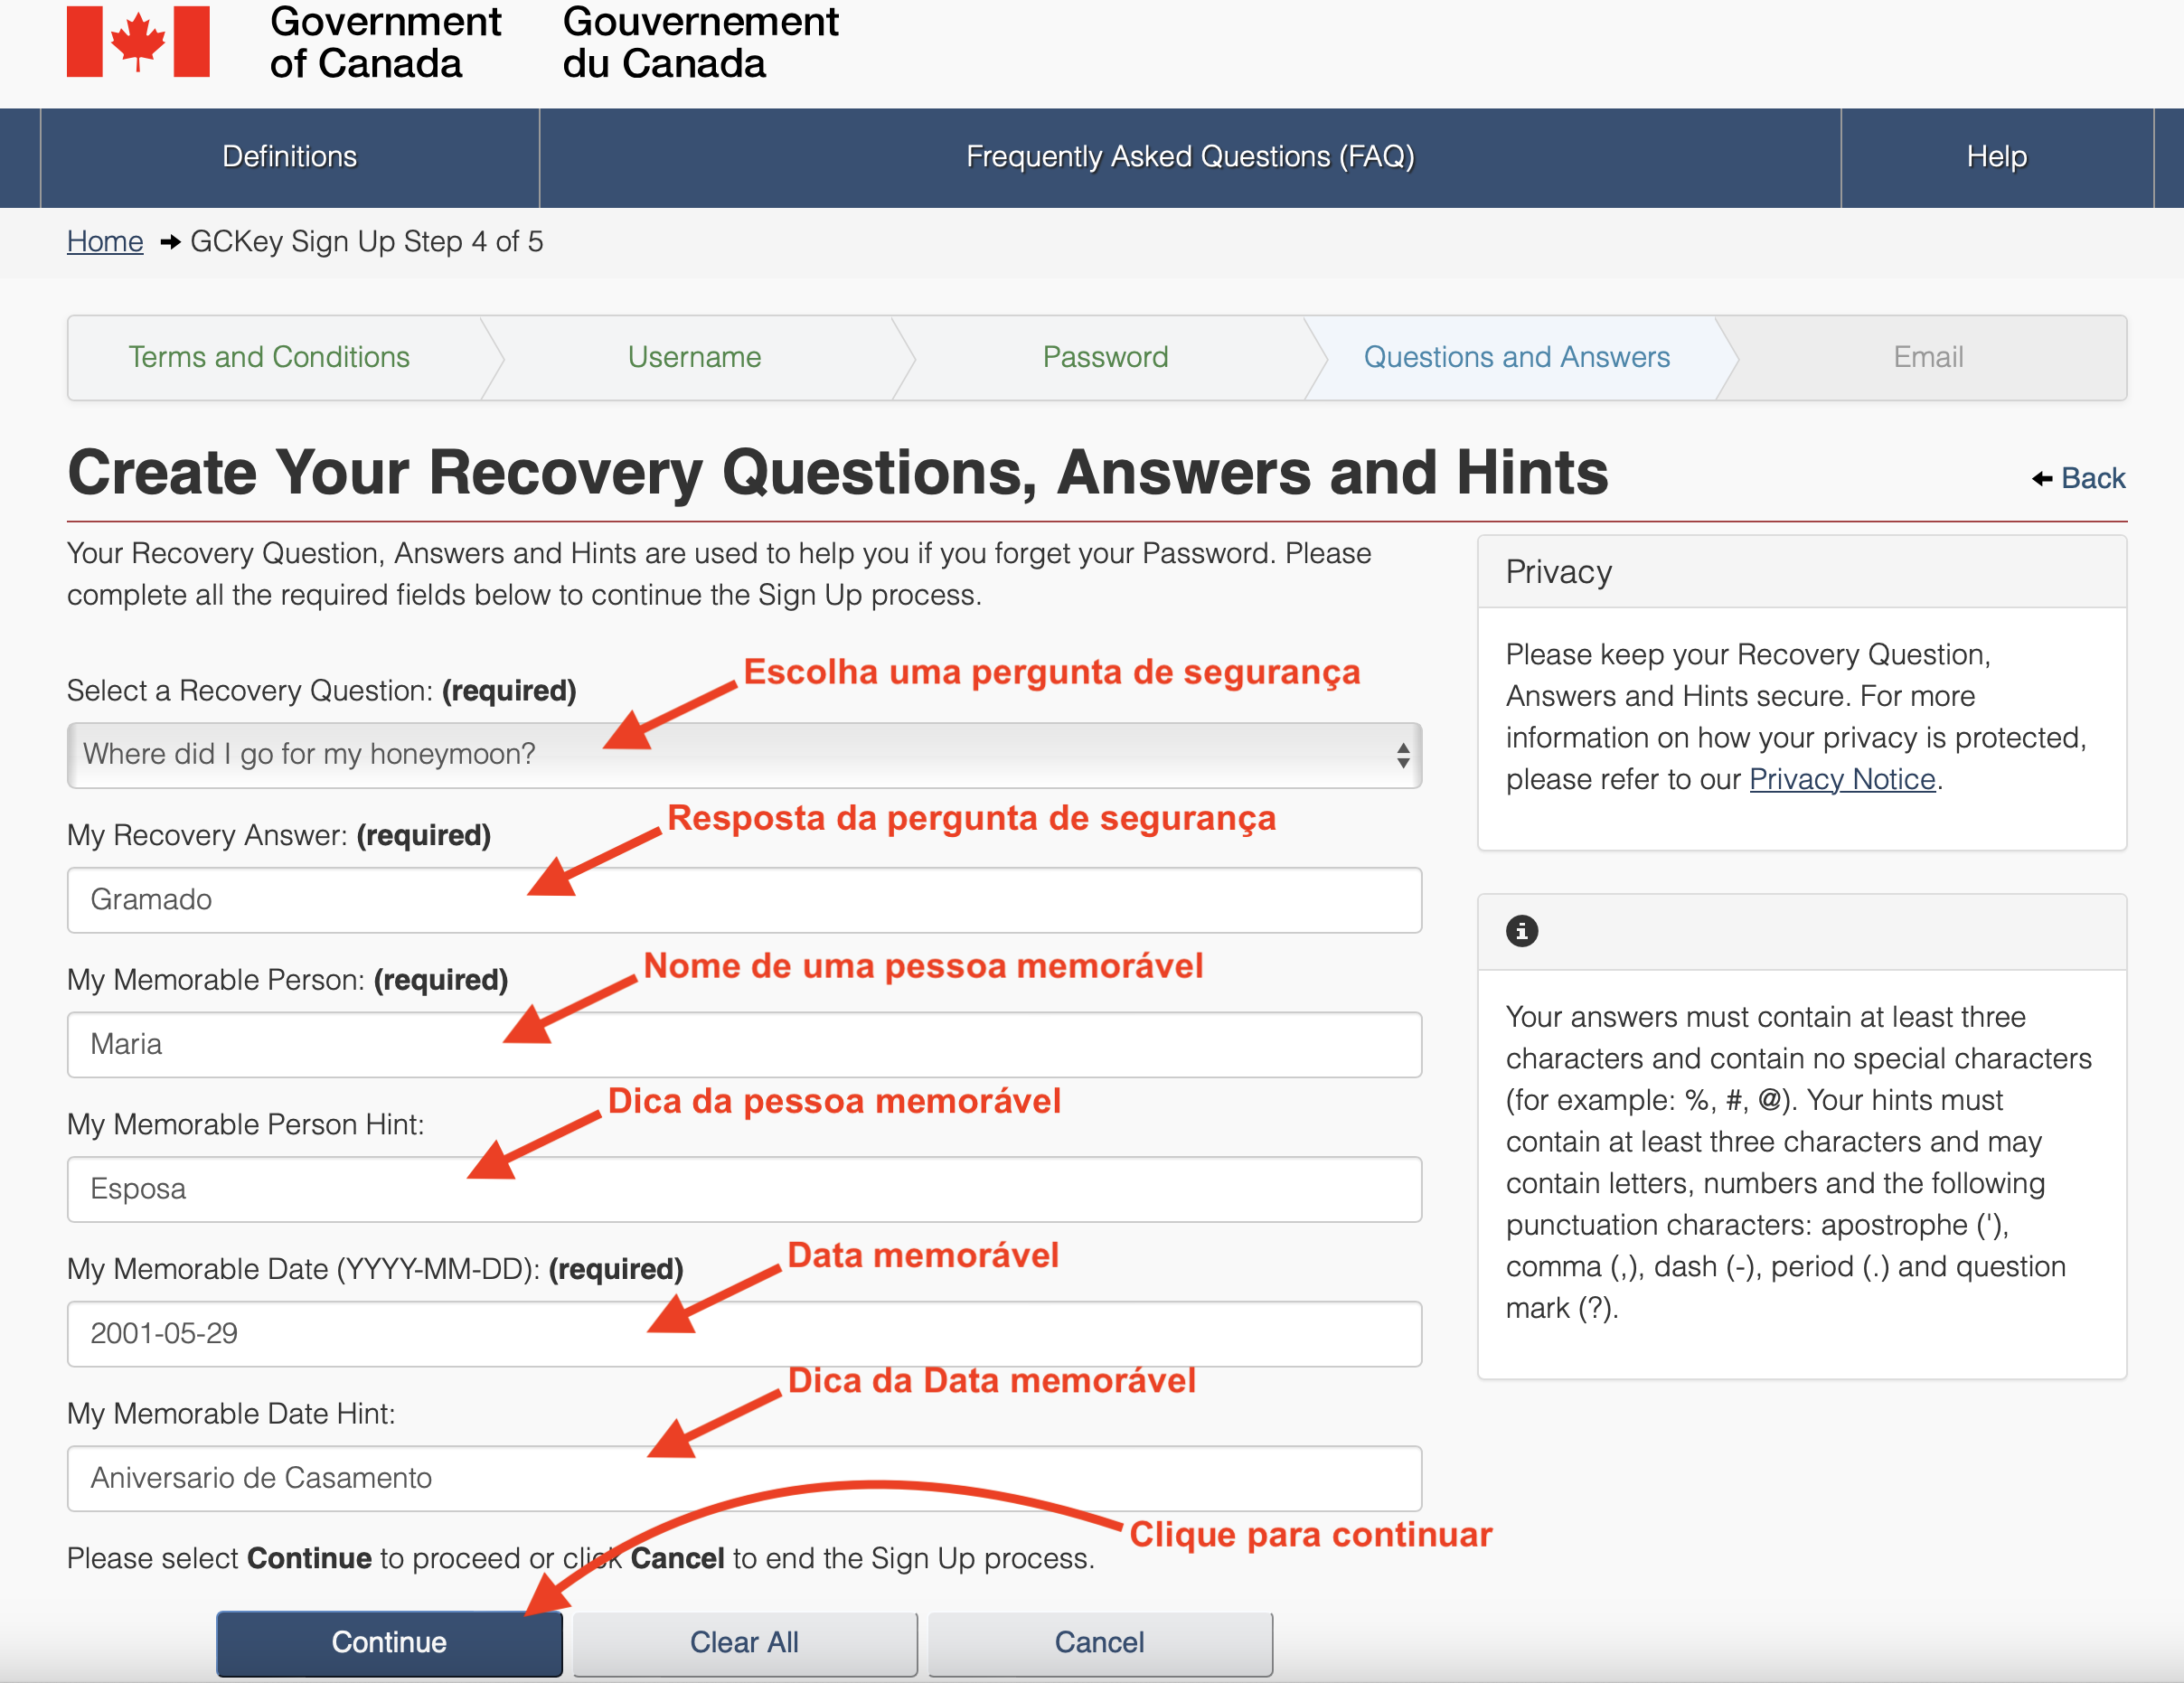
Screen 11 | Step-by-Step Guide: Create an Account on the Canadian Immigration Website
5. Complete the email verification and account recovery steps
- Please provide a valid email address *IRCC will send a confirmation email
- Click on the verification link to activate your account
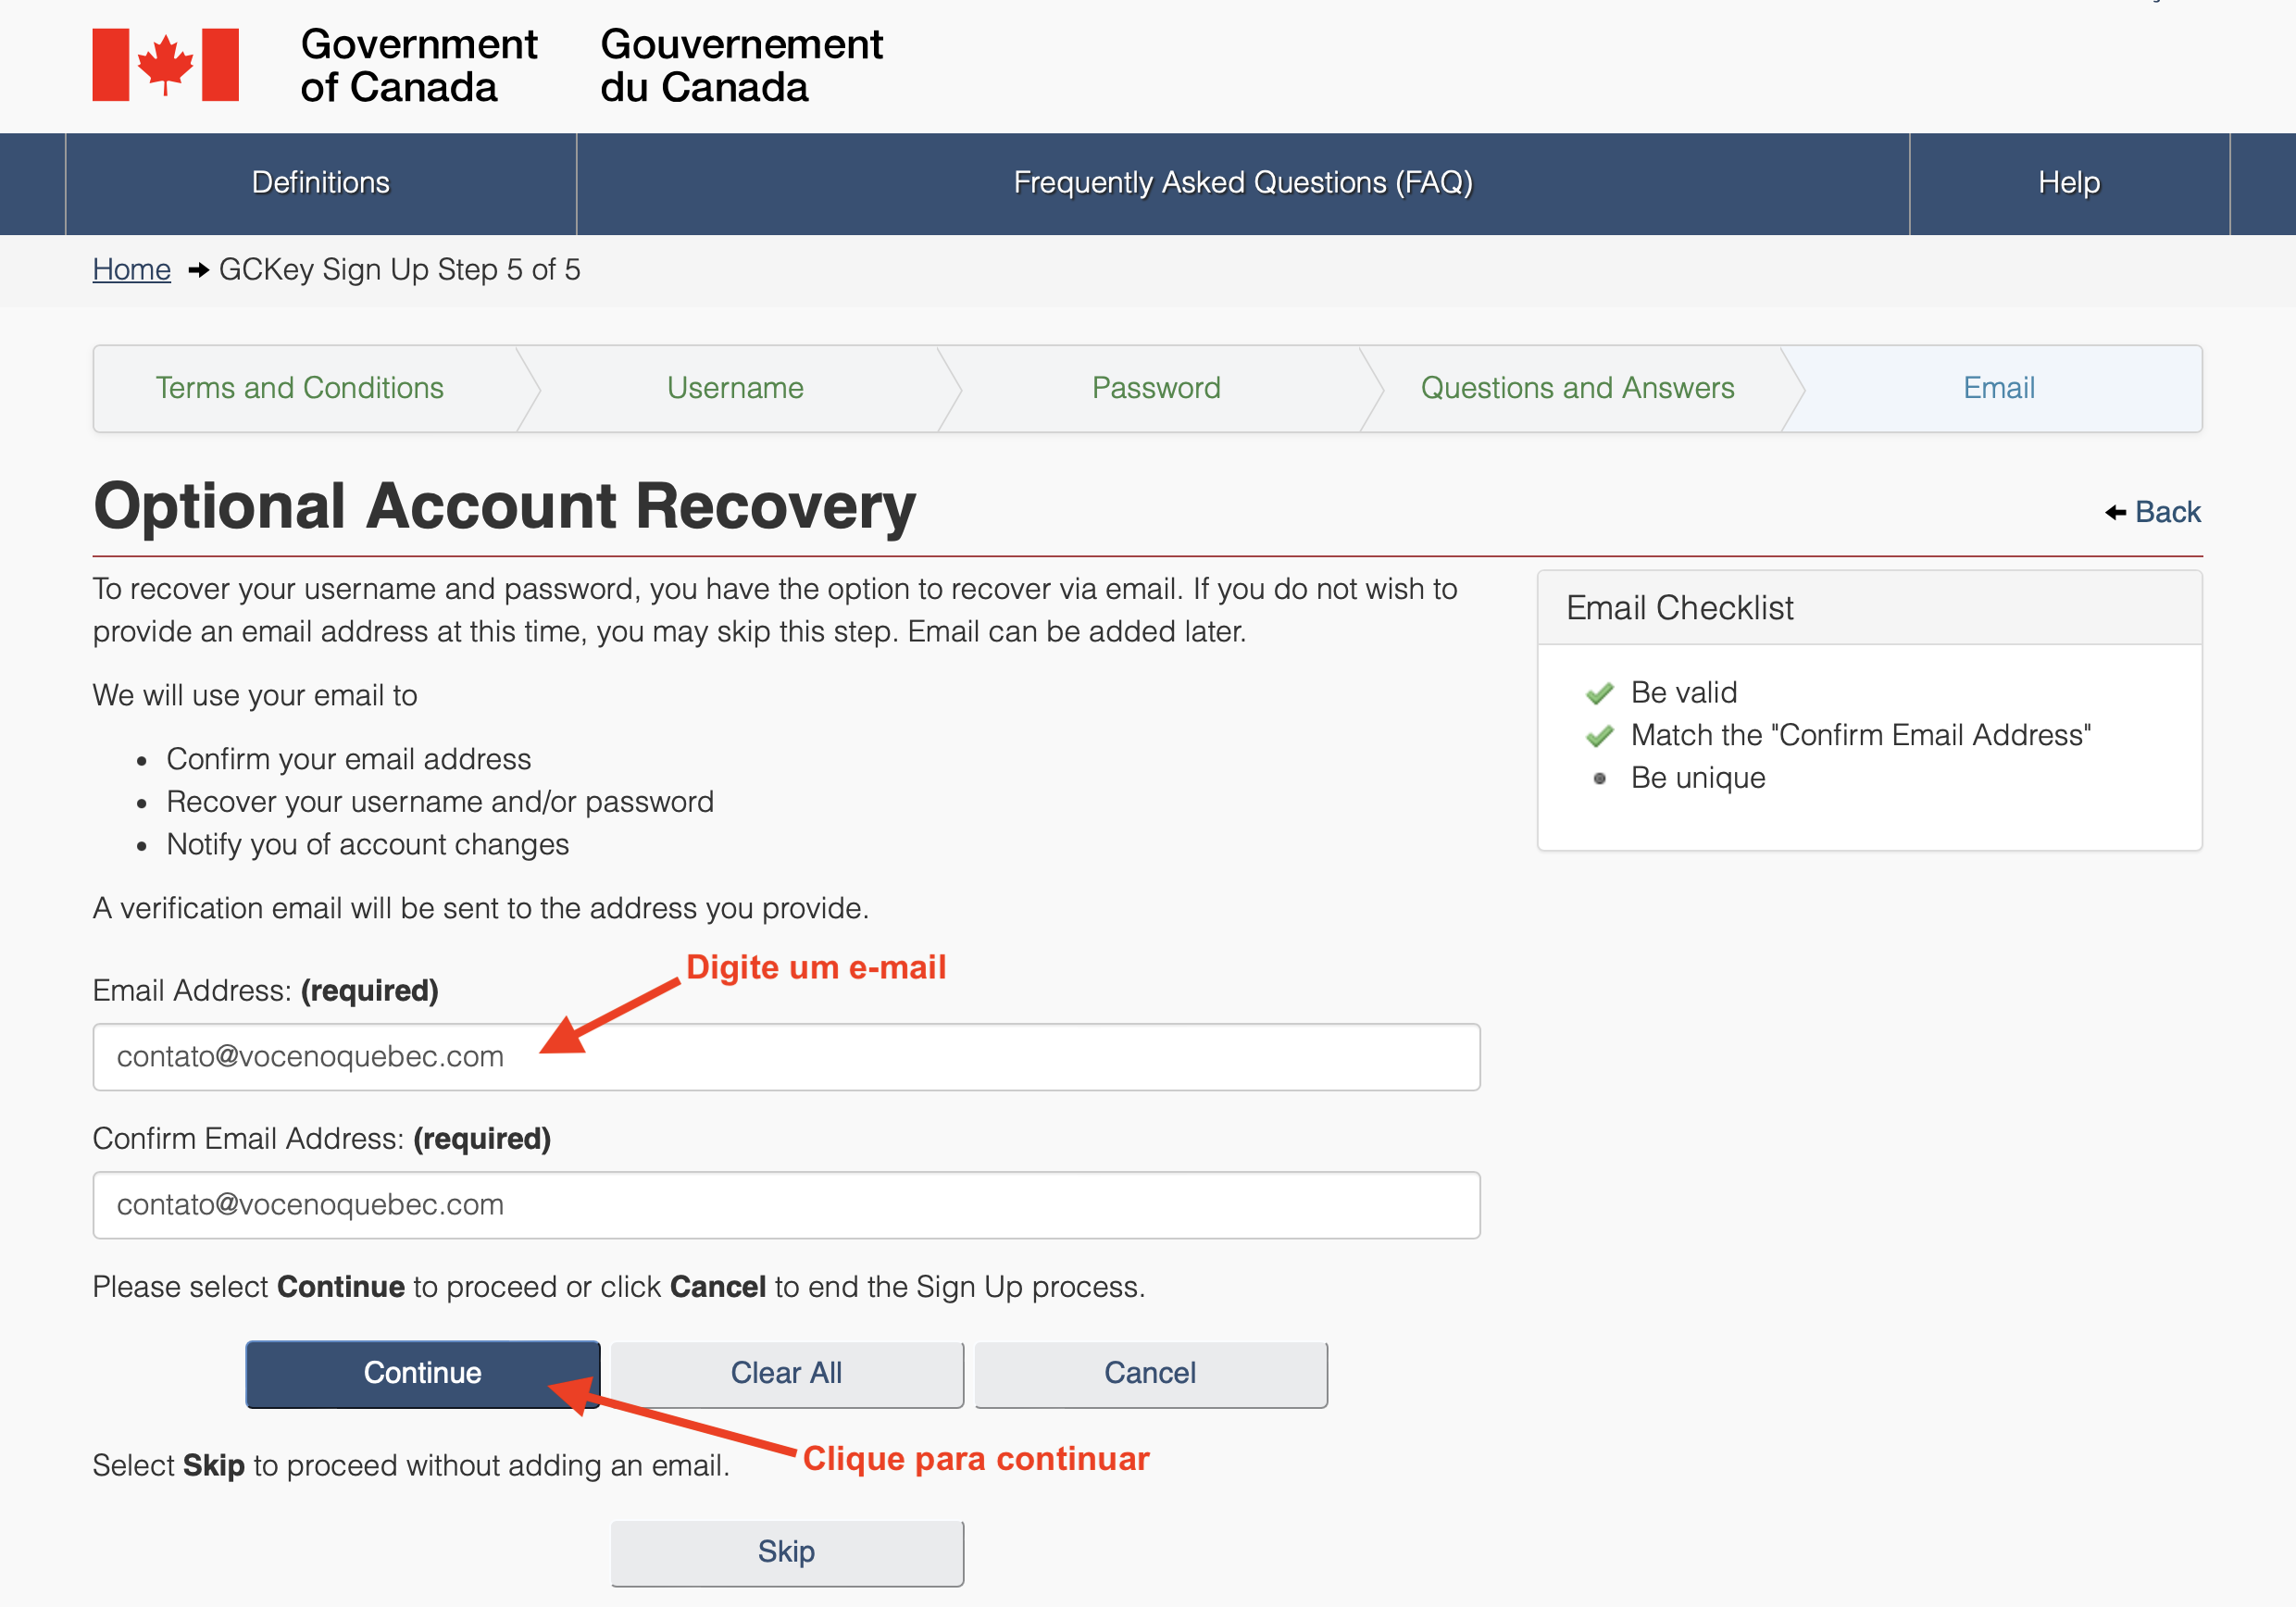
Screen 12 | Step-by-Step Guide: Create an Account on the Canadian Immigration Website
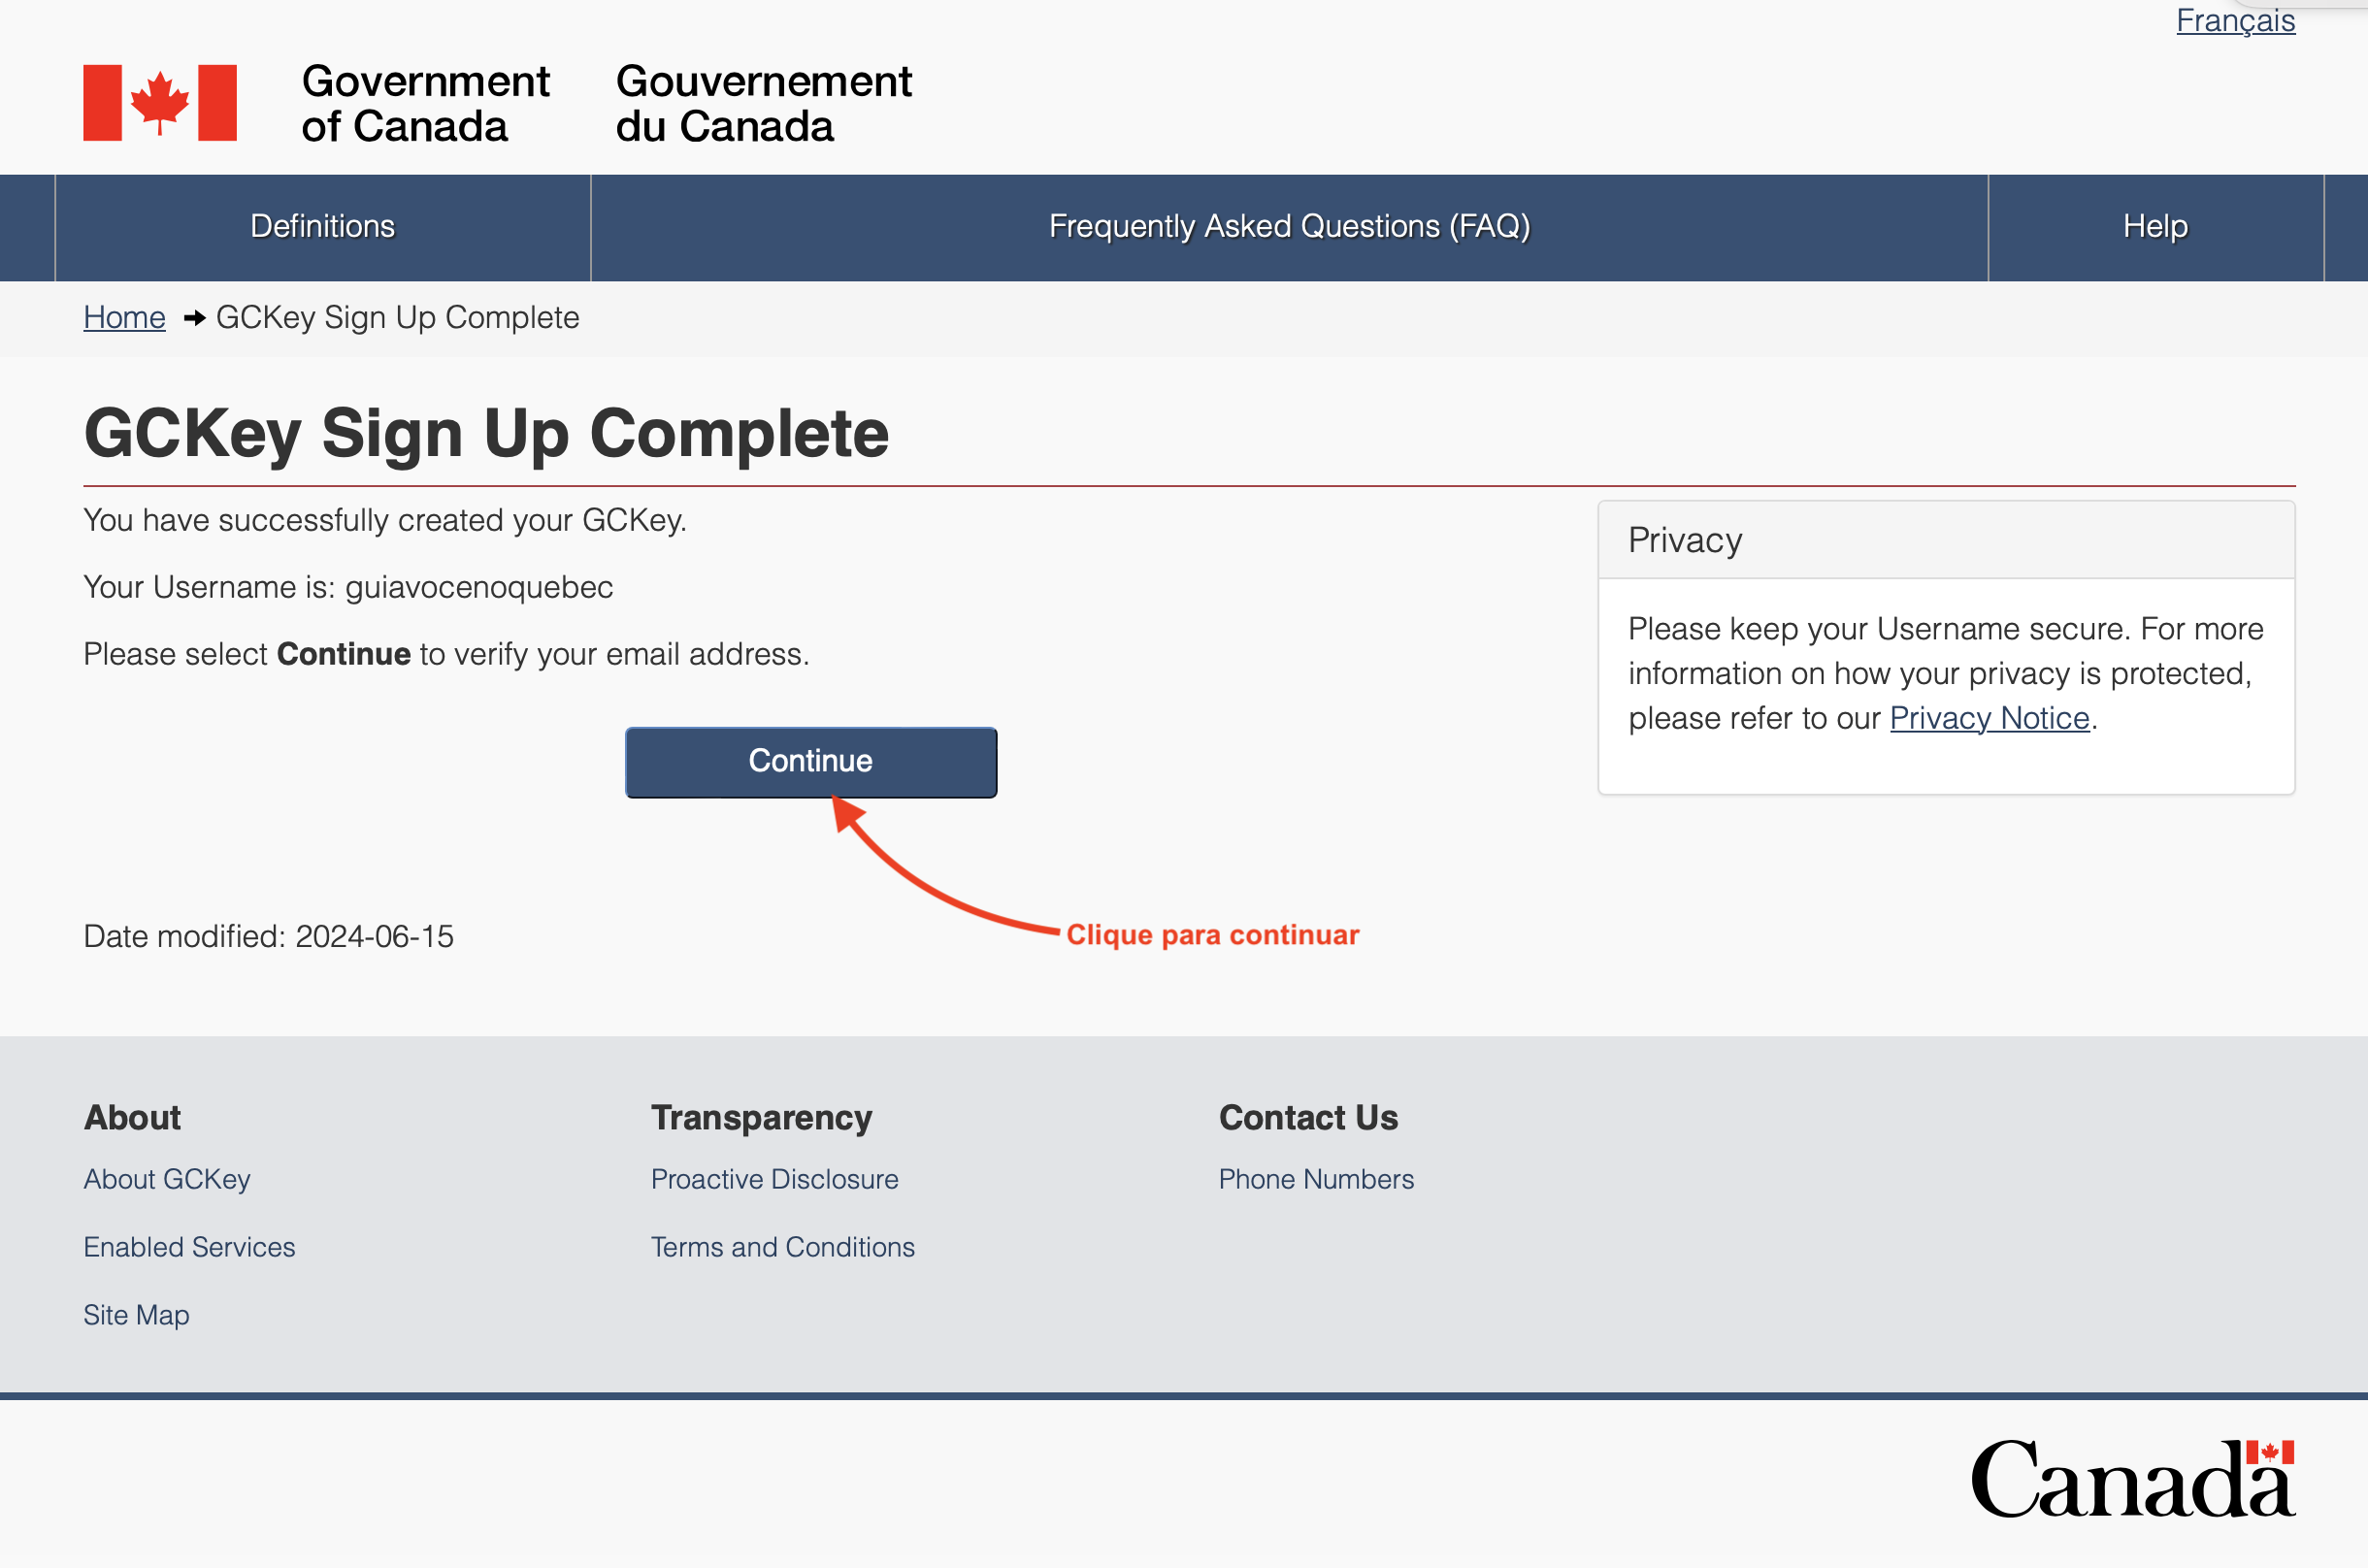
Screen 13 | Step-by-Step Guide: Create an Account on the Canadian Immigration Website
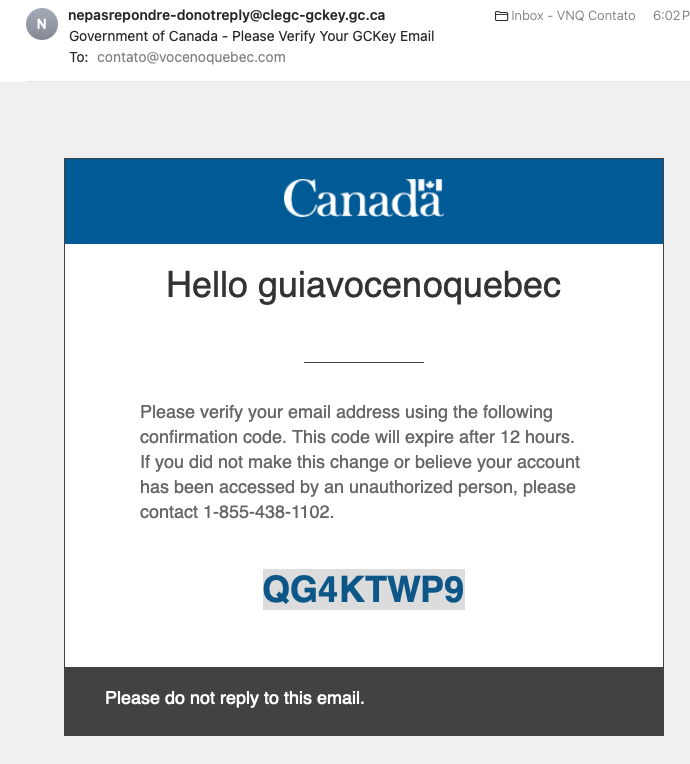
Screen 14 | Step-by-Step Guide: Create an Account on the Canadian Immigration Website
Instruction Screen 14: Check your email account using the registration process to see if you have received a confirmation email from IRCC containing a code. Copy this code and use it in the next step.
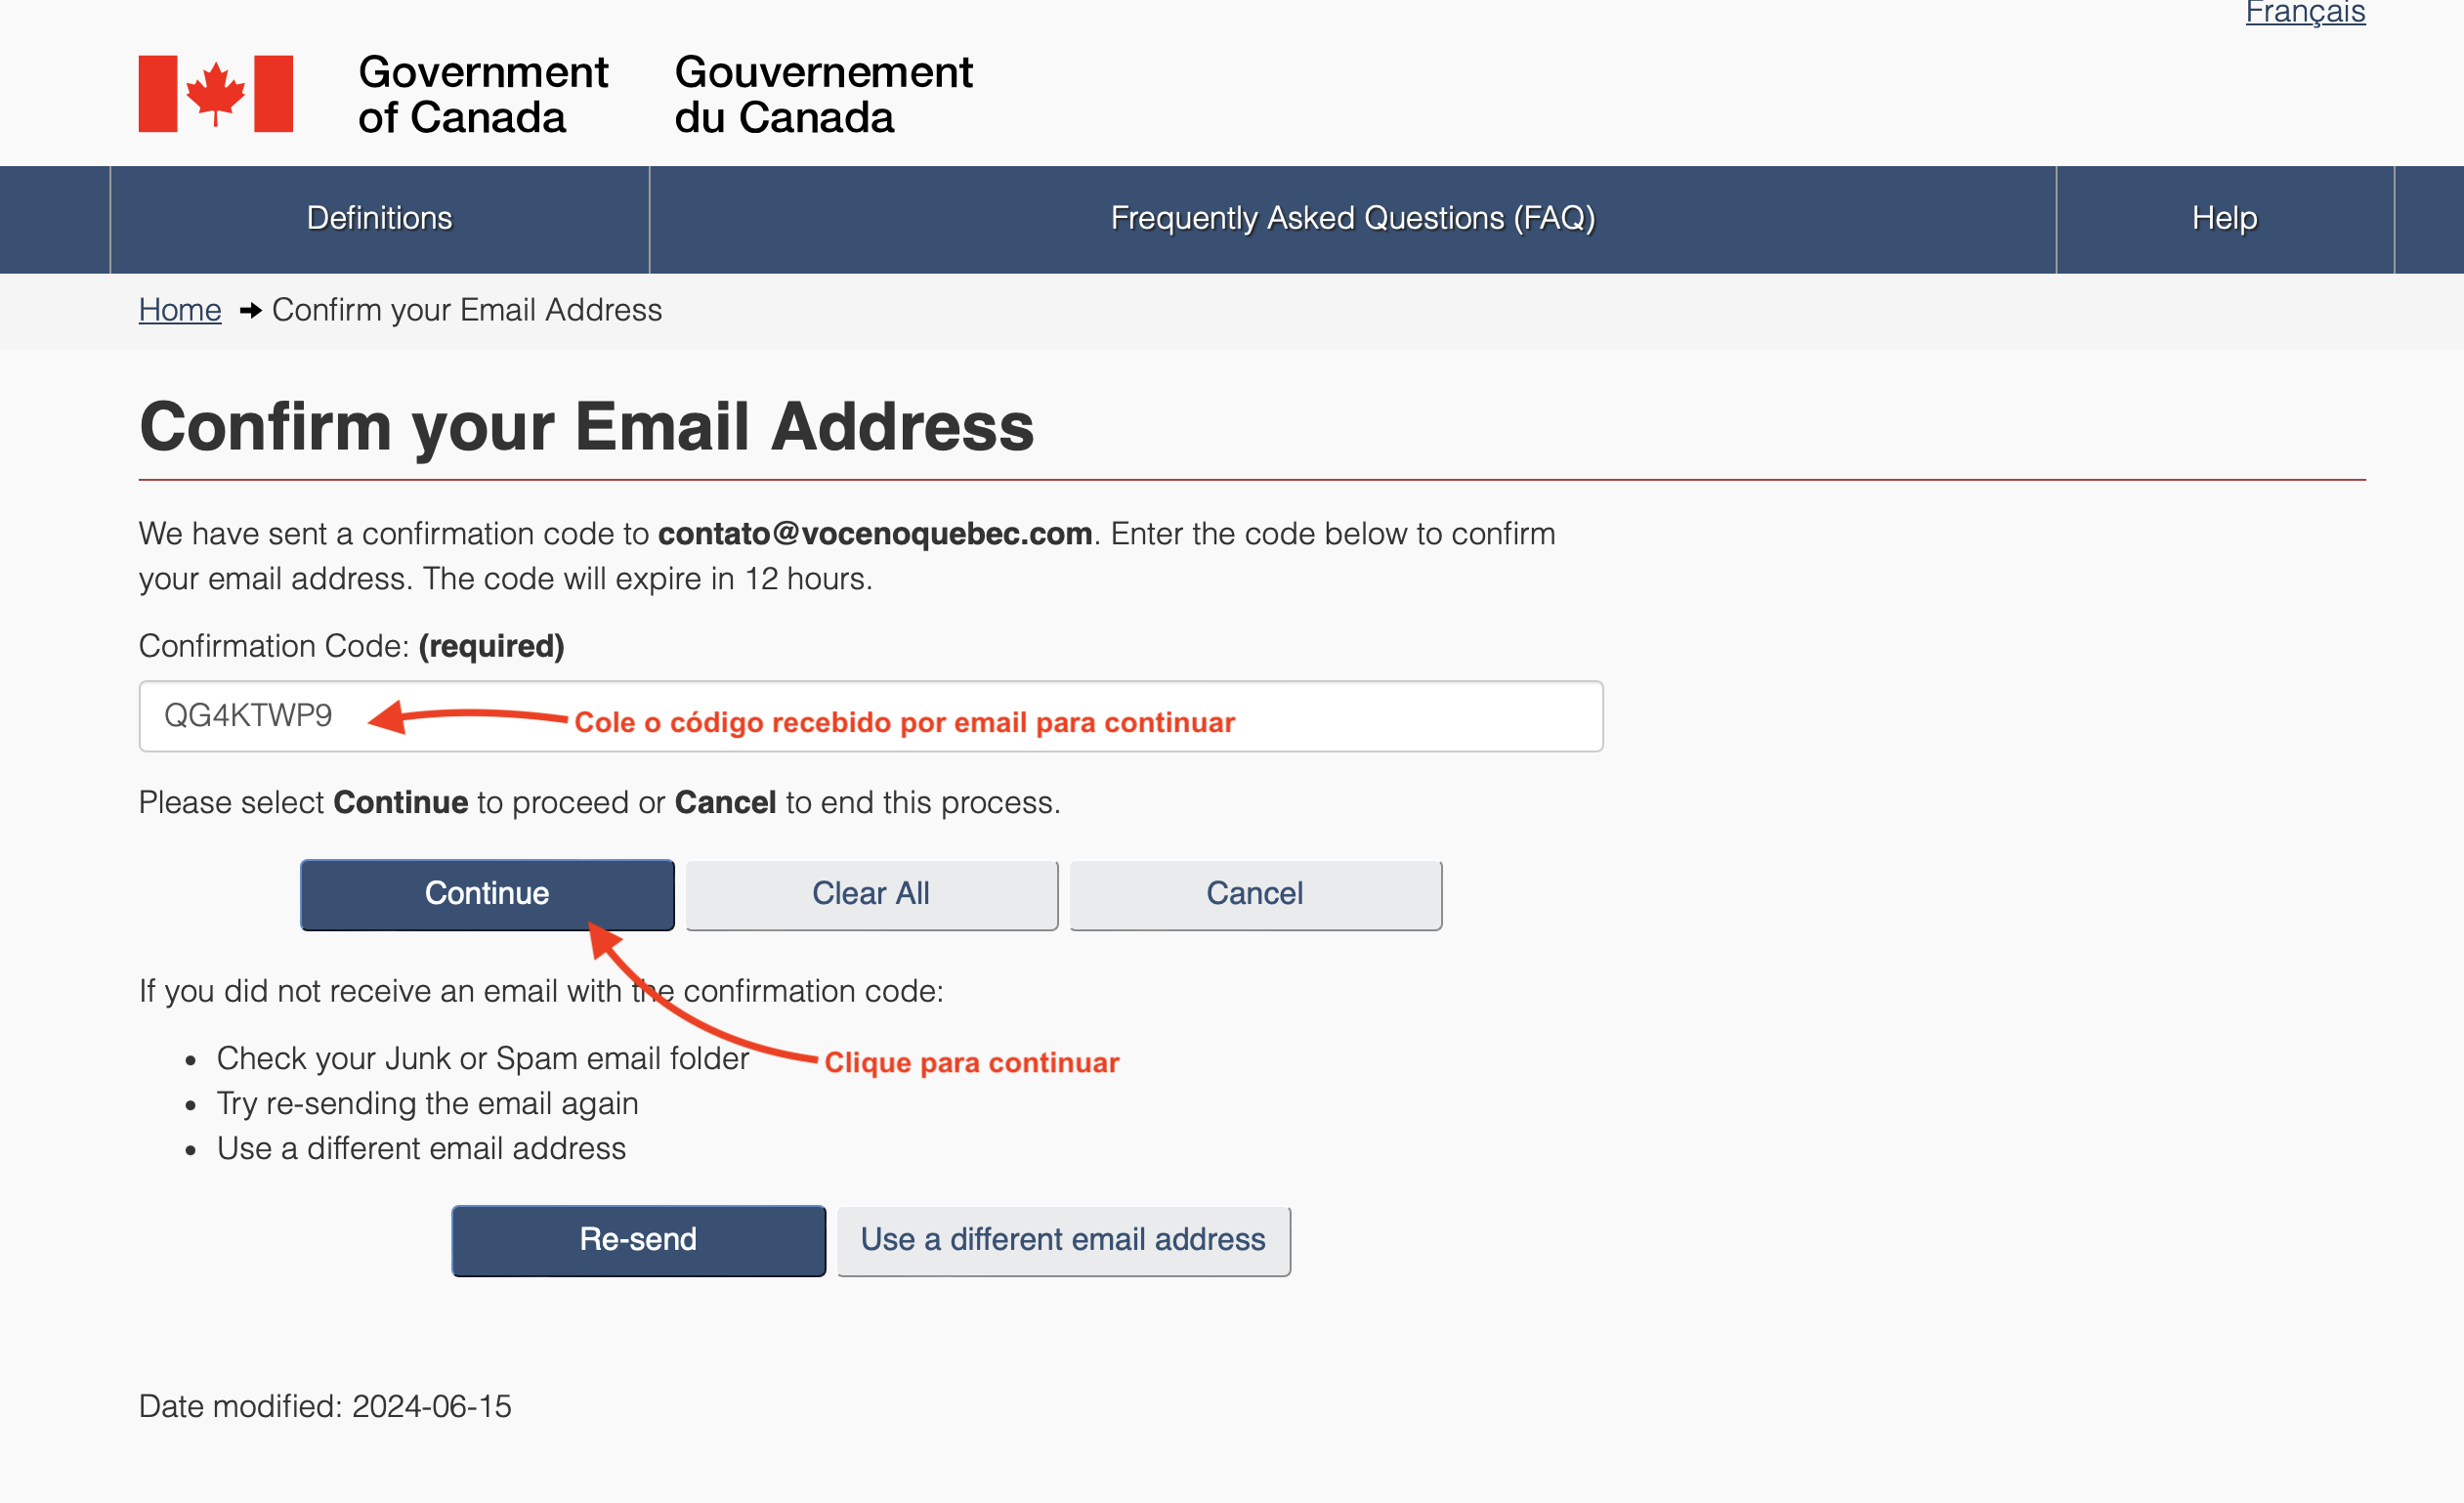
Screen 15 | Step-by-Step Guide: Create an Account on the Canadian Immigration Website
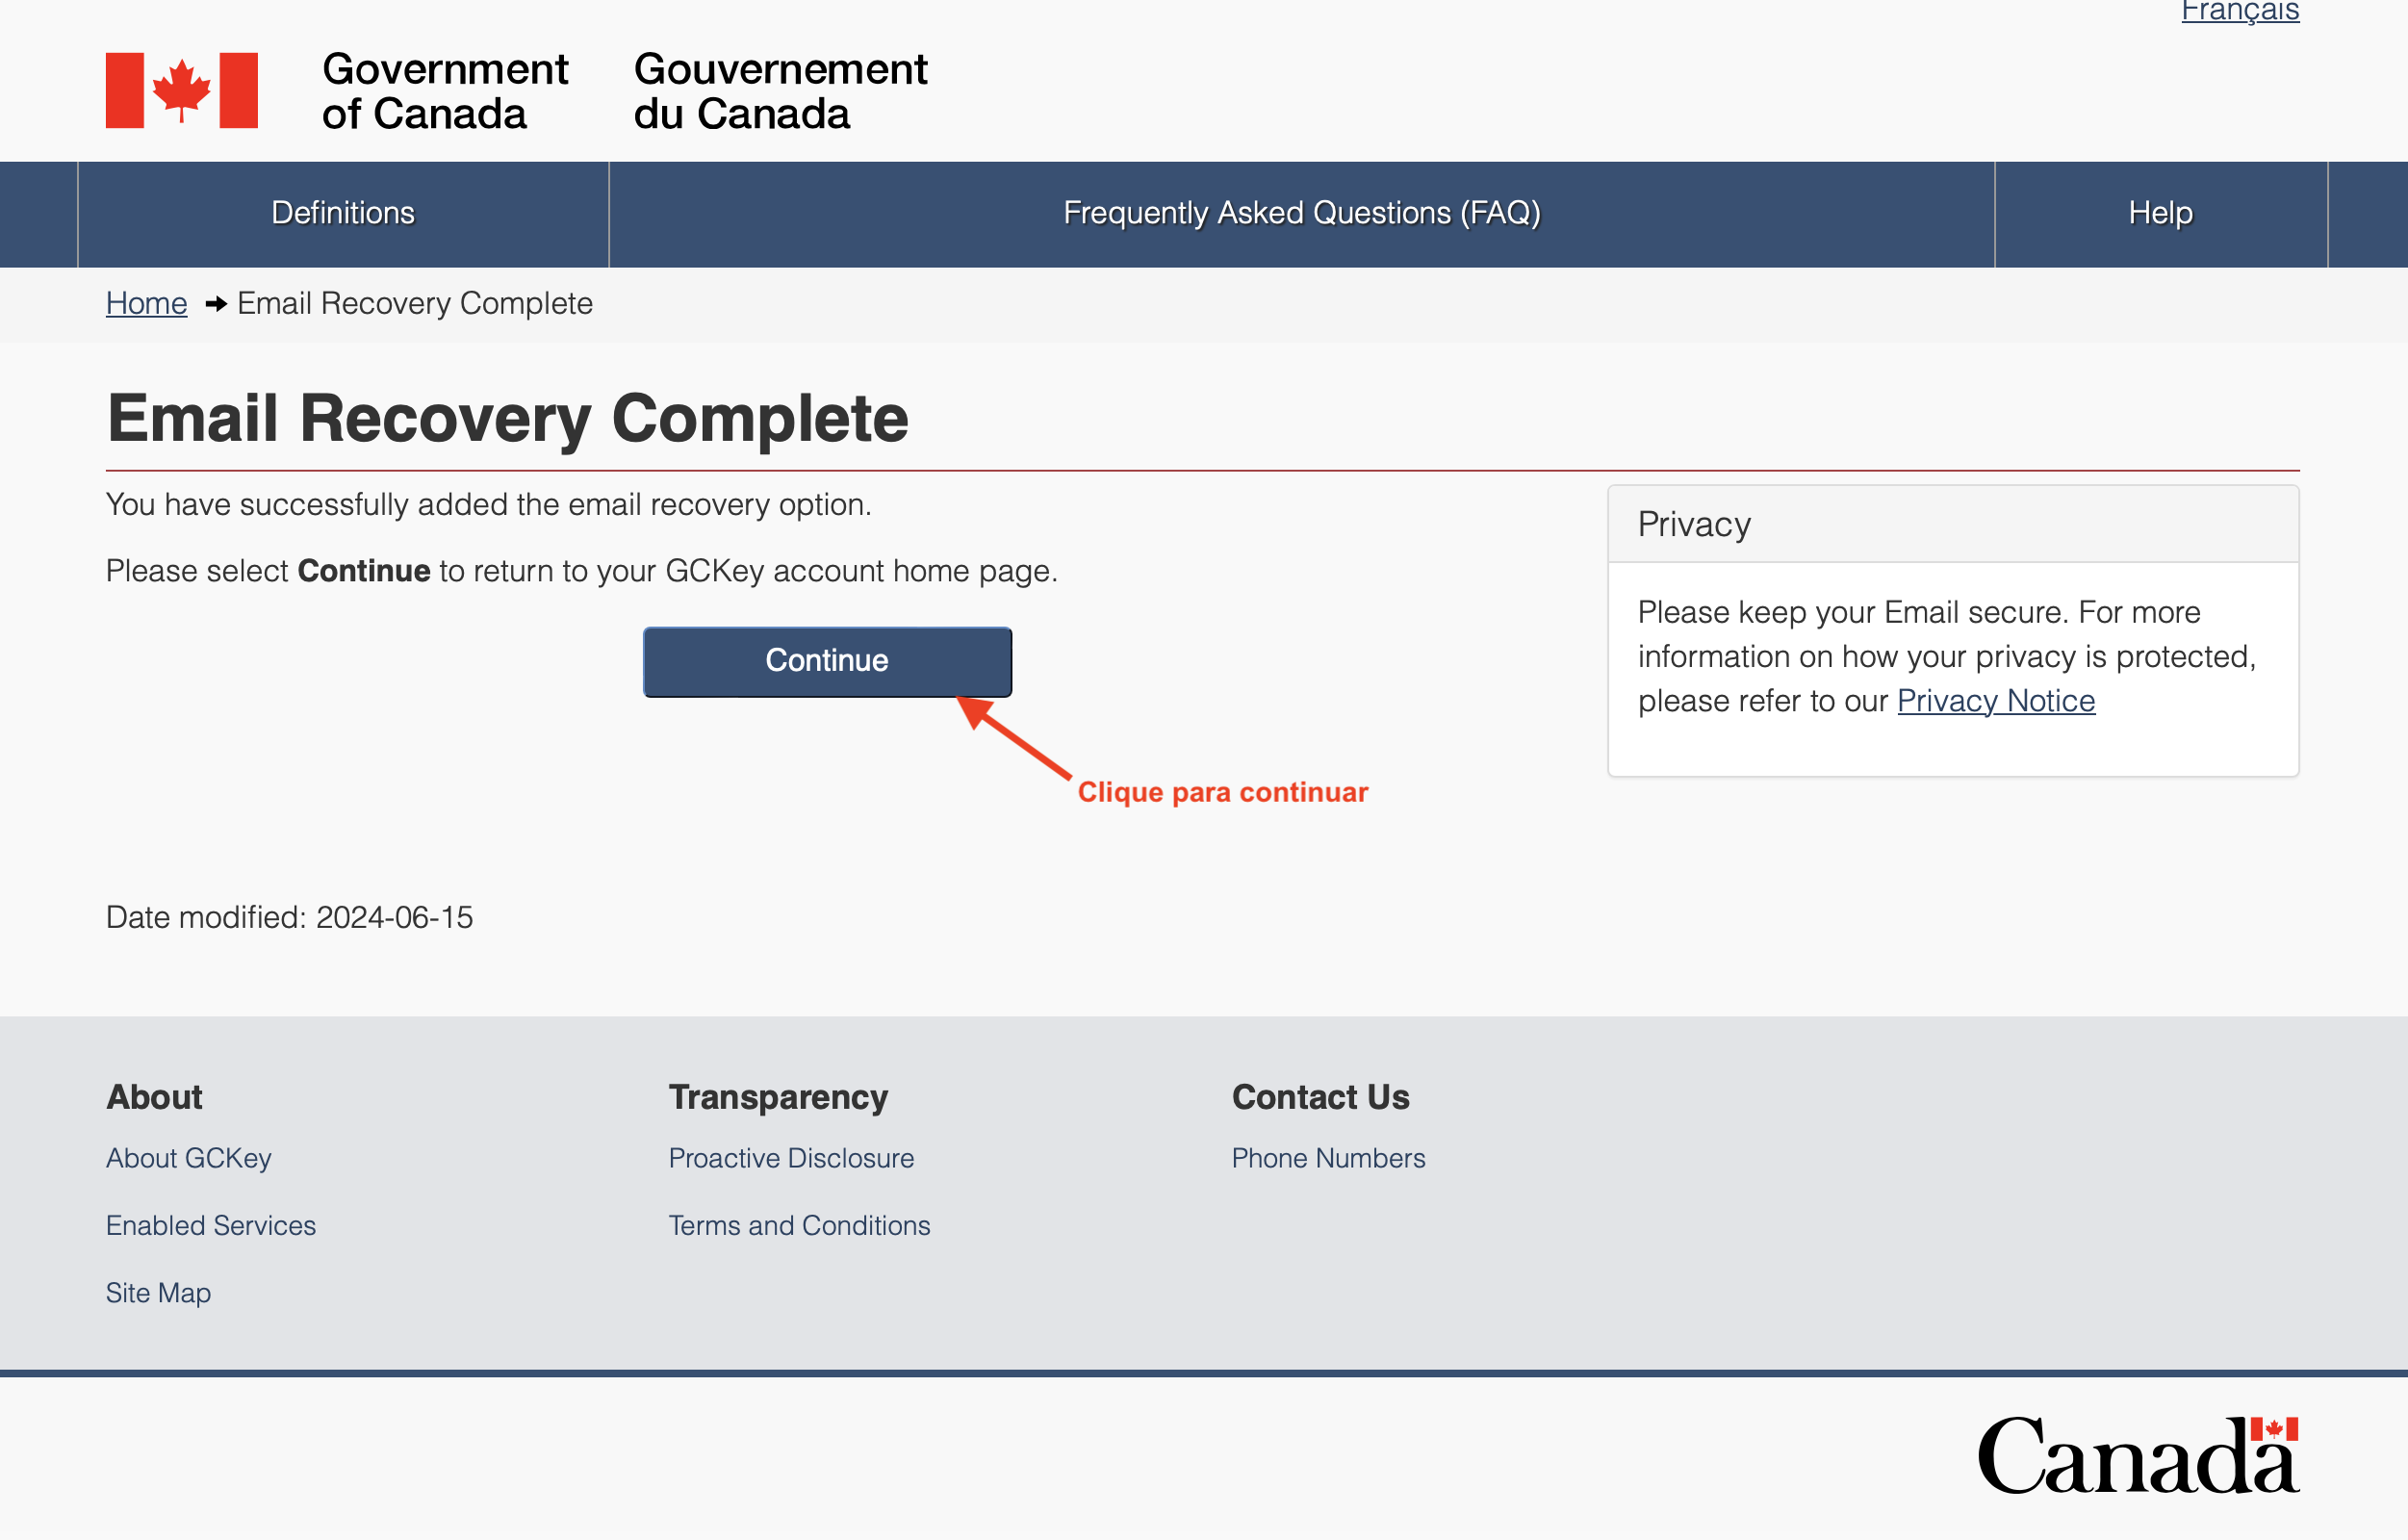
Screen 16 | Step-by-Step Guide: Create an Account on the Canadian Immigration Website
6. Create a two-factor security check
To simplify the process, I will use the two-factor authentication process through an email account, but you can opt for other methods.
- Provide a valid email address (it can be the same email address you used to create your account or another address you wish)
- Follow the same confirmation steps as the previous step
- Save access recovery codes in a safe place
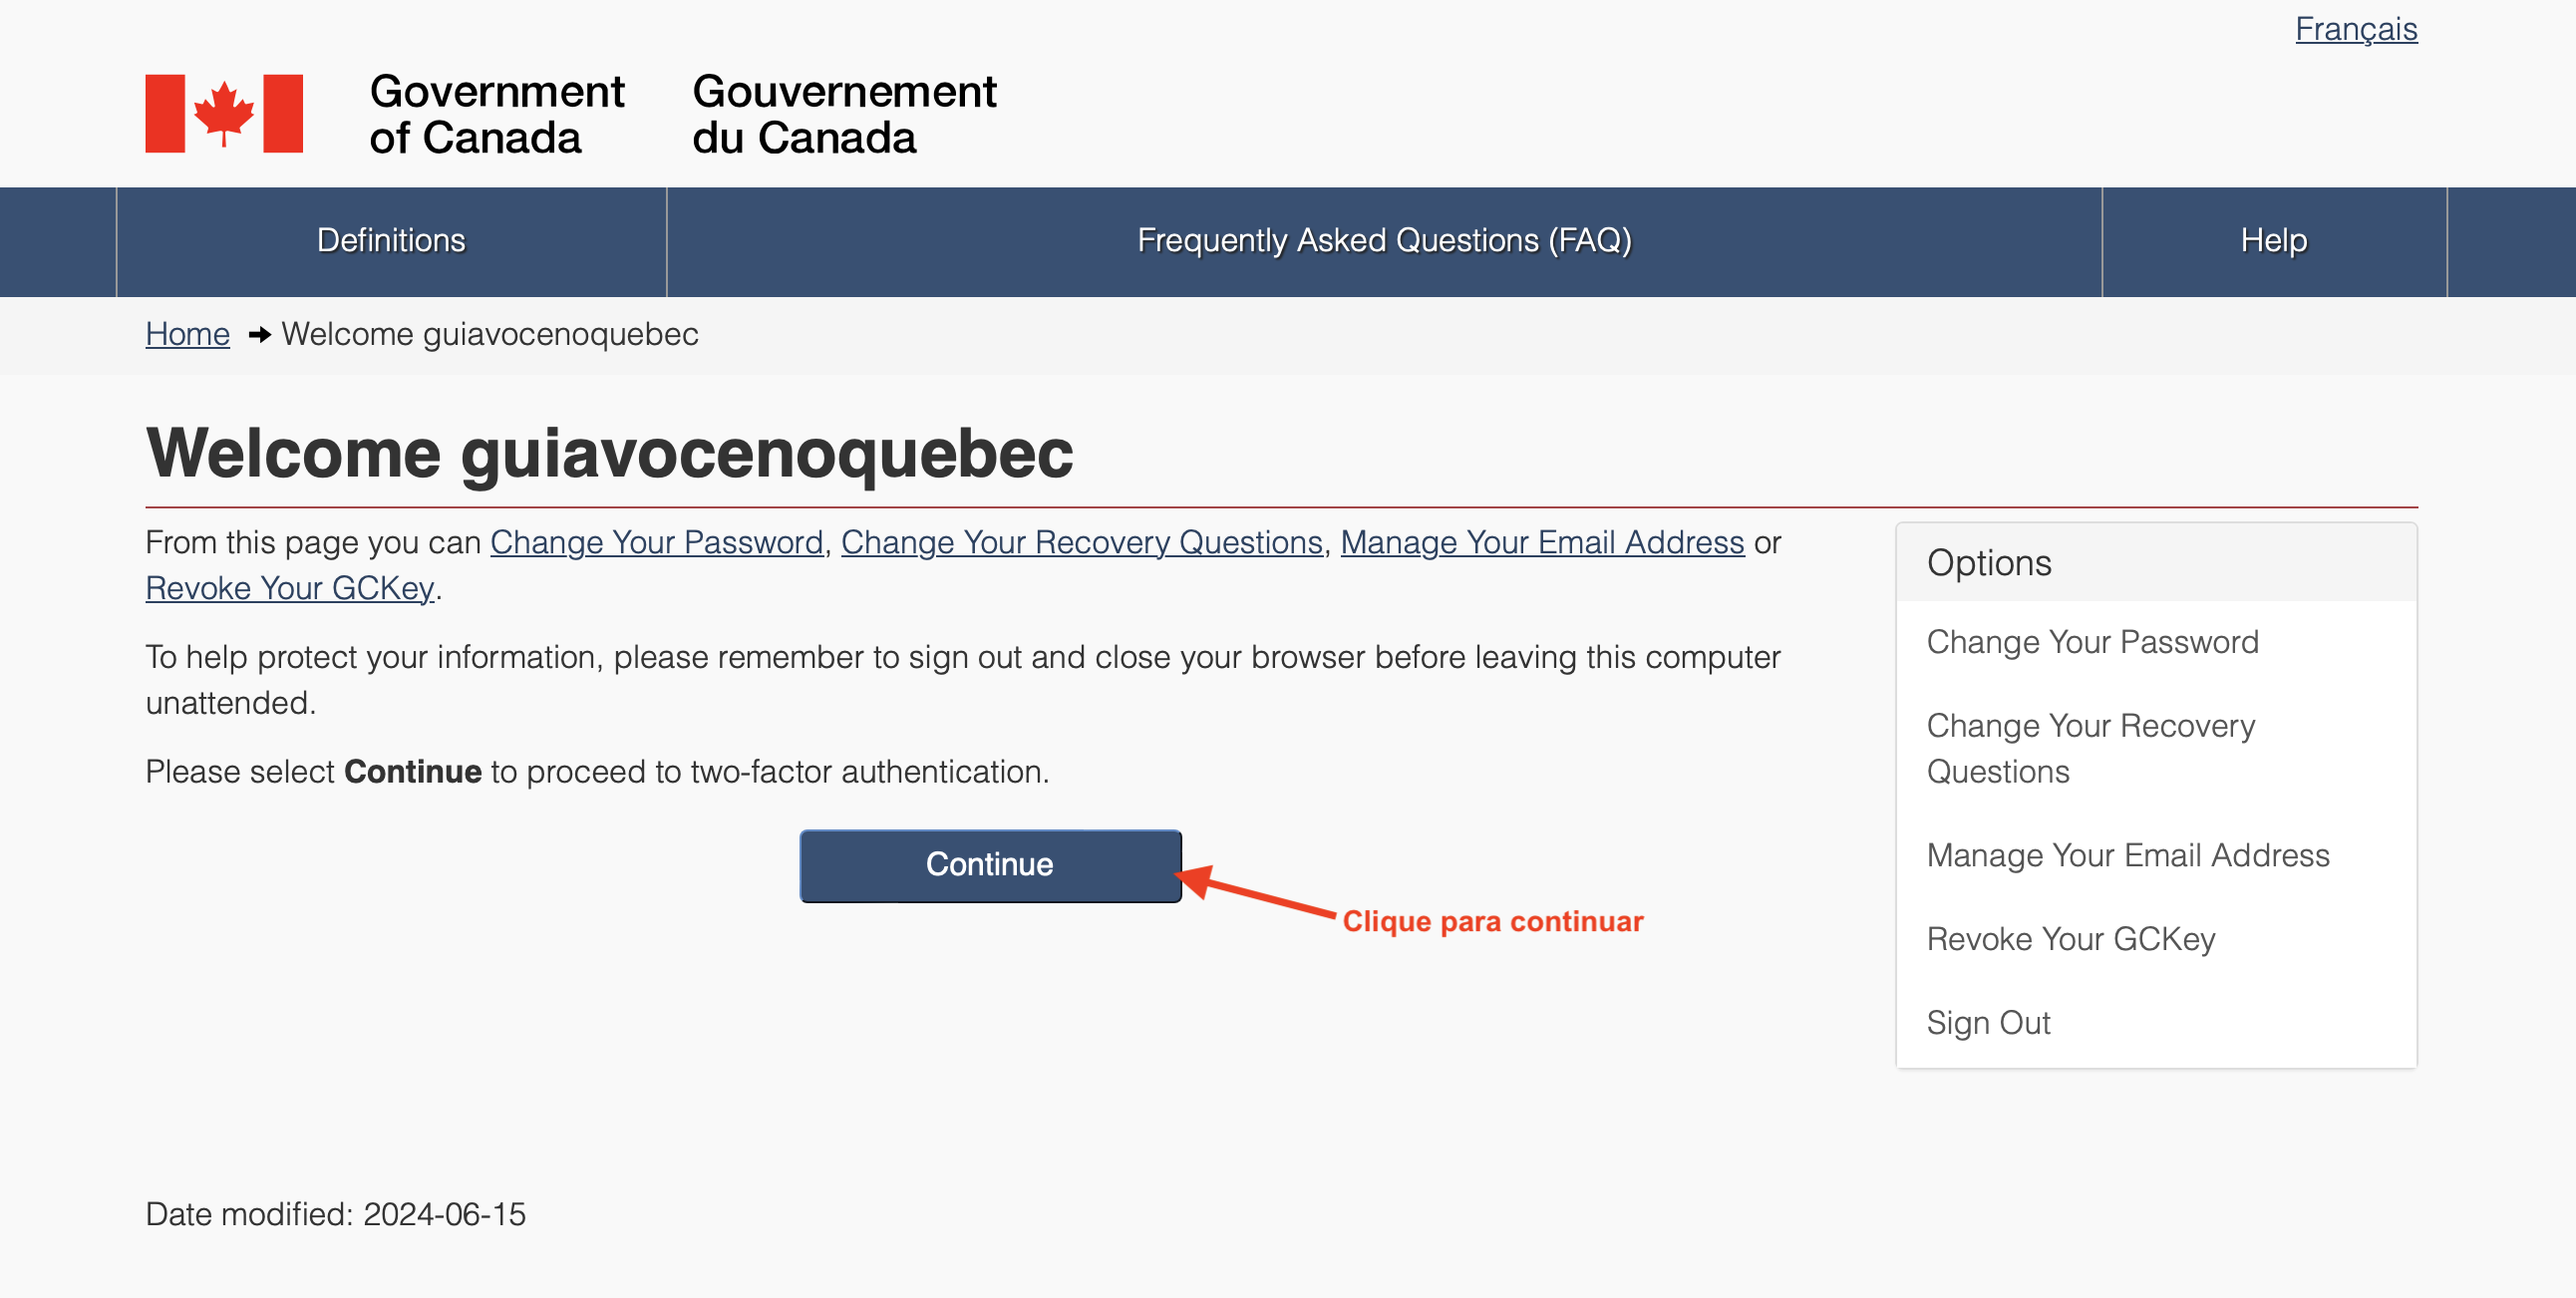
Screen 17 | Step-by-Step Guide: Create an Account on the Canadian Immigration Website
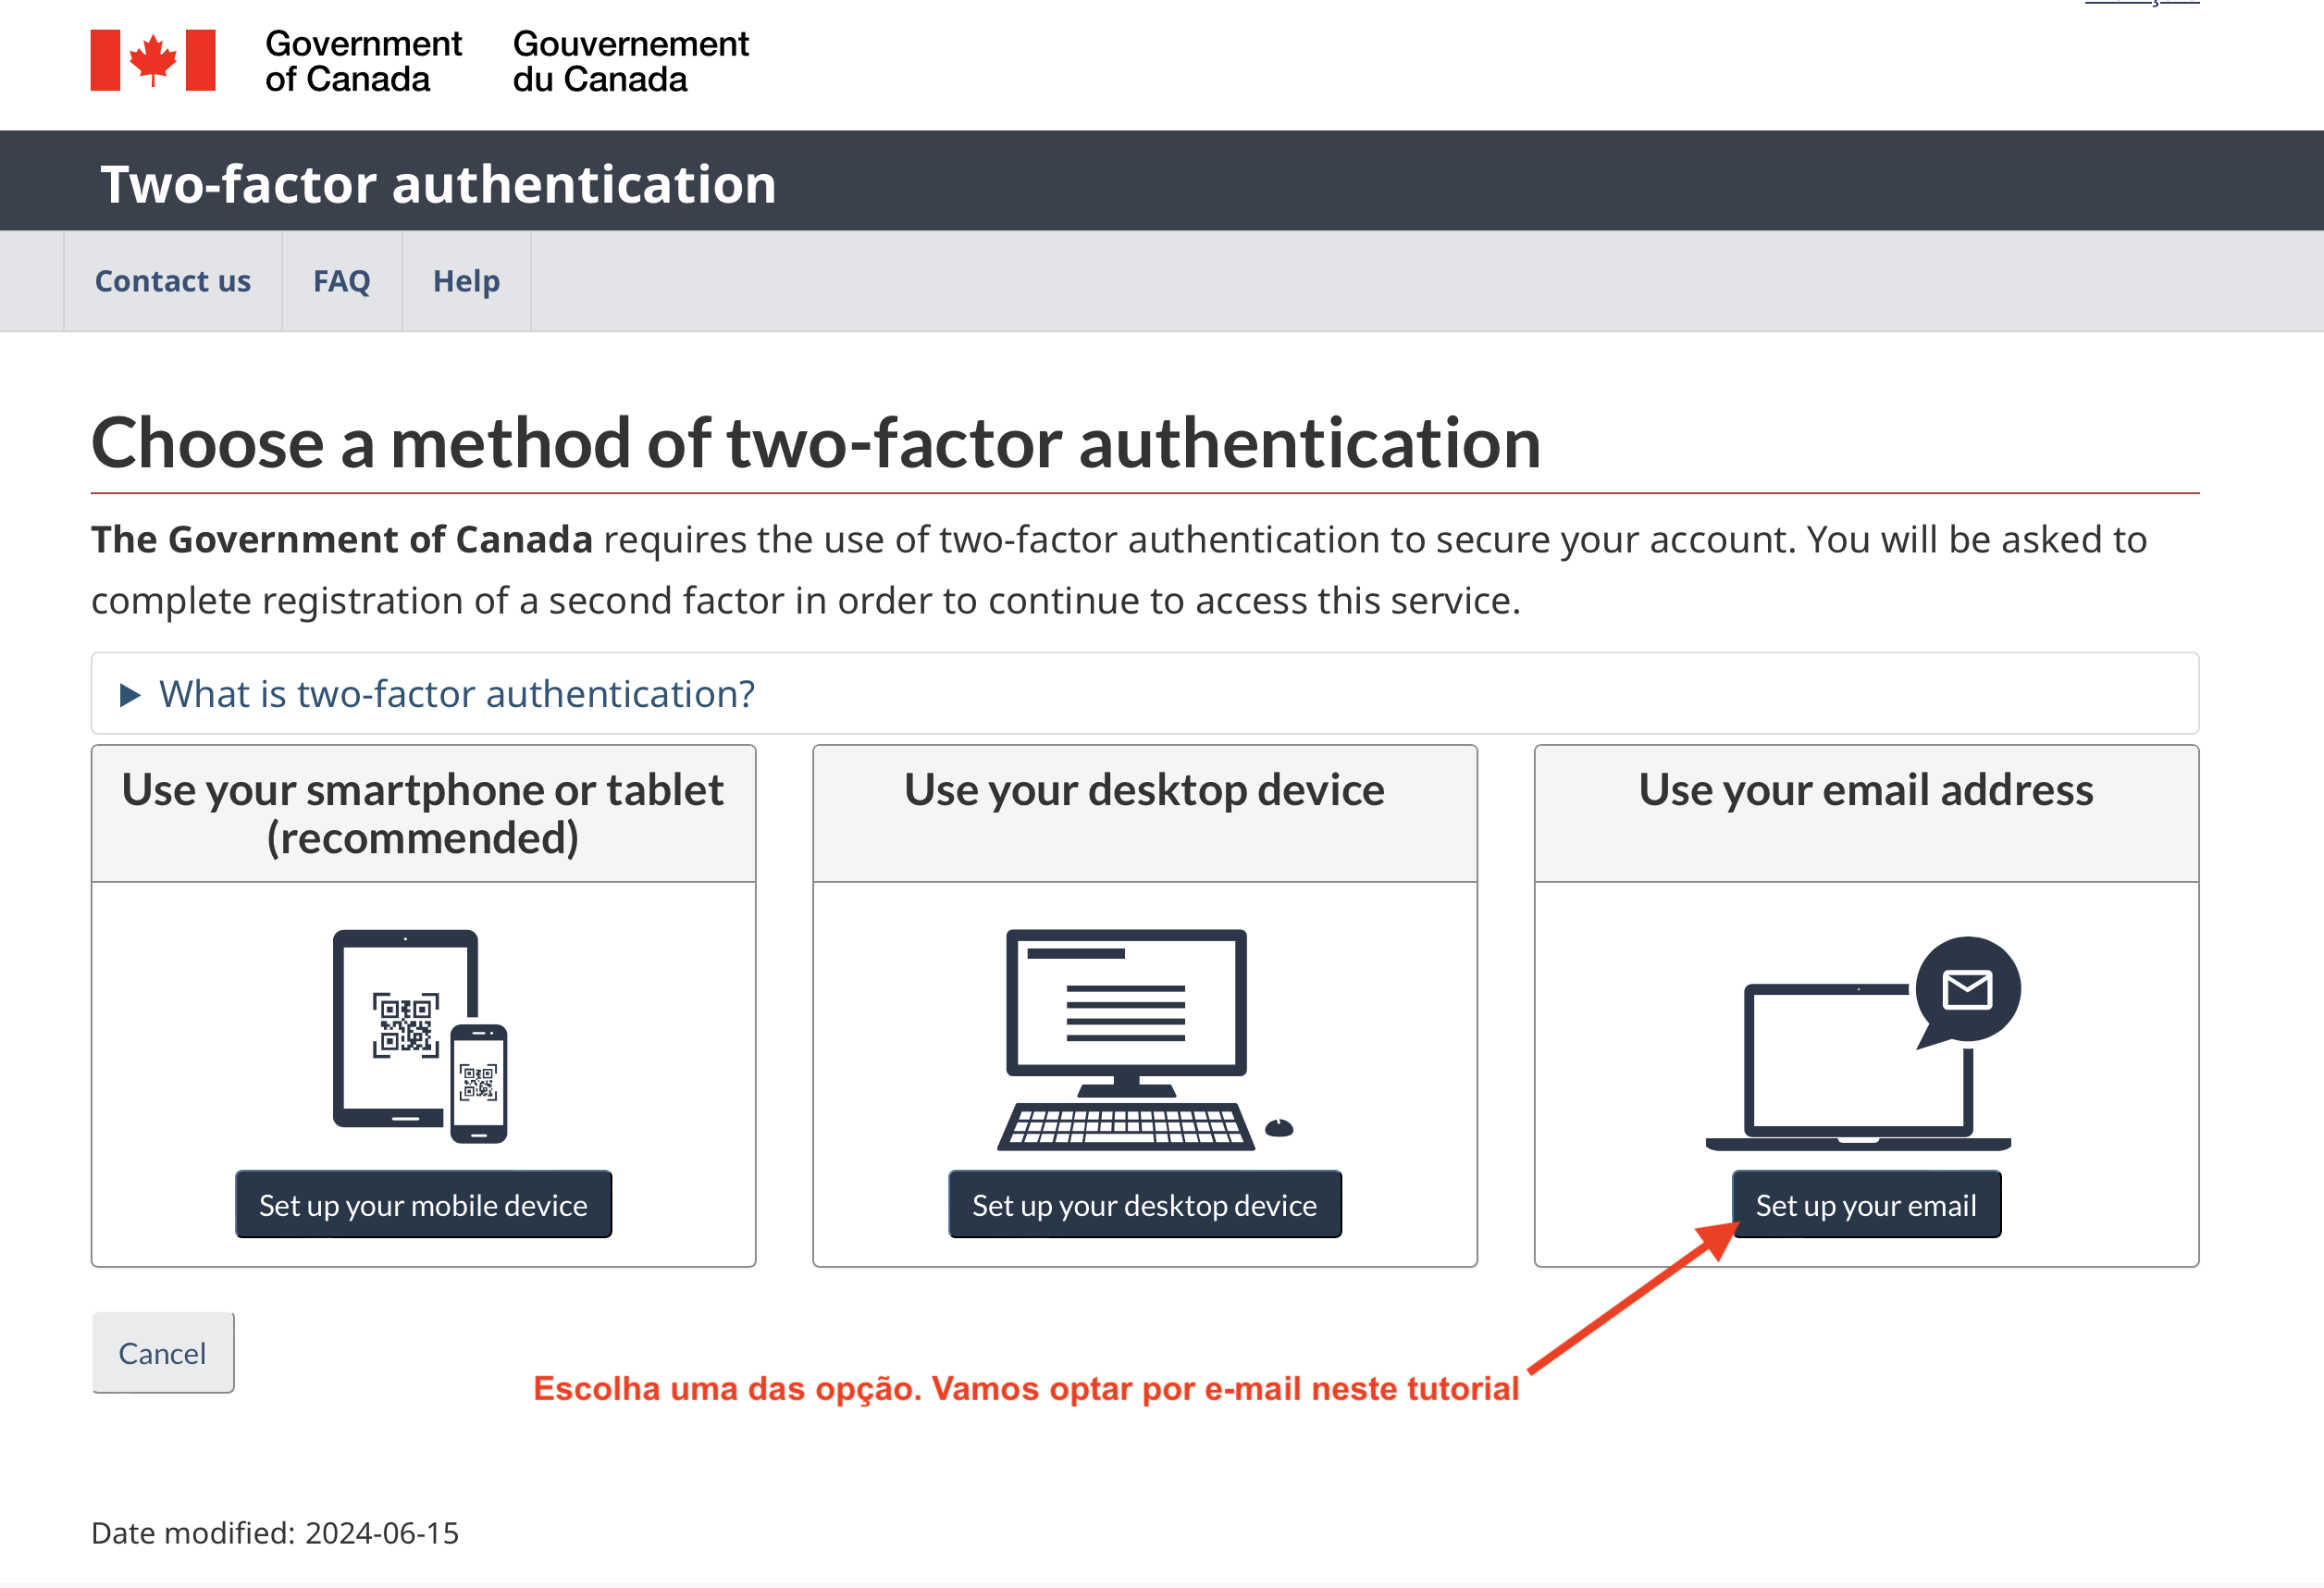
Screen 18 | Step-by-Step Guide: Create an Account on the Canadian Immigration Website
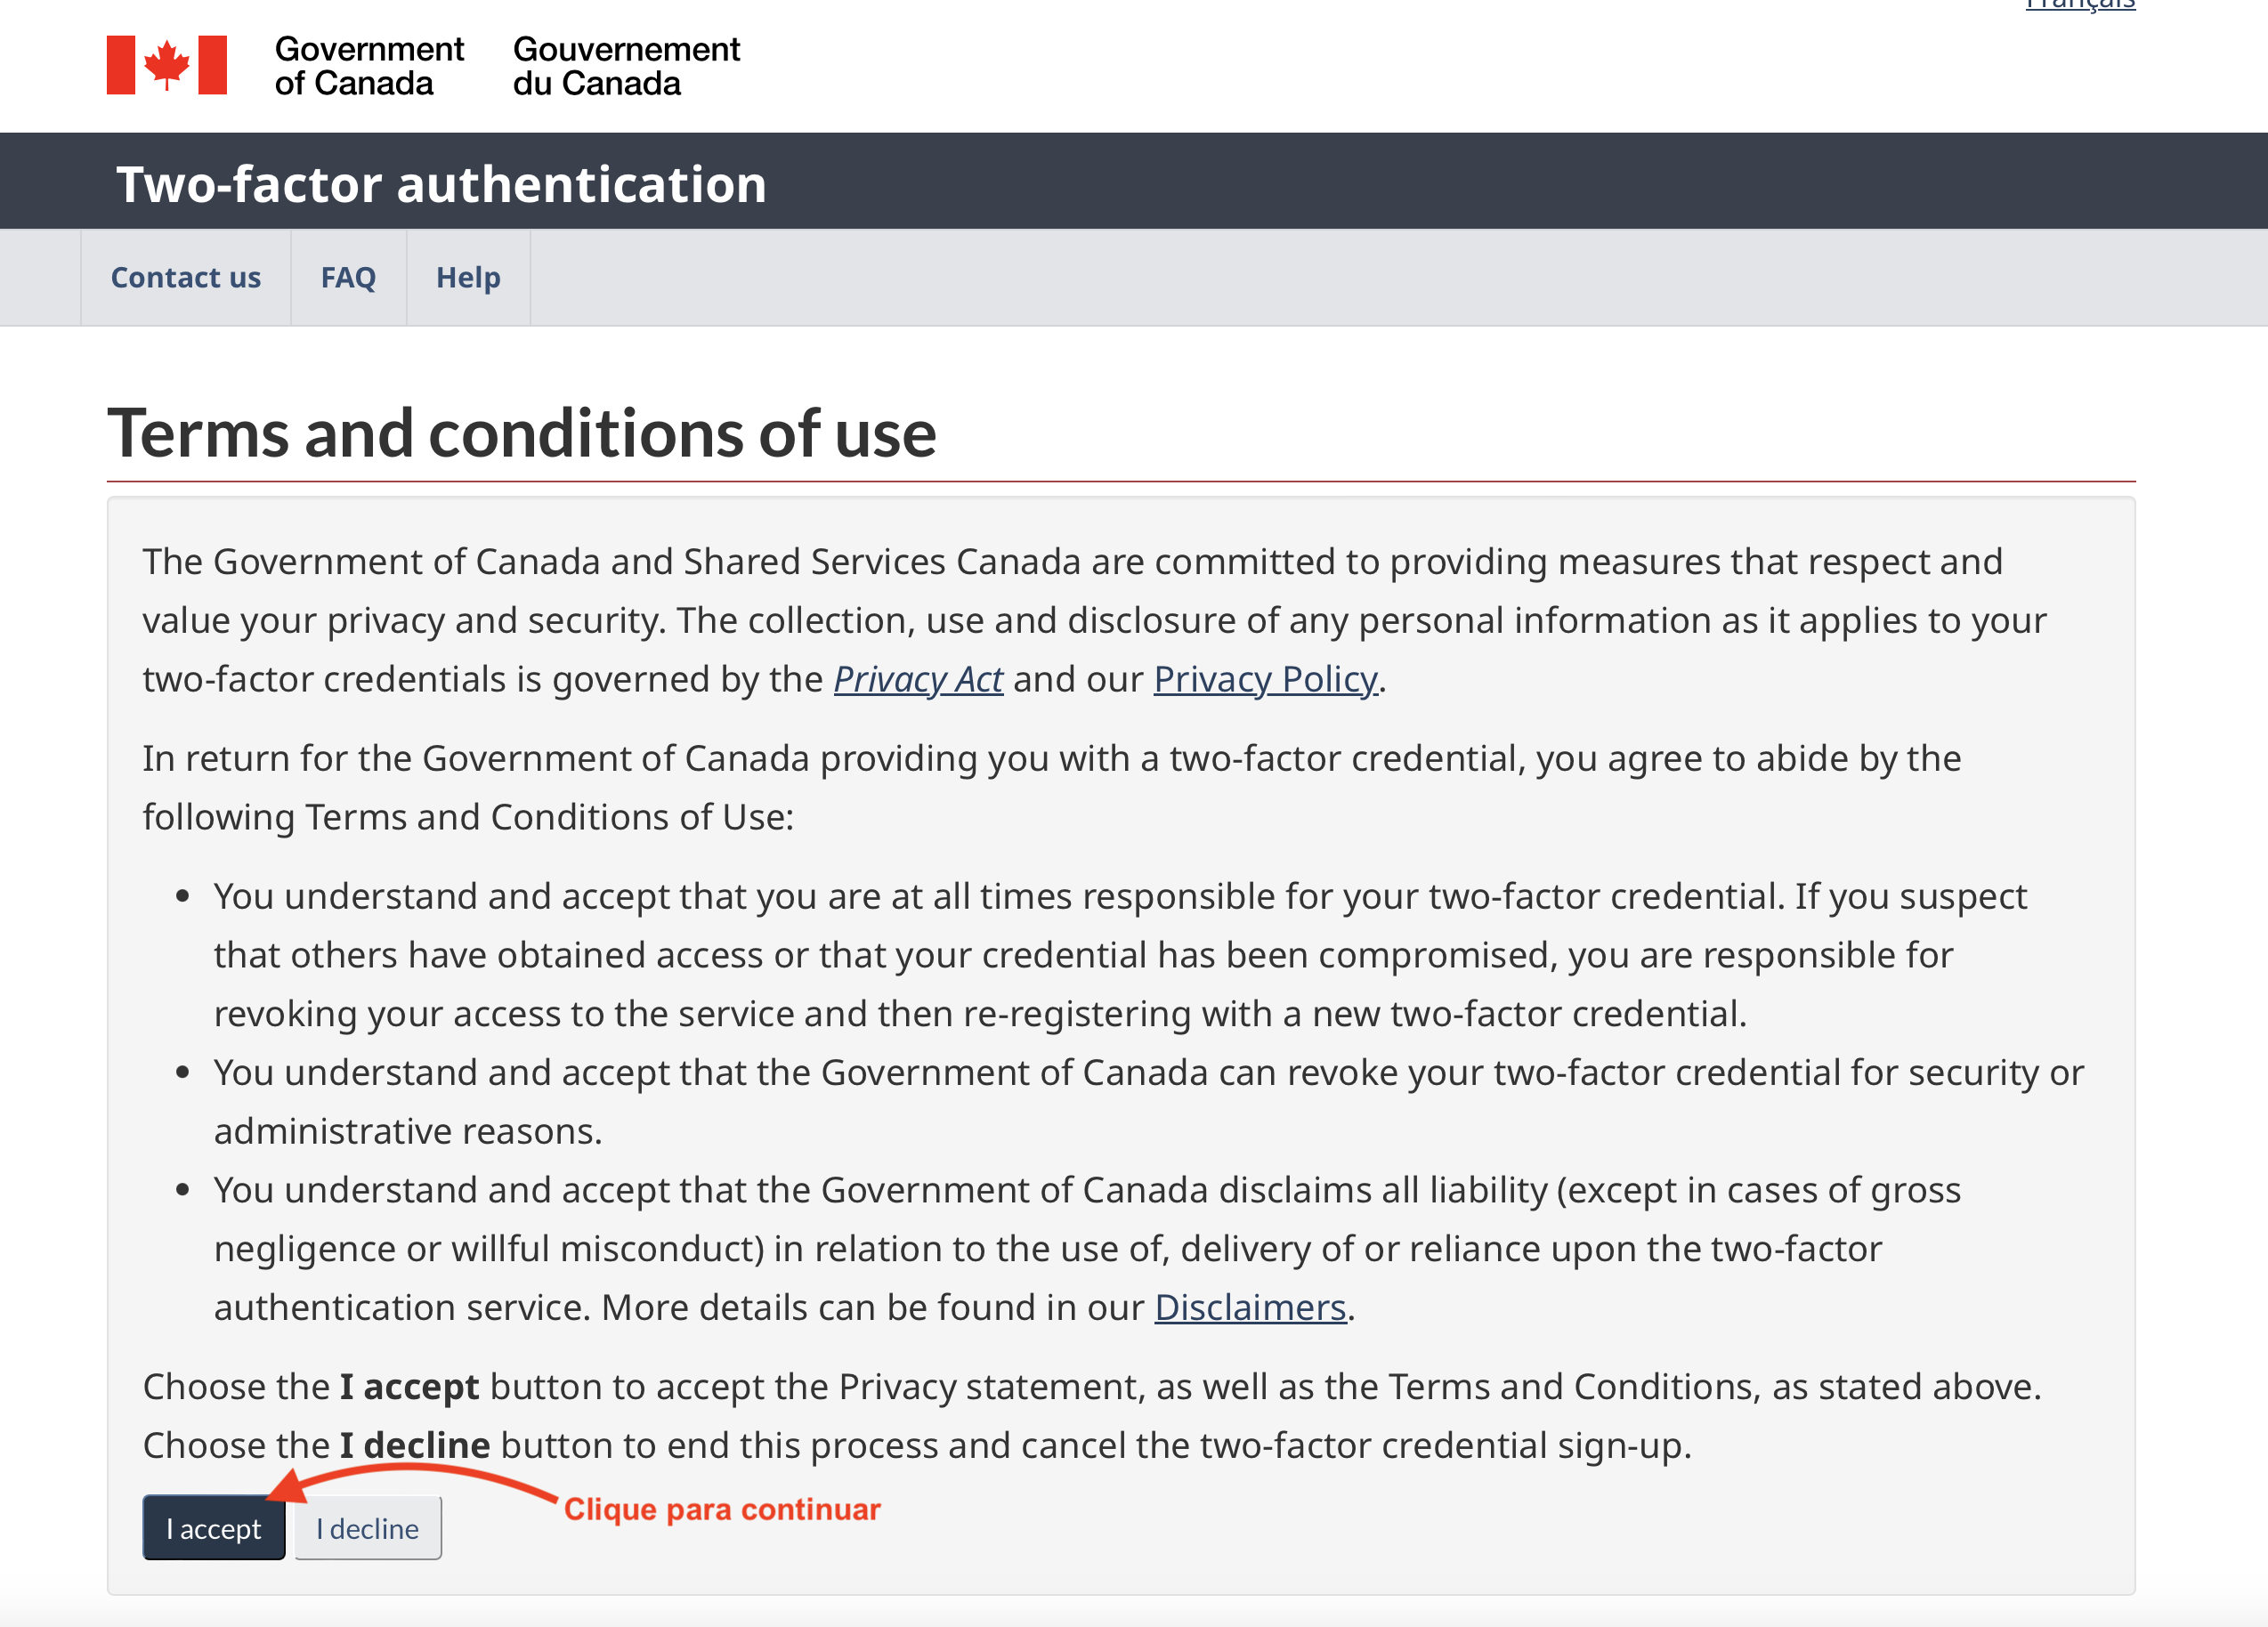 Screen 19 | Step-by-Step Guide: Create an Account on the Canadian Immigration Website
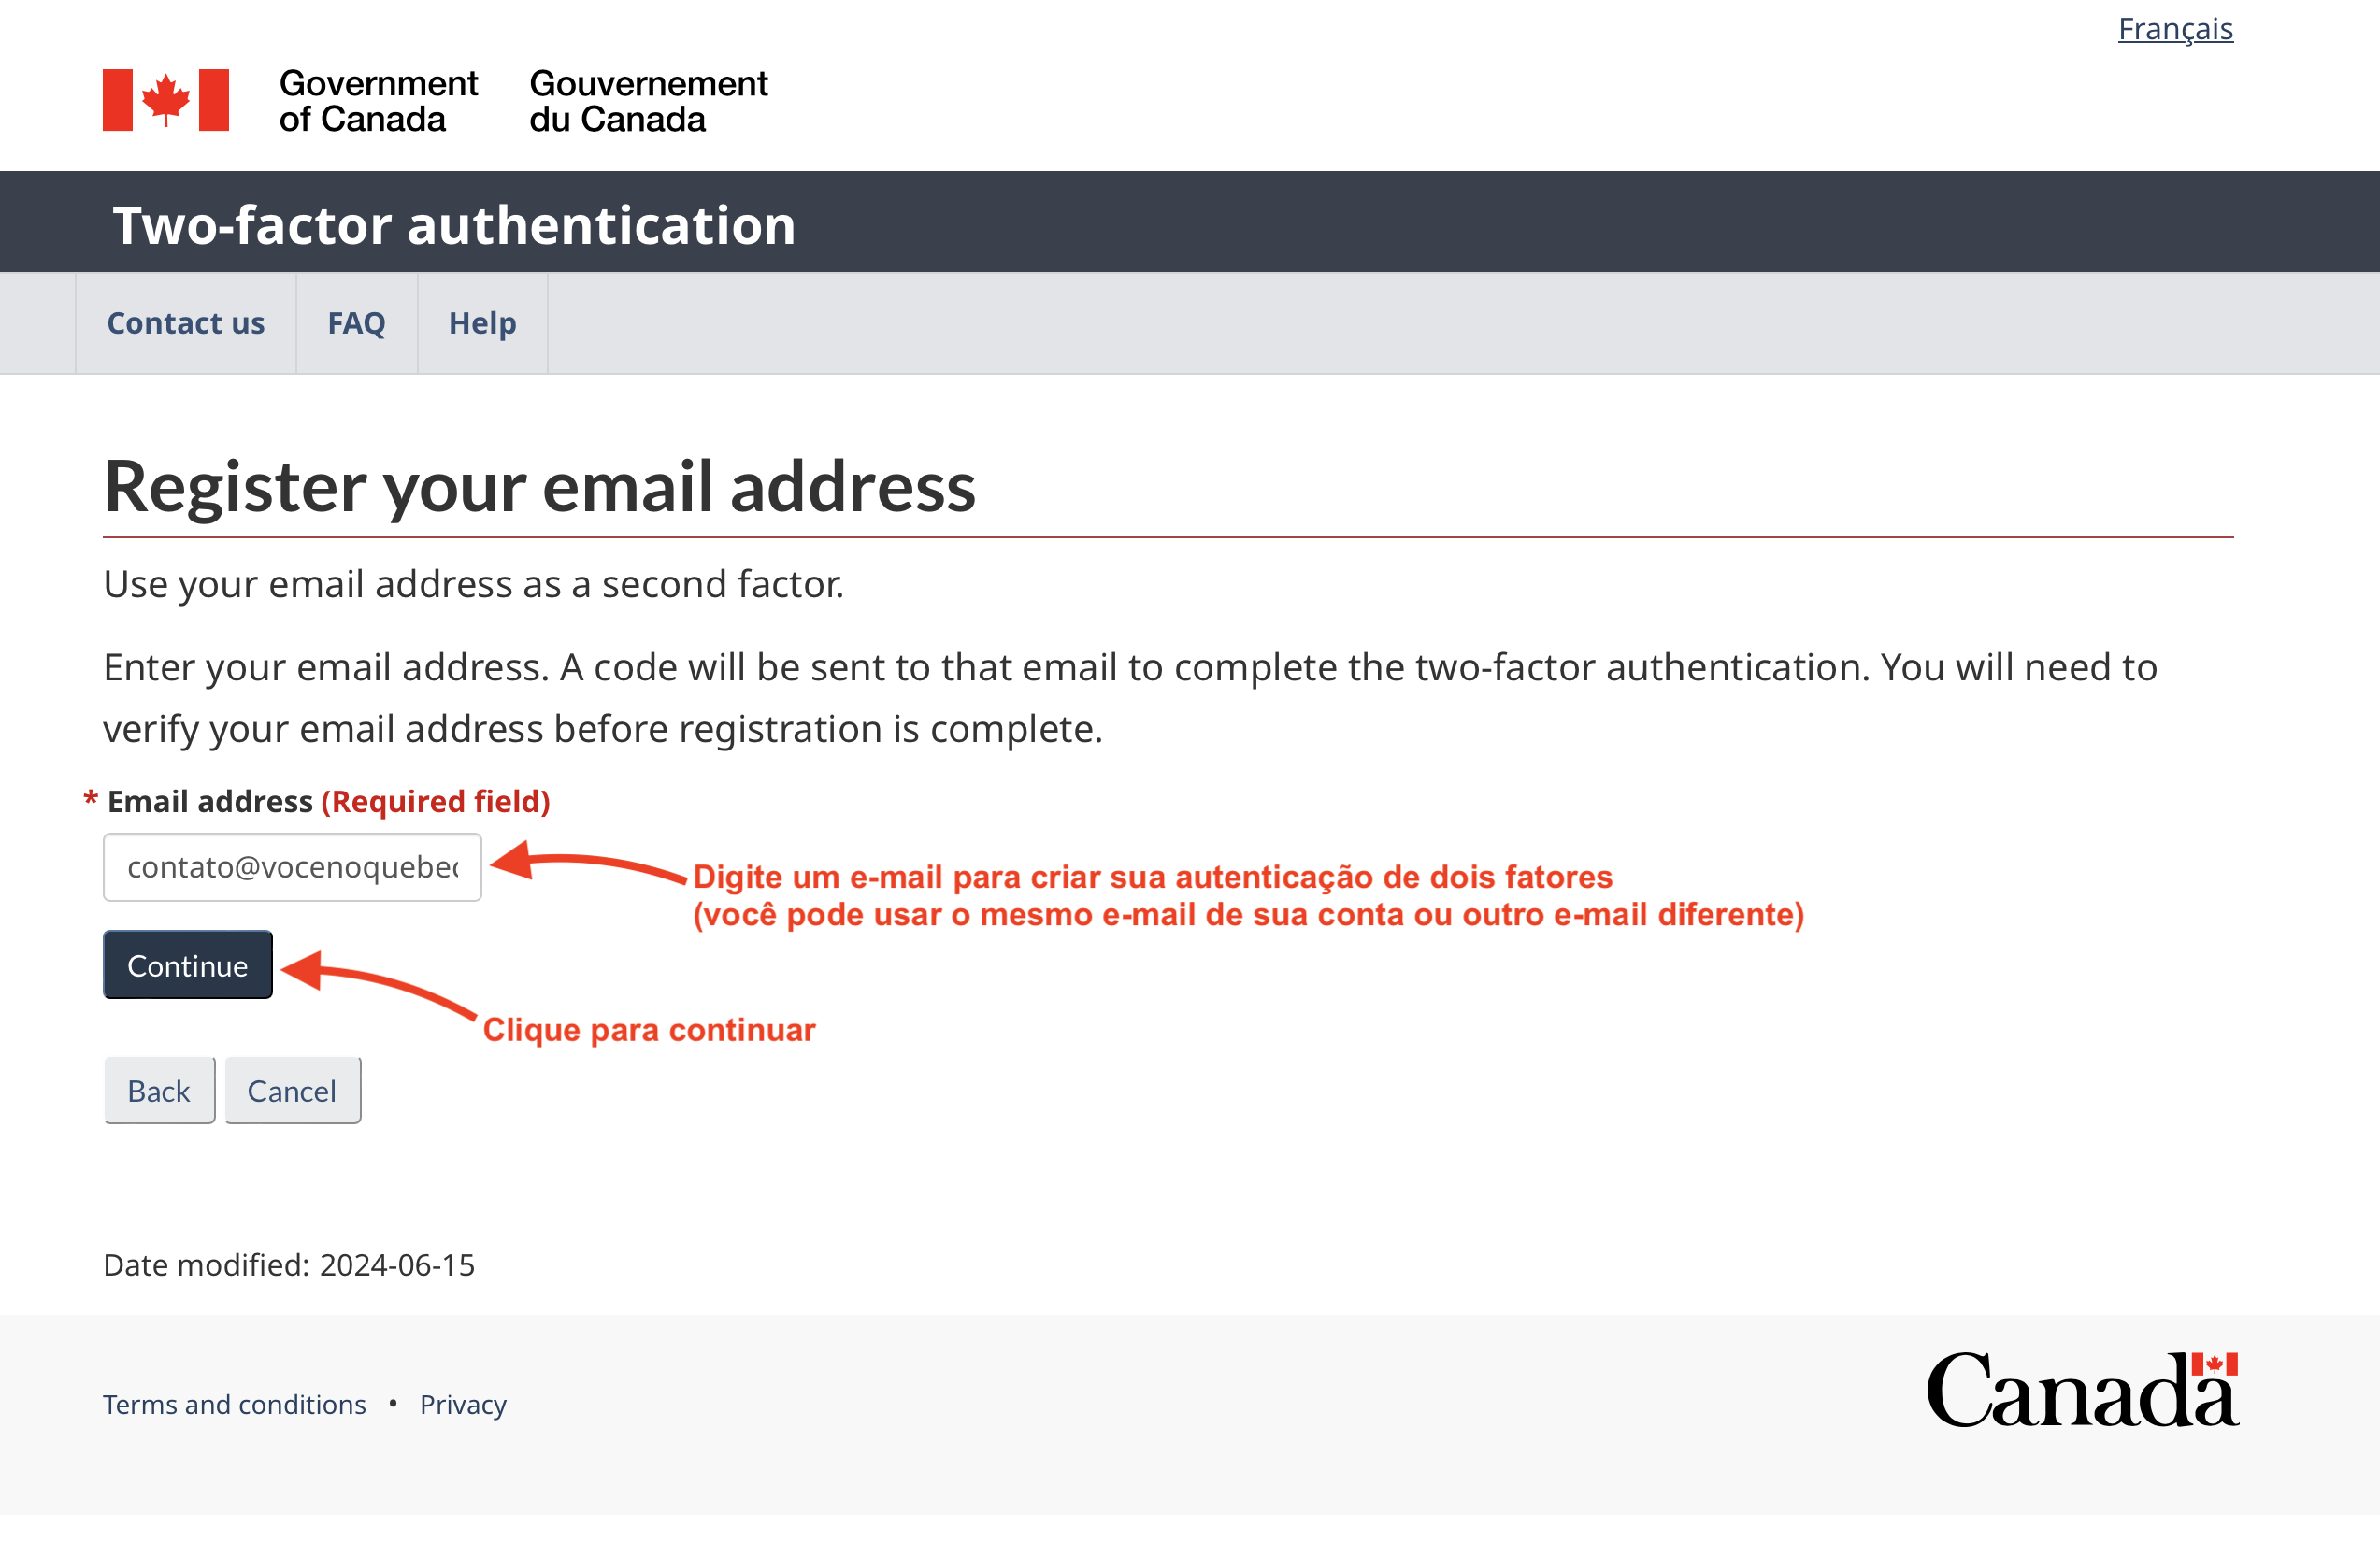
Screen 20 | Step-by-Step Guide: Create an Account on the Canadian Immigration Website
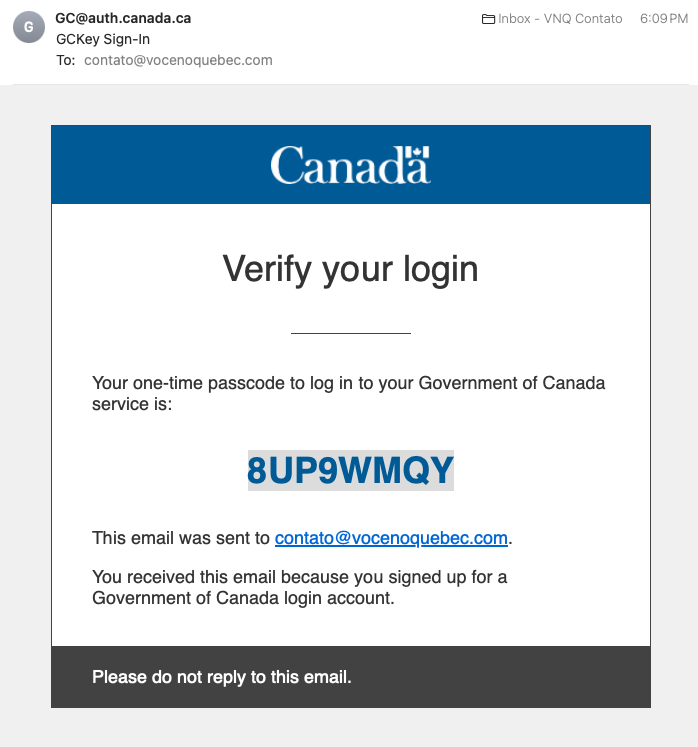
Screen 21 | Step-by-Step Guide: Create an Account on the Canadian Immigration Website
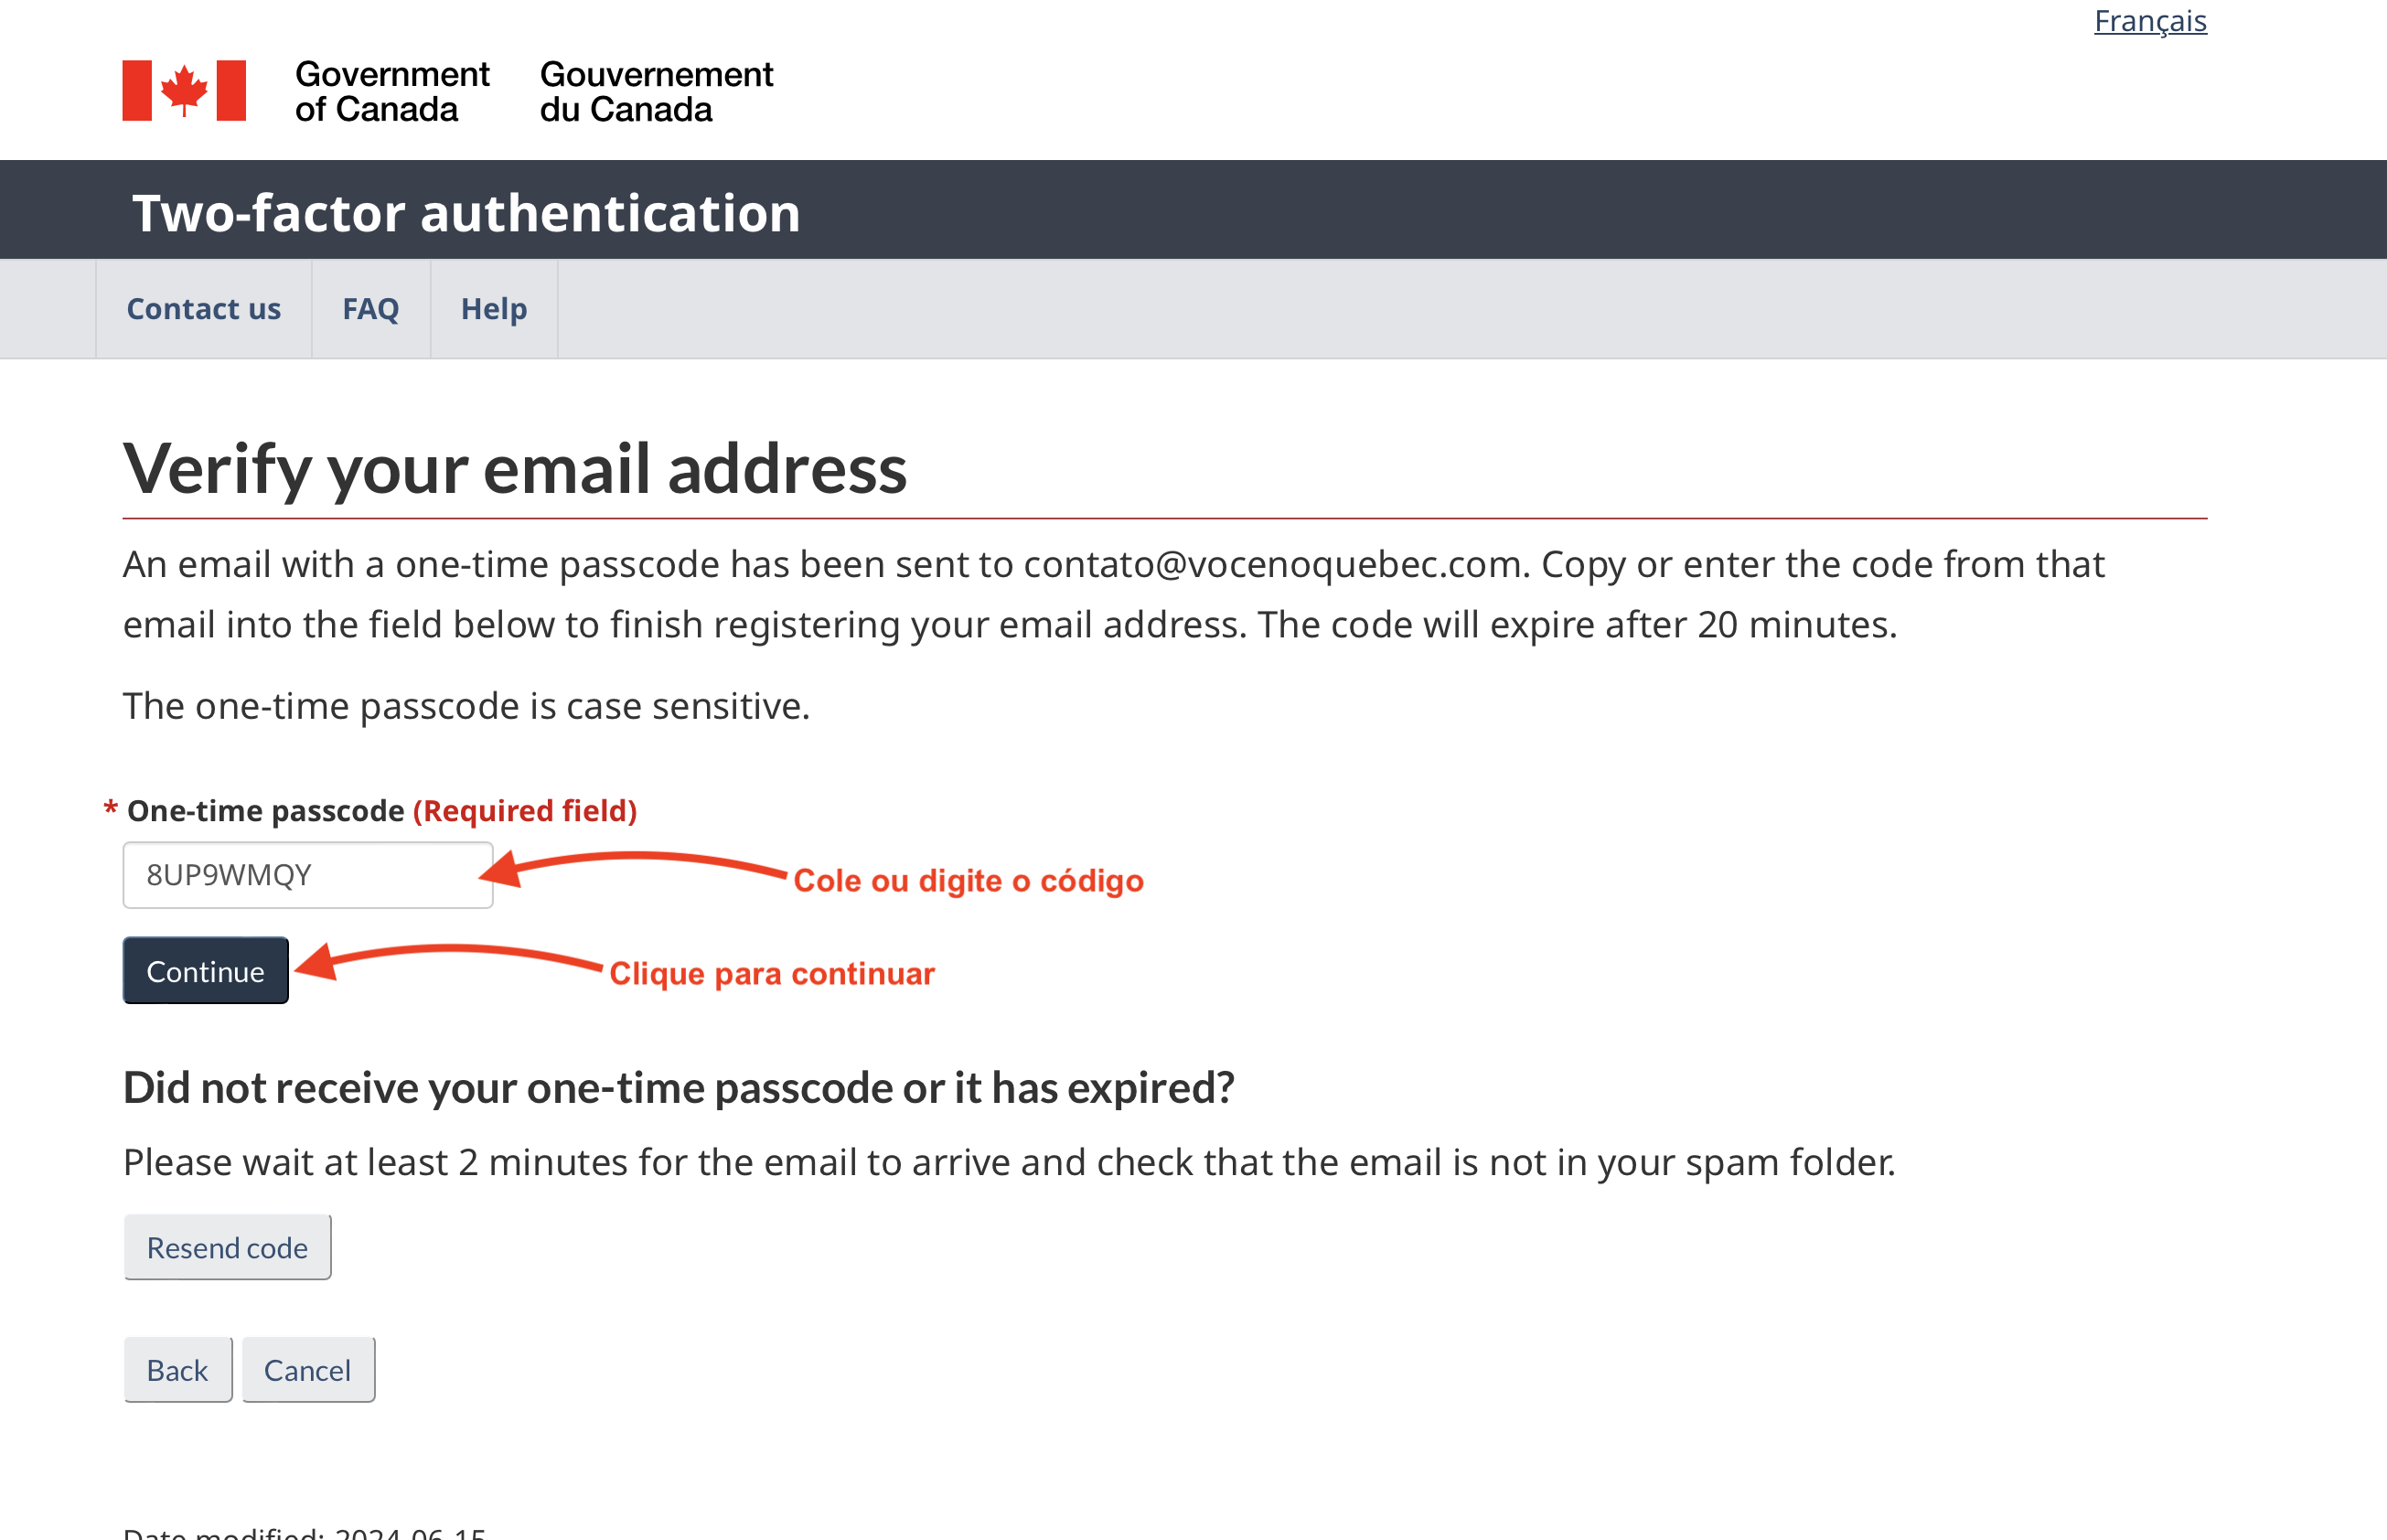
Screen 22 | Step-by-Step Guide: Create an Account on the Canadian Immigration Website
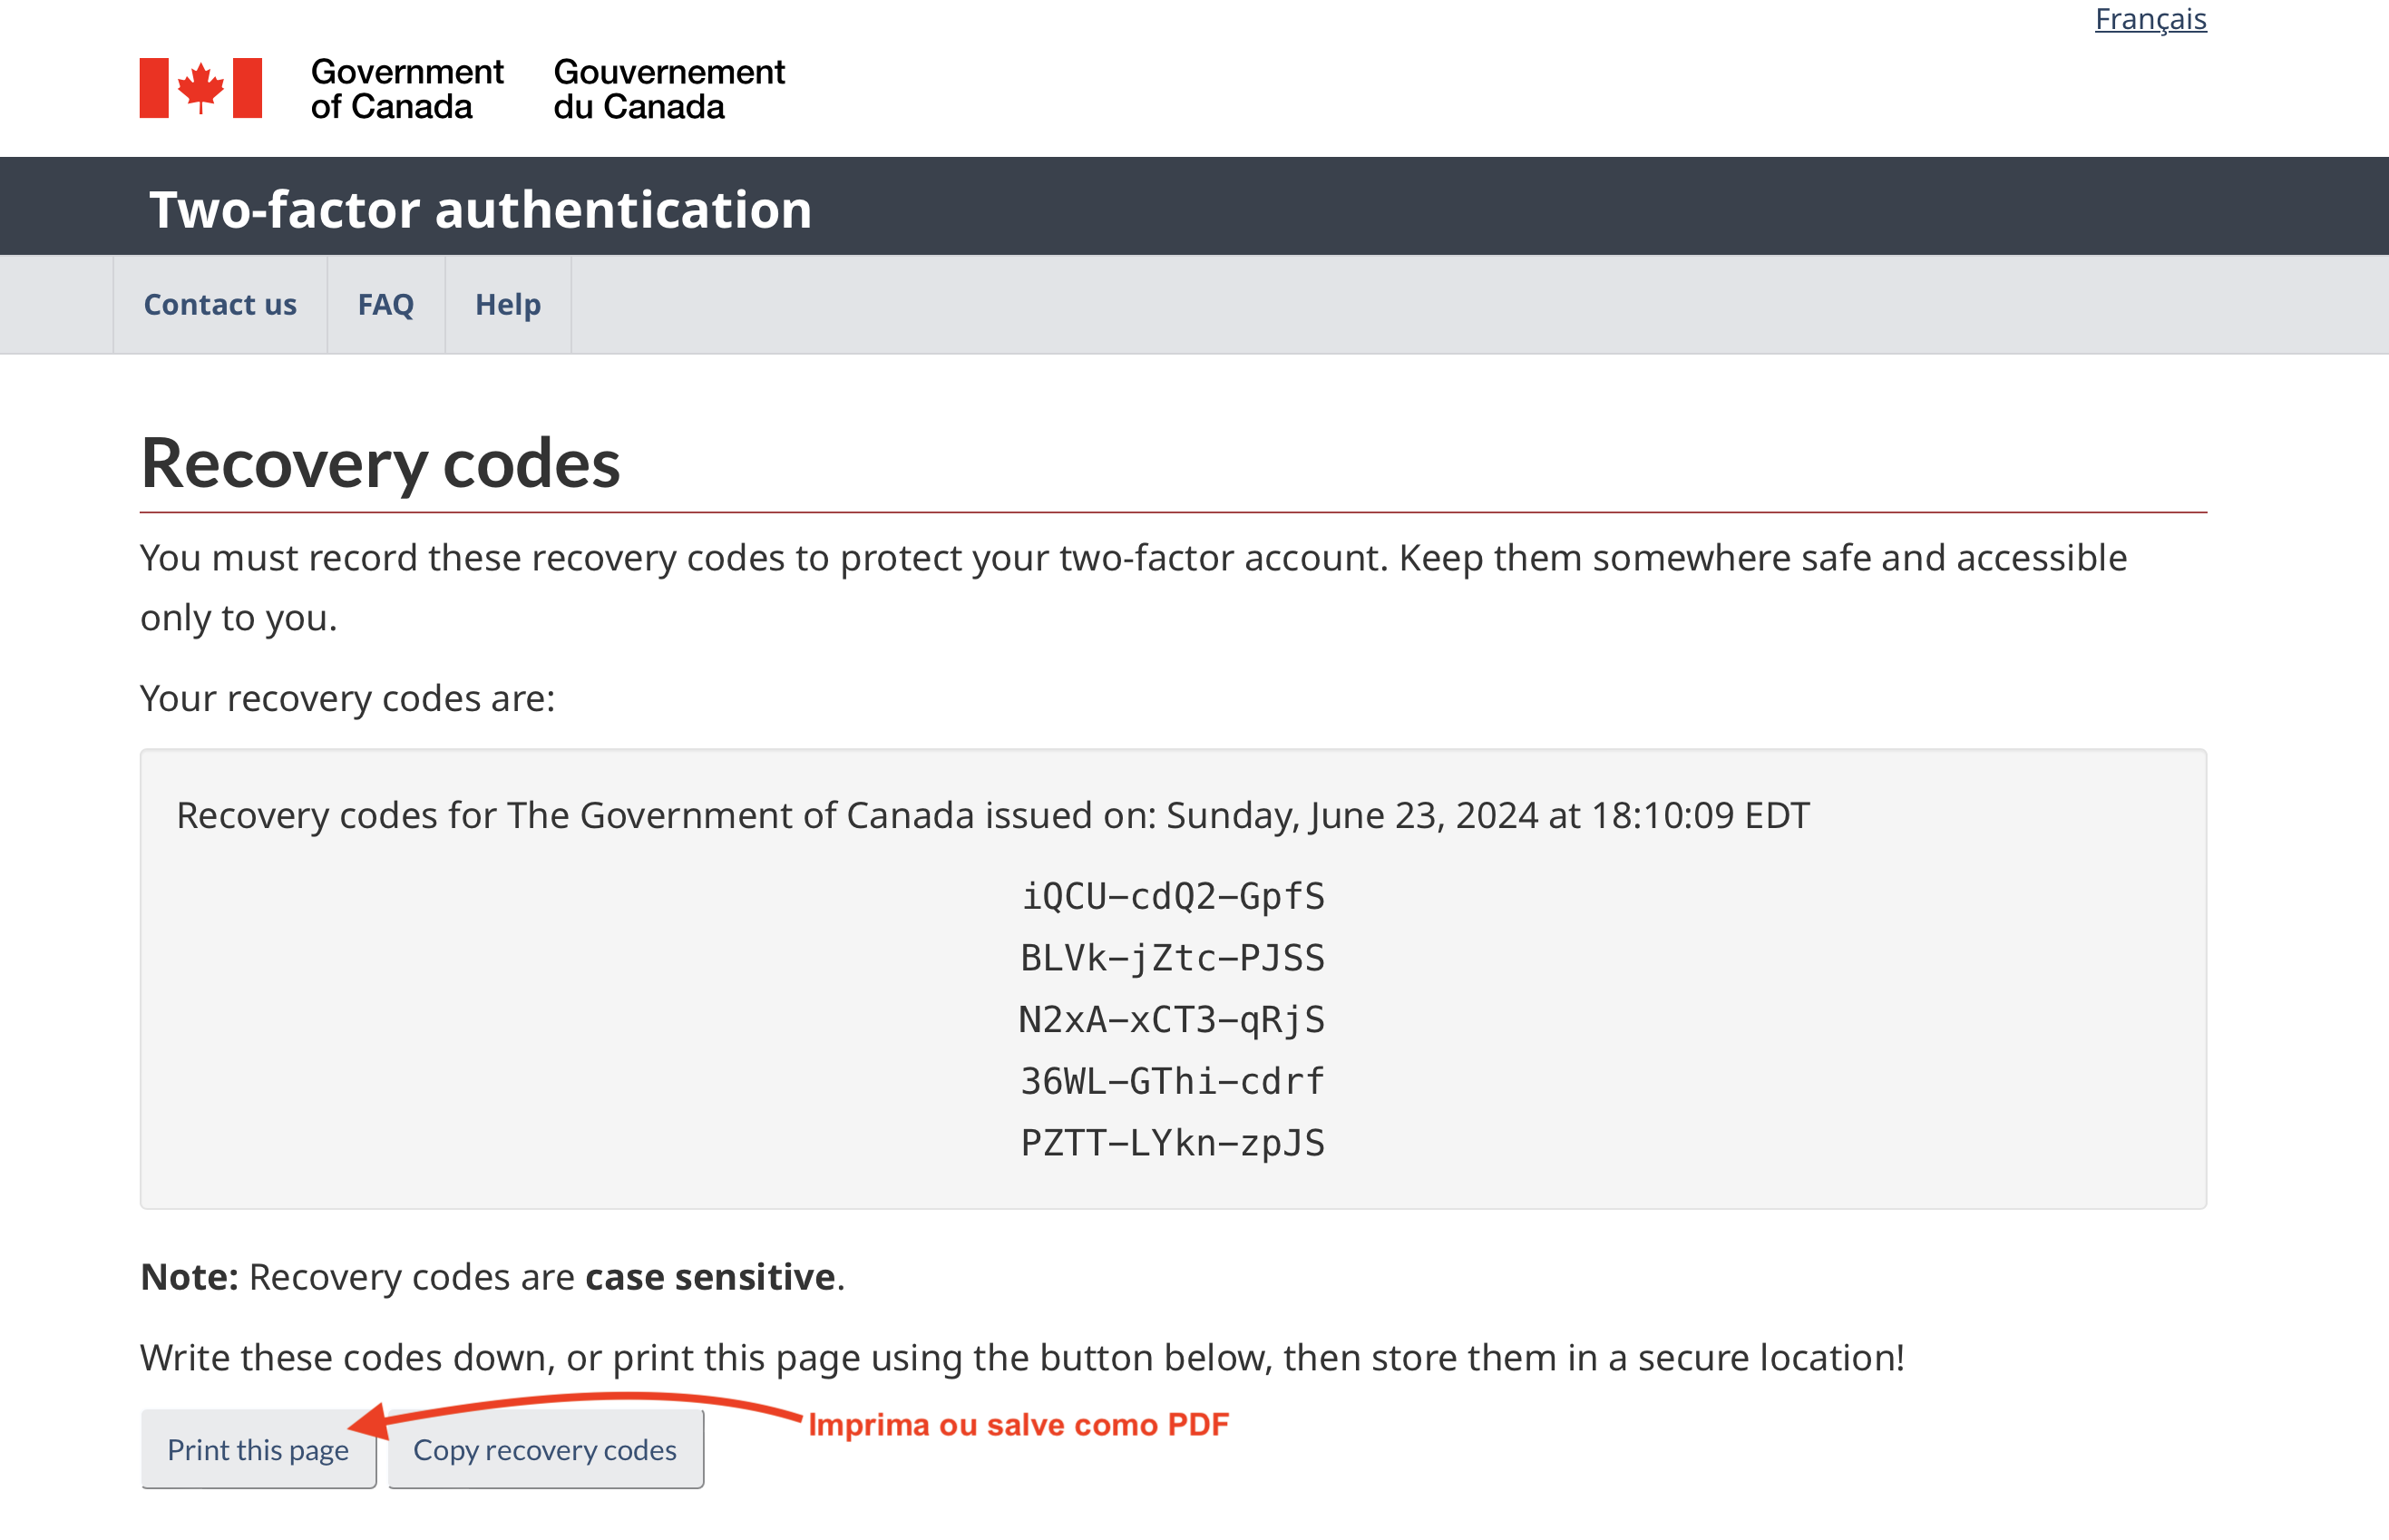
Screen 23 | Step-by-Step Guide: Create an Account on the Canadian Immigration Website
Instruction Screen 23: Save this page in a safe place or print it and then scroll down the page until the end to accept the terms and finish the process.
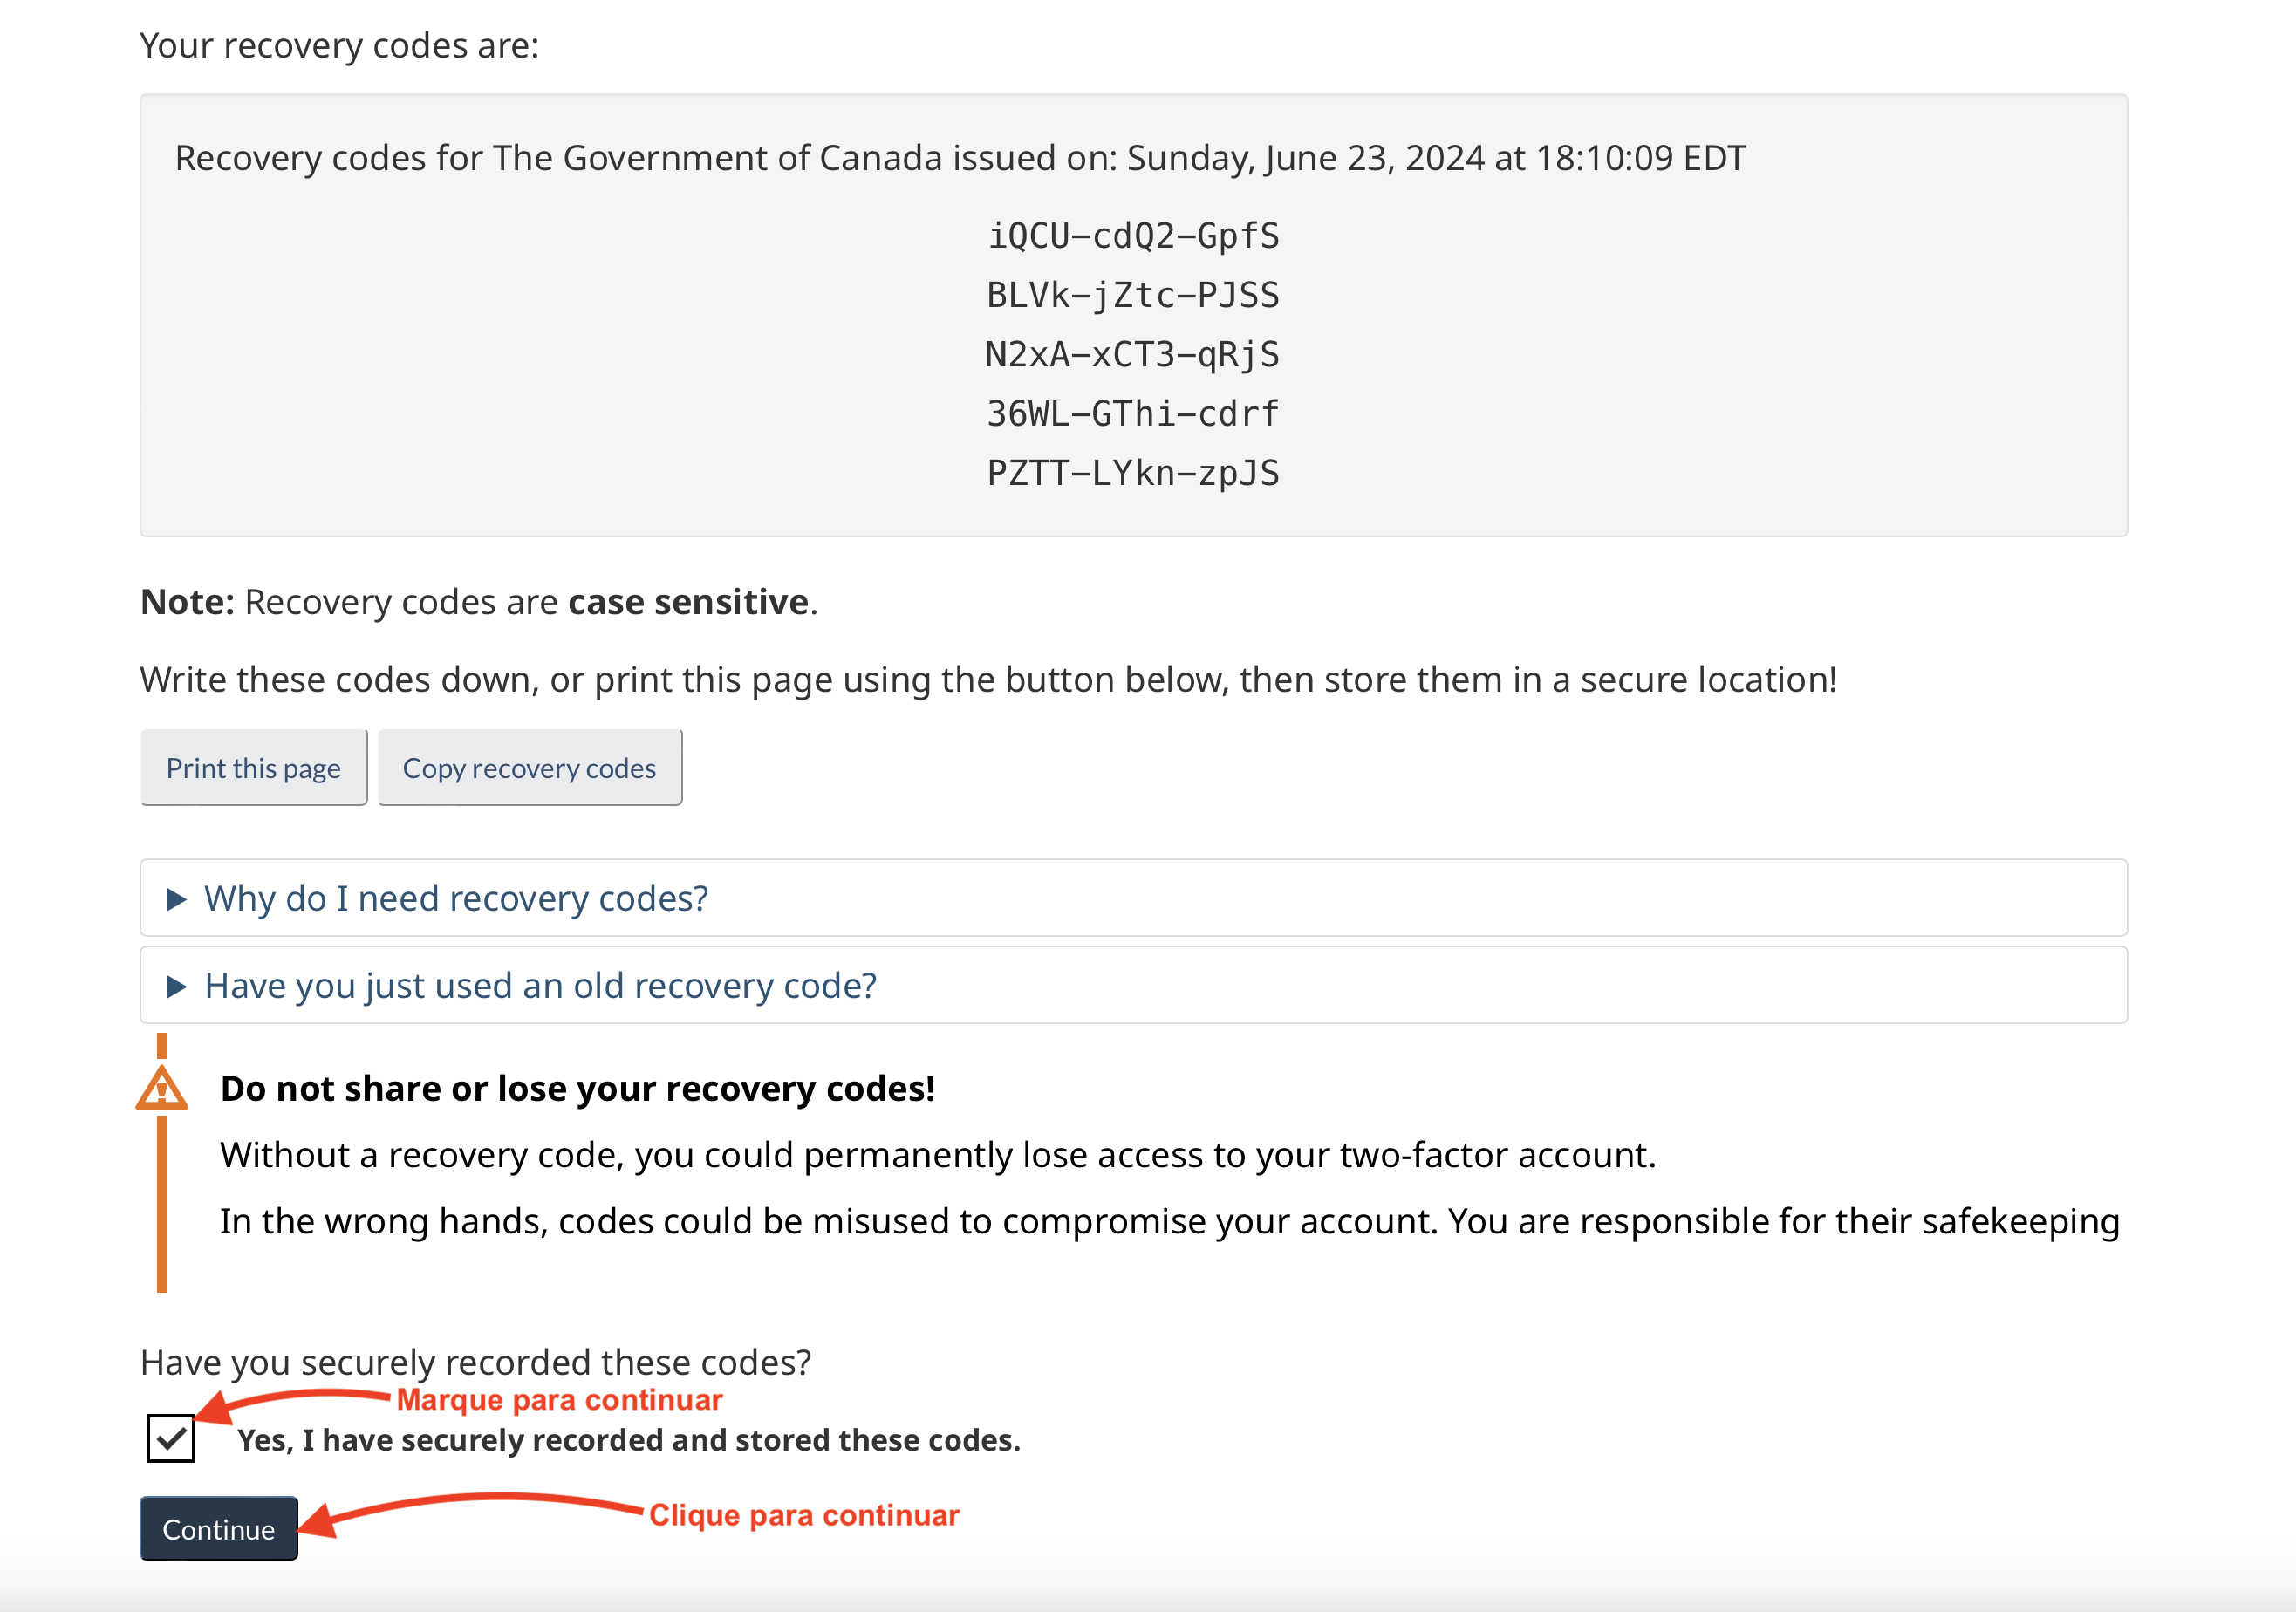
Screen 24 | Step-by-Step Guide: Create an Account on the Canadian Immigration Website
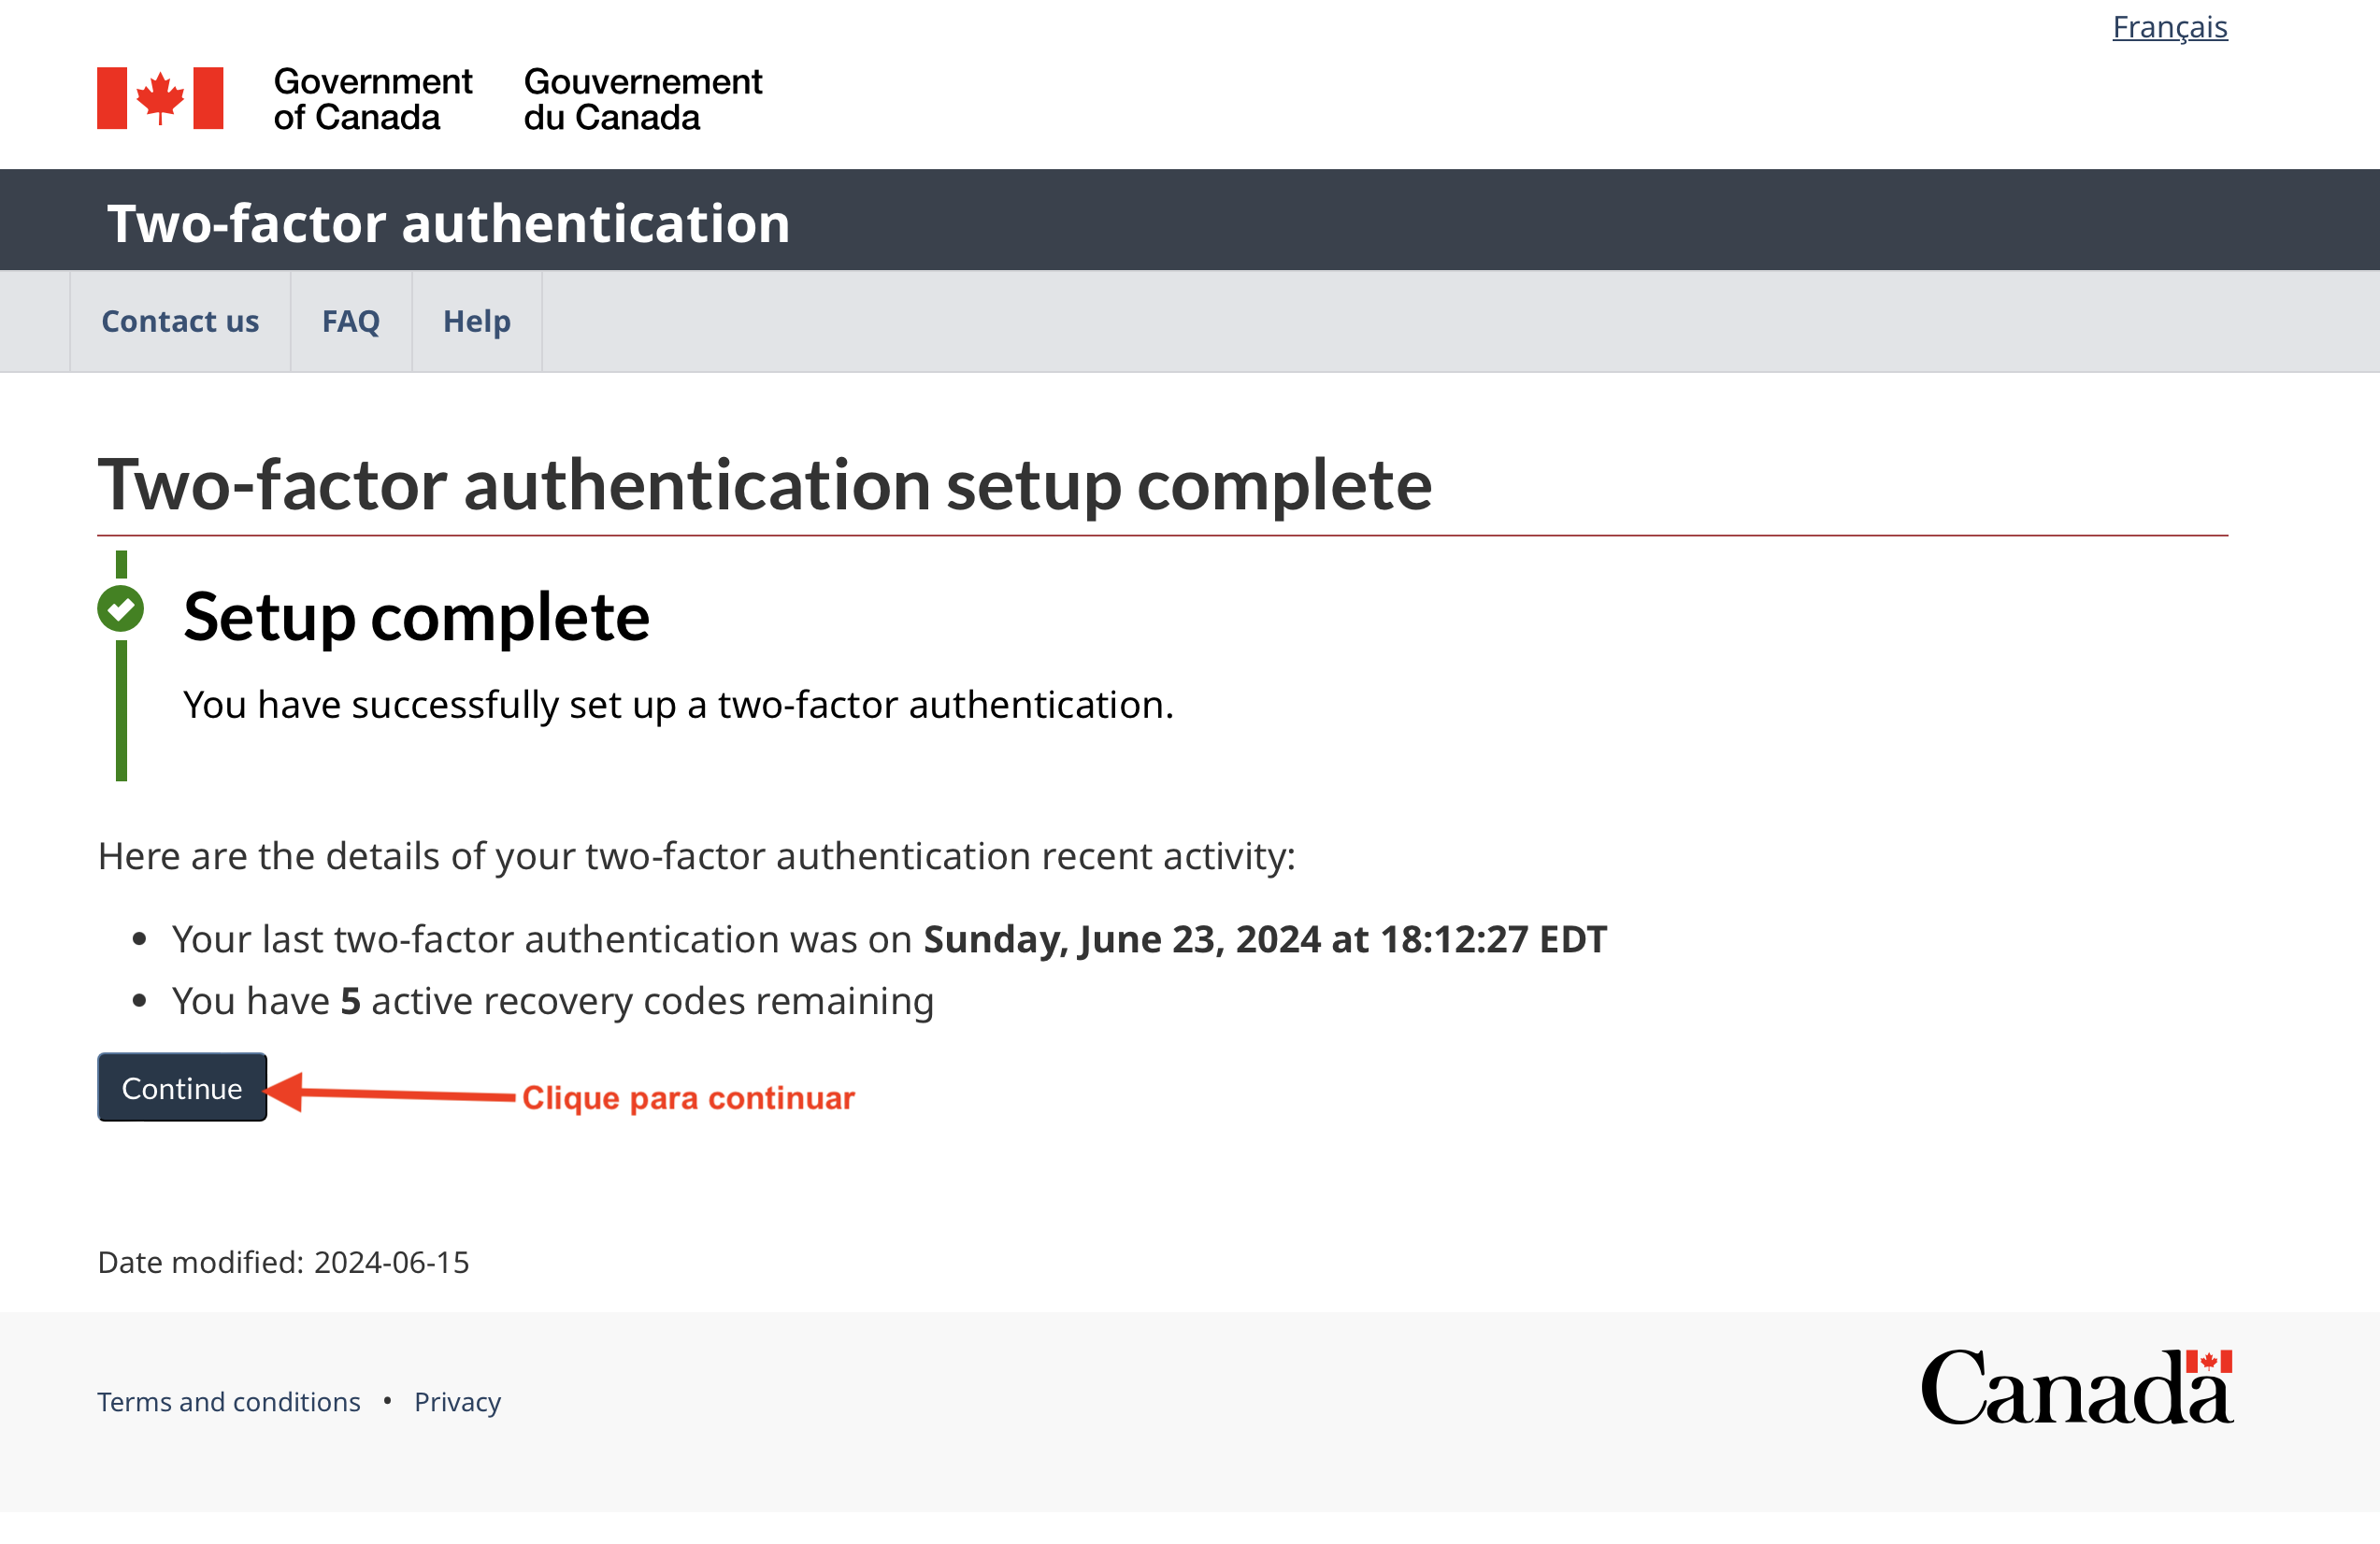
Screen 25 | Step-by-Step Guide: Create an Account on the Canadian Immigration Website
Congratulations! You have finally managed to pass this patience test after completing the 25 steps of this process.
Now, you’re officially ready to take the next step in your Canadian journey. Whether you intend to visit as a tourist, begin your studies, or work temporarily in the country, your IRCC account is the gateway to requesting the appropriate permission.
Remember to keep your information up to date and regularly check your account for any important communications from the Canadian government.
8. Log in to your IRCC account
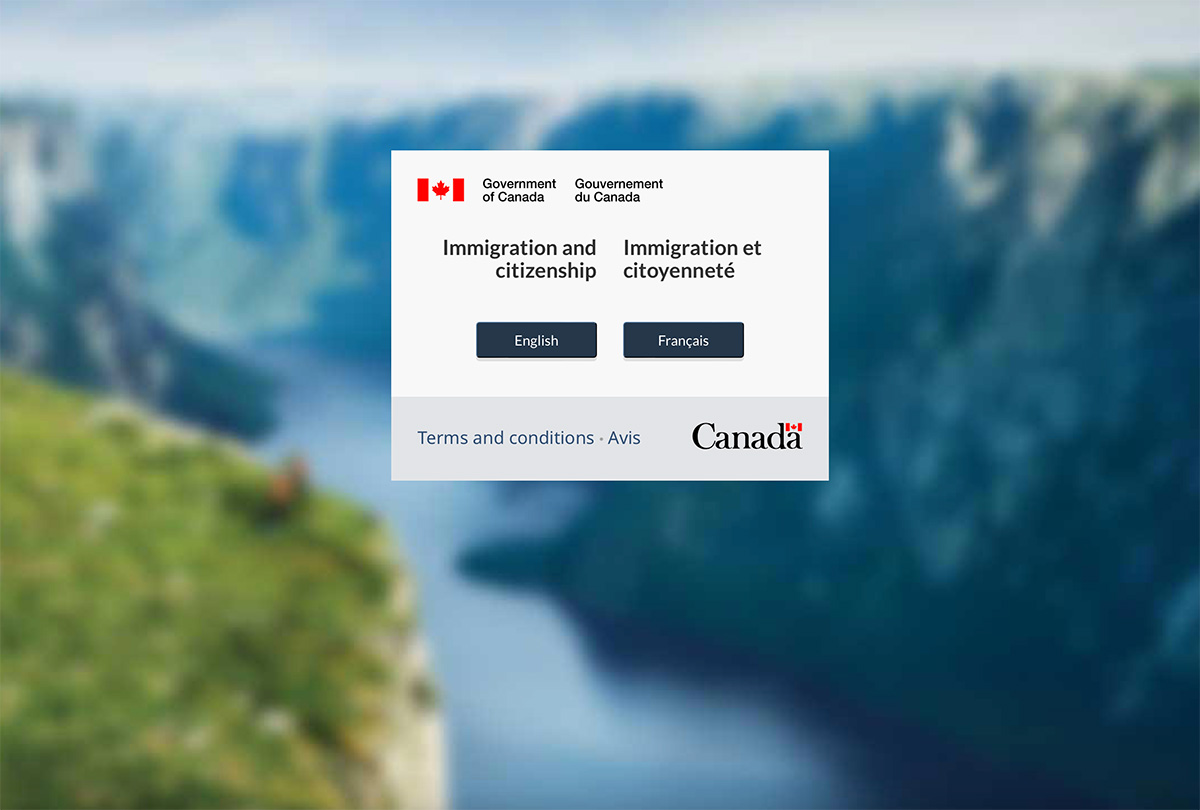
Screen 25 | Step-by-Step Guide: Create an Account on the Canadian Immigration Website
Remember to only use the official Canadian government website to ensure the security of your information. With your IRCC account, you will be able to start the visa application process, track the status of your applications and receive important communications from the Canadian government.
Common questions about your IRCC user account
- Can I use the same account for different types of visas?
- In many cases, a secure IRCC account can be used to track different applications. The account type and applicable portal depend on the process, so always start with the official IRCC accounts and portals page.
Read also: What do I need to study and work in Canada and How to write an invitation letter for someone visiting you in Canada. 2. Can I use my IRCC account to submit visa applications for other people, such as relatives and friends? *Yes, it is possible, but not advisable. When applying for family visas, it is common and more practical to apply for all visas through a single account. It is also a good option to apply for a visa for elderly relatives who are not familiar with technology. Keep in mind that you will be the intermediary for all notifications between the Canadian government and the visa applicant. 3. What documents are needed to create an IRCC account? * To create an IRCC account, you will need basic personal information, such as a username, valid email account and the creation of security questions. Additional documents are not required just for account creation, but they will be required for visa applications.
Also read: “How to create an Invitation Letter for someone who will visit you in Canada”
Well, that’s what I had to say today. I hope this information helped once again. Want more tips like these? Sign up for our newsletter to receive updates about life in Quebec and your first steps as a newcomer.
See you in the next post! 😉

Marco Vasconcelos
Brazilian, webmaster, and e-commerce specialist living in Montreal since 2018. Founder of Você no Quebec, sharing practical guides, housing tips, and real-life experiences in the province to help Brazilian and international newcomers transition smoothly.
Read more about Marco →